Final Fantasy is the first entry of the Final Fantasy series, it was initially Squaresoft's last hope as they were facing bankruptcy. However the game proved to be a huge success (despite having many bugs). It has since been ported to different consoles which this guide will hopefully cover all of them. Bestiary hunters will want to use Ctrl+F and type the 3 digit number with the # in front to find specific enemies you are missing. Those on the Origins version may have some names changed around so keep that in mind, also those on Pixel Remaster have many quality of life changes, but do not have any of the added content present in DoS+, also PR has no unrunable encounters unlike other versions of the game.
Character Choice
At the start of the game you are given a choice between 6 starting classes to which you make a party of 4 to begin your adventure, each with their advantages and disadvantages.
Fighter / Warrior
The overall tank of the group, all forms of physical attacks should impact him the least as he is capable of equipping highly durable armor compared to the other classes as well as having one of the highest HP pools among them all.
NES / PS: The Fighter is extremely expensive to upkeep early game specially due to the Silver / Mythril Sword which is incredibly powerful for the point in the game it is at, also including armor upgrades which are required for the best tankability.
DoS+: Not as expensive to upkeep compared to the NES version, but still the most expensive member of the group to keep in tip top condition.
PR: Due to how the Stone status works you can opt to not buy equipment after Earth Cave as they will still gain EXP and take no damage from any attack thrown their way staying as the mainline tank of the party.
Class Upgrade: Knight
The Fighter / Warriors class change is the Knight which is capable of equipping even better armor and weapons including an exclusive weapon at endgame. They also gain White Magic spells up to level 3 so they can provide some light healing / support in place of a White Wizard.
Black Belt / Monk
The physical bruiser of the group, his effectiveness is based more around his level compared to the rest of the group, however he is the cheapest class as you hardly need to buy any equipment for him.
NES / PS: A good class to have as you will not need to worry about dumping gil on this class after the early portion of the game. Due to the damage formula for the Black Belt they will not be good barehanded until around level 8 where the Nunchaku (which stop being sold around this point) are rendered obsolete, also their Absorb is equal to their level if they have no armor equipped. On NES there is a bug where the Absorb is not updated until you check the armor screen.
DoS+: The Monk has been buffed significantly compared to the NES version where a Monk can go barehanded and without equipment from the start (the starting equipment hinders them) thus they have absolutely no cost dependency as equipment they would use (Ribbon & Protect Ring (until STA is 64 then just the Ribbon by itself)) can be found for free. The Monk is mainly dependent on Stamina for defense (and partly offense) when certain parts are unequipped as follows
Hands ATK = [STR / 2] + [(STA + 1) * 3 / 4]
Unarmed HLM = [STA / 8]
Unarmed ARM = [[STA / 4] * 3 / 2]
Unarmed GLV = [STA / 8]
Class Change: Master
The Black Belt / Monks class change is Master which makes them even stronger with no weapon equipped.
NES / PS: The Master is oddly a downgrade as they get less Magic Defense per level up compared to Monk (from 4 to 1) though a Ribbon should cover that weak point. On NES there is a bug like Black Belts Absorb, unlike Black Belt however the bug is different in that the game checks to see if you have a weapon equipped and will make Absorb equal to your level if unarmed, you can take advantage of the bug by having a Ribbon on for it's effects without body armor to stay with higher defense than you should without looking at the armor screen on level ups.
DoS+: The Master stays true as an upgrade unlike the NES version since Magic Defense was fixed for this class. The formula gets altered for the Stamina dependency which are as follows
Hands ATK = [STR / 2] + STA
Unarmed HLM = [STA / 8]
Unarmed ARM = [STA / 2]
Unarmed GLV = [STA / 8]
Thief
The Thief has high evasion and accuracy, though the weapon selection is very limited (for practically two-thirds of the game). They have the highest success rate for running from battles among the group.
NES / PS: The Thief is bar none the worse class due to having no access to magic spells or very good equipment. While their class upgrade is miles better the point you get it at is after the hardships of the game.
DoS+: Much more viable thanks to the upgrade to their stats. While they still have the same problem of limited equipment they start off having 2 hits compared to other classes and will often get more hits earlier than others to compensate for their bad equipment draw.
Class Upgrade: Ninja
The class change for Thief is Ninja which is basically a Knight-light capable of equipping nearly the same equipment barring a select few. Contrary to the Knight, Ninja has access up to level 4 Black Magic which due to their high speed often make them act first to get a buff off before an ally.
NES / PS: As mentioned the hard part of the game is basically done with by the time you get this class, though it is a major upgrade compared to the Thief as you should have a good pair of better equipment waiting by the time you class change.
DoS+: Due to added content this class is invaluable to a party specially since having a Haste user get the buff off before an attacking member makes bosses a breeze to fight, specially the bonus dungeon bosses.
Red Mage
The Red Mage is the jack of all trades class of the group, capable of using most White and Black Magic as well as getting a decent array of equipment.
NES / PS: Due to INT being bugged the Red Mage is just as good of a caster as the White and Black Mage. Due to having better equipment choices it is generally a better choice because of the spell charge system since physical attacks are more dominant throughout the game and magic having a limited range of damage / healing. At certain levels they are able to use higher level spells. In the Origins version they get less spell charges compared to the Black & White Mages.
Lv 2 Spells: 2
Lv 3 Spells: 6
Lv 4 Spells: 10
Lv 5 Spells: 15
Lv 6 Spells: 20
Lv 7 Spells: 26
DoS+: With INT fixed the Red Mage has been nerfed to now actually be a jack of all trades since their magic is not nearly as effective as a White or Black Mage. At certain levels they are able to use higher level spells.
Lv 2 Spells: 4
Lv 3 Spells: 9
Lv 4 Spells: 15
Lv 5 Spells: 22
Lv 6 Spells: 29
Lv 7 Spells: 37
Class Change: Red Wizard
The class change for Red Mage is Red Wizard which is a minor upgrade of the Red Mage (nearly non existent on DoS+) with a few weapon upgrades from the Red Mage and a few White & Black magic spells that couldn't be previously learned.
White Mage
The White Mage is the overall healer of the group, mainly specializing in healing and buffing spells from the White Magic category and a few undead harming spells. At certain levels they are able to use higher level spells.
NES & Origins / DoS+
Lv 2 Spells: 2 / 3
Lv 3 Spells: 5 / 8
Lv 4 Spells: 8 / 13
Lv 5 Spells: 12 / 19
Lv 6 Spells: 16 / 26
Lv 7 Spells: 20 / 33
Lv 8 Spells: 25 / 39
Spell Charge System: A vital member regardless what the other 3 members are. Though the spell charge system is to their detriment as they have a limited number of spells they can use, a large supply of HEAL Potions would be needed to otherwise cover for the lack of one.
MP System: With the addition of Ethers which weren't present in the original they are more manageable to use MP for healing outside of battles.
Class Change: White Wizard
The class change for White Mage is White Wizard which allows for higher level White Magic to be usable.
Black Mage
The Black Mage is the overall magic nuker of the group, mainly specializing in debilitating and damaging spells from the Black Magic category, will tend to have the lowest HP among other classes. At certain levels they are able to use higher level spells.
NES & Origins / DoS+
Lv 2 Spells: 2 / 3
Lv 3 Spells: 5 / 8
Lv 4 Spells: 8 / 13
Lv 5 Spells: 12 / 19
Lv 6 Spells: 16 / 26
Lv 7 Spells: 20 / 33
Lv 8 Spells: 25 / 39
NES: The main downside of this class is the damage dependent mostly on magic which is rather scarce due to the spell charge cap being 9. Due to the INT stat being bugged a Red Mage is a better pick compared to this class.
PS: Having more spell charges available than the NES version and the Red Mage makes this more viable to use their magic for nuking even after getting items that use spells when used in battle.
DoS / Anniversary: With the addition of Ethers which weren't present in the original they are more manageable to use MP for crowd control during battle as they can use all of their MP provided you have enough Ethers to upkeep them until you can substitute their MP use for items with the same effect as magic.
PR: The way Ethers work make this class more valuable than it ever could with the old spell charge system allowing more liberal use of your charges to nuke your foes.
Class Change: Black Wizard
The class change for Black Mage is Black Wizard which allows for higher level Black Magic to be usable.
Stats
Stats determine how well your characters will preform this is a basic overview in case you don't know what each stat does.
| Stat | Effect |
|---|---|
| STR | Effects your DAMAGE / ATK value. |
| AGL | Effects your Evade. |
| INT | Effects your magic damage / healing. Bugged on NES & Origins. |
| VIT / STA | Effects how often you will get good HP gains. Also Monk / Master stats on DoS+. |
| LUCK | Effects how often you will run. Doesn't fully work on NES version. |
| DAMAGE / ATK | How much damage your weapon will deal. |
| HIT% / ACC | Effects how many hits you do. Every 32 points = 1 more hit (2 if unarmed). |
| ABSORB / DEF | Defense against physical attacks. |
| EVADE% / EVA | Effects how well you avoid physical attacks. |
HIT% / ACC & EVADE% / EVA is not percentage based, it is out of 255 not 100.
Status Ailments
| Ailment | Player effect | Enemy effect | Notes |
|---|---|---|---|
| Confusion | No effect. | Uses physical attacks on its teammates. | No enemy uses the Confuse spell or attacks able to deal confusion. |
| Darkness | Lower Hit rate. | Lowers Hit rate. | Does nothing in all versions. Is cured after battle. |
| Mute | Can't use spells and items | Can't use special abilities | Origins onward can use Potions while under this condition. Is cured after battle. |
| Poison | Lose a small amount of HP in battle (2 on NES), lose 1 HP per step outside of battle. Can be killed in battle, but not outside. | No effect. | Can't inflict on enemies. |
| Sleep | Unable to preform actions. | Unable to preform actions. | Eventually wears off, is cured after battle if still under ailment. |
| Stone | Character is turned grey in their weak pose, counts as a dead member. | Instant death. | Can be cured with SOFT Potion / Gold Needle. |
| Stun / Paralysis | Unable to preform actions. | Unable to preform actions. | Is cured after battle if still under ailment. |
On the NES version characters hit by Poison or Stone are sent to the back row of the party after battle if they were still under the ailment. Stone has to be cured outside of battle in that version since a SOFT Potion couldn't be used during battle by the affected character. On the PR version characters who are stoned can still be targeted for attacks where they would normally be ignored in other versions, this allows for your squishier members to be safer from harm as they will be targeted less. Additionally members who are stoned in PR will still gain EXP so they won't fall behind the rest of the party.
The Adventure begins
After picking your party and naming them your adventure in Final Fantasy is ready to begin. Note for shops if I write the base class only their class change is also able to equip / use it. Word of warning those playing the NES version there is no auto-targeting like later entries of the series so plan your attacks carefully otherwise you will have a wasted attack, also any drop listed are not meant for this version as no enemies drop an item, same for Origins. Origins players have the option of turning auto-target on or off as well as choosing between Normal Mode which plays like the NES version with the spell charge system or Easy Mode which gives more spell charges than Normal. The maps presented in this guide use the tile set from Origins in mind so NES players will not travel as far in dungeons, also any treasure mentioned for NES on my maps are also meant for Origins, PS+ is meant for Dawn of Souls onward.
NES / PS: Do not get into a random battle as your characters do not have any equipment on and thus will deal low damage and take a lot from the IMP/Goblin's around Coneria/Cornelia. Head to town and buy the best weapons your characters can equip. For armor look at what your two best members can equip as they will take more physical attacks compared to the bottom two. If you have any spare gil buy some spells for your mages then head out and grind to level 3, make sure to switch your party by pressing Select so your main tanks are at the top.
DoS+: Unlike the NES & Origins versions your characters have some equipment on so you can immediately grind to level 3 (which will take no time for you). If you are using a Monk remove his equipment as he will be better unequipped. Once you enter Cornelia you will not be allowed to leave unless you talk to a guard who will lead you to the King.
Coneria / Cornelia Area
Enemies
South of Coneria / Cornelia
| Name | Bestiary | HP | Attack | Defense | EXP | Gil | Weak | Drop | Notes |
|---|---|---|---|---|---|---|---|---|---|
| IMP / Goblin | #001 | 8 | 4-8 / 4 | 4 | 1.5 / 6 | 6 | |||
IMP / Goblin - Is nothing to be afraid of as you should be able to one shot them with any class (barring Black Mage) with weapons bought from Coneria / Cornelia.
North of Coneria / Cornelia
| Name | Bestiary | HP | Attack | Defense | EXP | Gil | Weak | Drop | Notes |
|---|---|---|---|---|---|---|---|---|---|
| IMP / Goblin | #001 | 8 | 4-8 / 4 | 4 | 1.5 / 6 | 6 | |||
| GrIMP / Goblin Guard | #002 | 16 | 8-16 / 8 | 6 | 13 / 18 | 18 | Potion | ||
| WOLF / Wolf | #003 | 20 | 8-16 / 8 | 0 | 24 | 6 | |||
| MADPONY / Crazy Horse | #004 | 64 | 10-20 / 10 | 2 | 63 | 15 | Potion | ||
GrIMP / Goblin Guard - Stronger than the previous IMP / Goblin though they should still fall all the same.
WOLF / Wolf - Might be a slight threat due to having more HP than GrIMP / Goblin Guard.
MADPONY / Crazy Horse - Can be quite a deadly enemy if you fight it this early due to your lack of HP, if you have bought the Fire or Thunder Black Magic spell use it to defeat it faster.
Town of Coneria / Cornelia
Inn cost: 30
Weapon Shop
| Item | Cost (NES / PS Normal) | Cost (PS Easy / DoS+) | Attack | Accuracy | User |
|---|---|---|---|---|---|
| Wooden Nunchaku / Nunchaku | 10 | 8 | 12 | 0 | Black Belt / Monk, Ninja |
| Small Knife / Knife | 5 | 4 | 5 | 10 | Fighter / Warrior, Thief, Red Mage, Black Mage |
| Staff | 5 | 4 | 6 | 0 | All except Thief |
| Rapier | 10 | 8 | 9 | 5 | Fighter / Warrior, Thief, Red Mage |
| Iron Hammer / Hammer | 10 | 8 | 9 | 0 | Fighter / Warrior, White Mage, Ninja |
NES / PS: If using a Fighter, Thief or Red Mage buy a Rapier for each one of them. If you are using a Black Belt buy a Wooden Nunchaku for them. If using a White Mage buy an Iron Hammer for them. If using a Black Mage buy a Small Knife for them.
DoS+: If using a Warrior, Thief or Red Mage buy a Rapier for each one of them. If you are using a Monk remove all equipment from them. If using a White Mage buy a Hammer for them. If using a Black Mage buy a Knife for them.
Armor Shop
| Item | Cost (NES / PS Normal) | Cost (PS Easy / DoS+) | Defense | Evade | Weight | User |
|---|---|---|---|---|---|---|
| Clothes | 10 | 8 | 1 | -2 | 2 | Everyone |
| Wooden Armor / Leather Armor | 50 | 40 | 4 | -8 | 8 | Fighter / Warrior, Black Belt / Monk, Thief, Red Mage |
| Chain Mail | 80 | 65 | 15 | -15 | 15 | Fighter / Warrior, Red Mage, Ninja |
When deciding what Armor to buy look at your party to see which members will be in the first two slots as they will take the most physical attacks. Those two should be the ones you buy for and leave the other two bare (or what they started with for those playing the DoS and onward ports.).
White Magic Shop
| Spell (NES / PS+) | Cost (NES / PS Normal) | Cost (PS Easy / DoS+) | NES / PS effect | DoS+ effect | MP Cost | User |
|---|---|---|---|---|---|---|
| CURE / Cure | 100 | 50 | Heal 16-32 HP to one ally. | Restores a little HP to one ally. | 3 | White Mage, Red Mage, Knight |
| HARM / Dia | 100 | 50 | Deal 20-80 damage to all undead enemies. | Deals damage to all undead foes. | 5 | White Mage |
| FOG / Protect | 100 | 50 | Increase ally absorb by 8. | Raise one ally's defense (+8). | 3 | White Mage, Red Mage, Knight |
| RUSE / Blink | 100 | 50 | Increase casters Evade by 80. | Raise caster's evasion (+80). | 3 | White Mage, Knight, Red Wizard |
CURE / Cure - The lowest tier healing spell which is very useful in the long run, get this for your Red Mage & White Mage if you are using one or both.
HARM / Dia - The lowest tier undead damaging spell White Mages have to deal with undead enemies which are pretty prevalent in this game.
FOG / Protect - Not a really worthwhile buffing spell which can be stacked up to a total of 255. You can skip this since 8 Defense for one party member doesn't make too much of a difference.
RUSE / Blink - A good spell if you are planning to have your White Mage act as a tank since it can be stacked up to a total of 255. Later in the game the Knight can use this which is very beneficial for them.
Black Magic Shop
| Spell (NES / PS+) | Cost (NES / PS Normal) | Cost (PS Easy / DoS+) | NES / PS effect | DoS+ effect | MP Cost | User |
|---|---|---|---|---|---|---|
| FIRE / Fire | 100 | 50 | Deal 10-40 damage on one enemy, deal more if enemy is weak to Fire. | Deals fire damage to one foe. | 5 | Red Mage, Black Mage, Ninja |
| SLEP / Sleep | 100 | 50 | Can put all enemies to sleep. | Puts all foes to sleep. | 3 | Red Mage, Black Mage, Ninja |
| LOCK / Focus | 100 | 50 | Decreases one enemies evade by 10. (Bugged, always misses on NES) | Lower one foes evasion (-10). | 3 | Red Mage, Black Mage, Ninja |
| LIT / Thunder | 100 | 50 | Deal 10-40 damage on one enemy, deal more if enemy is weak to Lightning. | Deals lightning damage to one foe. | 5 | Red Mage, Black Mage, Ninja |
FIRE / Fire - The lowest tier Fire damaging spell which is very useful in the early game, this is a good early spell to get for Red Mage and Black Mage since you will want it for a tough enemy in the next area and around Coneria / Cornelia.
SLEP / Sleep - A good crowd control spell if you want some enemies to get off your back, you can choose to get it if you want, though I would wait until after having FIRE / Fire & LIT / Thunder first.
LOCK / Focus - A pretty worthless spell since there is no reason to worry about lowering one enemies evade.
LIT / Thunder - The lowest tier Lightning damaging spell which is very useful in the early game, this is a good early spell to get for Red Mage and Black Mage for when we eventually get the Ship.
Item Shop
| Item (NES / PS+) | Cost (NES / PS Normal) | Cost (PS Easy / DoS+) | Effect NES / PS | Effect DoS+ |
|---|---|---|---|---|
| HEAL Potion / Potion | 60 | 40 | Heal one ally for 30 HP outside of battle (16-32 in battle). | Restore 50 HP. |
| PURE Potion / Antidote | 75 | 50 | Remove poison from an ally. | Cure poison. |
| Phoenix Down | — | 500 (Not in Origins) | — | Revives one KO'd ally. |
| TENT / Sleeping Bag | 75 | 50 | Restores 30 HP and saves game. | Restores 100 HP. |
If you have any spare Gil from grinding to level 3 I would suggest buying a couple of HEAL Potion / Potions, at least 4. After you are done with purchases and grinding you can go to the Castle and speak with the King who will tell you his daughter has been kidnapped by a knight named Garland who took her Northwest to the Temple of Fiends / Chaos Shrine. Make sure to use the Inn to get your Spell Charges / MP back when you are ready to head out.
To the Temple of Fiends / Chaos Shrine
Suggested Level: 3
When you are ready exit the town and head to the Northwest, those playing on DoS+ will notice a cave to the left, there is nothing we can do there yet as we are blocked off from entering due to a statue. The Temple of Fiends / Chaos Shrine is located at the northern most point of the area head inside to begin the rescue.
Enemies
Outside of the Temple of Fiends / Chaos Shrine
| Name | Bestiary | HP | Attack | Defense | EXP | Gil | Weak | Drop | Notes |
|---|---|---|---|---|---|---|---|---|---|
| IMP / Goblin | #001 | 8 | 4-8 / 4 | 4 | 1.5 / 6 | 6 | |||
| GrIMP / Goblin Guard | #002 | 16 | 8-16 / 8 | 6 | 13 / 18 | 18 | Potion | ||
| MADPONY / Crazy Horse | #004 | 64 | 10-20 / 10 | 2 | 63 | 15 | Potion | ||
| BONE / Skeleton | #005 | 10 | 10-20 / 10 | 0 | 9 | 3 | Echo Screen | ||
| SPIDER / Black Widow | #006 | 28 | 10-20 / 10 | 0 | 30 | 8 | |||
| CREEP / Gigas Worm | #007 | 56 | 17-34 / 17 | 8 | 63 | 15 | |||
BONE / Skeleton - A weak undead monster, you should have no trouble dispatching them, unless you fight against a group of 4 don't worry about using HARM / Dia.
SPIDER / Black Widow - Not too much to worry about, despite its appearance you don't have to worry about being Poisoned as it can't do that.
CREEP / Gigas Worm - A pretty nasty enemy to meet early, use Fire on it if you have the spare charge / MP as you don't want them getting too many attacks off.
Inside the Temple of Fiends / Chaos Shrine
| Name | Bestiary | HP | Attack | Defense | EXP | Gil | Weak | Drop | Notes |
|---|---|---|---|---|---|---|---|---|---|
| IMP / Goblin | #001 | 8 | 4-8 / 4 | 4 | 1.5 / 6 | 6 | |||
| GrIMP / Goblin Guard | #002 | 16 | 8-16 / 8 | 6 | 13 / 18 | 18 | Potion | ||
| WOLF / Wolf | #003 | 20 | 8-16 / 8 | 0 | 24 | 6 | |||
| BONE / Skeleton | #005 | 10 | 10-20 / 10 | 0 | 9 | 3 | Echo Screen | ||
| SPIDER / Black Widow | #006 | 28 | 10-20 / 10 | 0 | 30 | 8 | |||
| CREEP / Gigas Worm | #007 | 56 | 17-34 / 17 | 8 | 63 | 15 | |||
| GrWOLF / Warg Wolf | #008 | 72 | 14-28 / 14 | 0 | 93 | 22 | Antidote | ||
| WrWOLF / Werewolf | #009 | 68 | 14-28 / 14 | 6 | 135 | 67 | Attack may Poison, 3 HP Regen per turn (not on NES) | ||
| ZOMBIE / Zombie | #010 | 20 | 10-20 / 0 | 0 | 24 | 12 | Staff | ||
| GHOUL / Ghoul | #011 | 48 | 8-16 / 8 | 6 | 93 | 50 | Attack may Stun / Paralyze | ||
GrWOLF / Warg Wolf - Basically a stronger WOLF / Wolf.
WrWOLF / Werewolf - Can be a bit dangerous if they manage to Poison you, you may want to defeat these first to reduce the risk of being Poisoned when encountered. If they live they will recover 3 HP per turn (not on NES).
ZOMBIE / Zombie - Is not too dangerous as they are only slightly stronger than BONE / Skeletons, if you meet a group of 4 consider using HARM / Dia to take them out.
GHOUL / Ghoul - Has weaker attack than ZOMBIE / Zombie, but is a bit more durable. Their attack has a chance to Stun / Paralyze if they hit.
Map
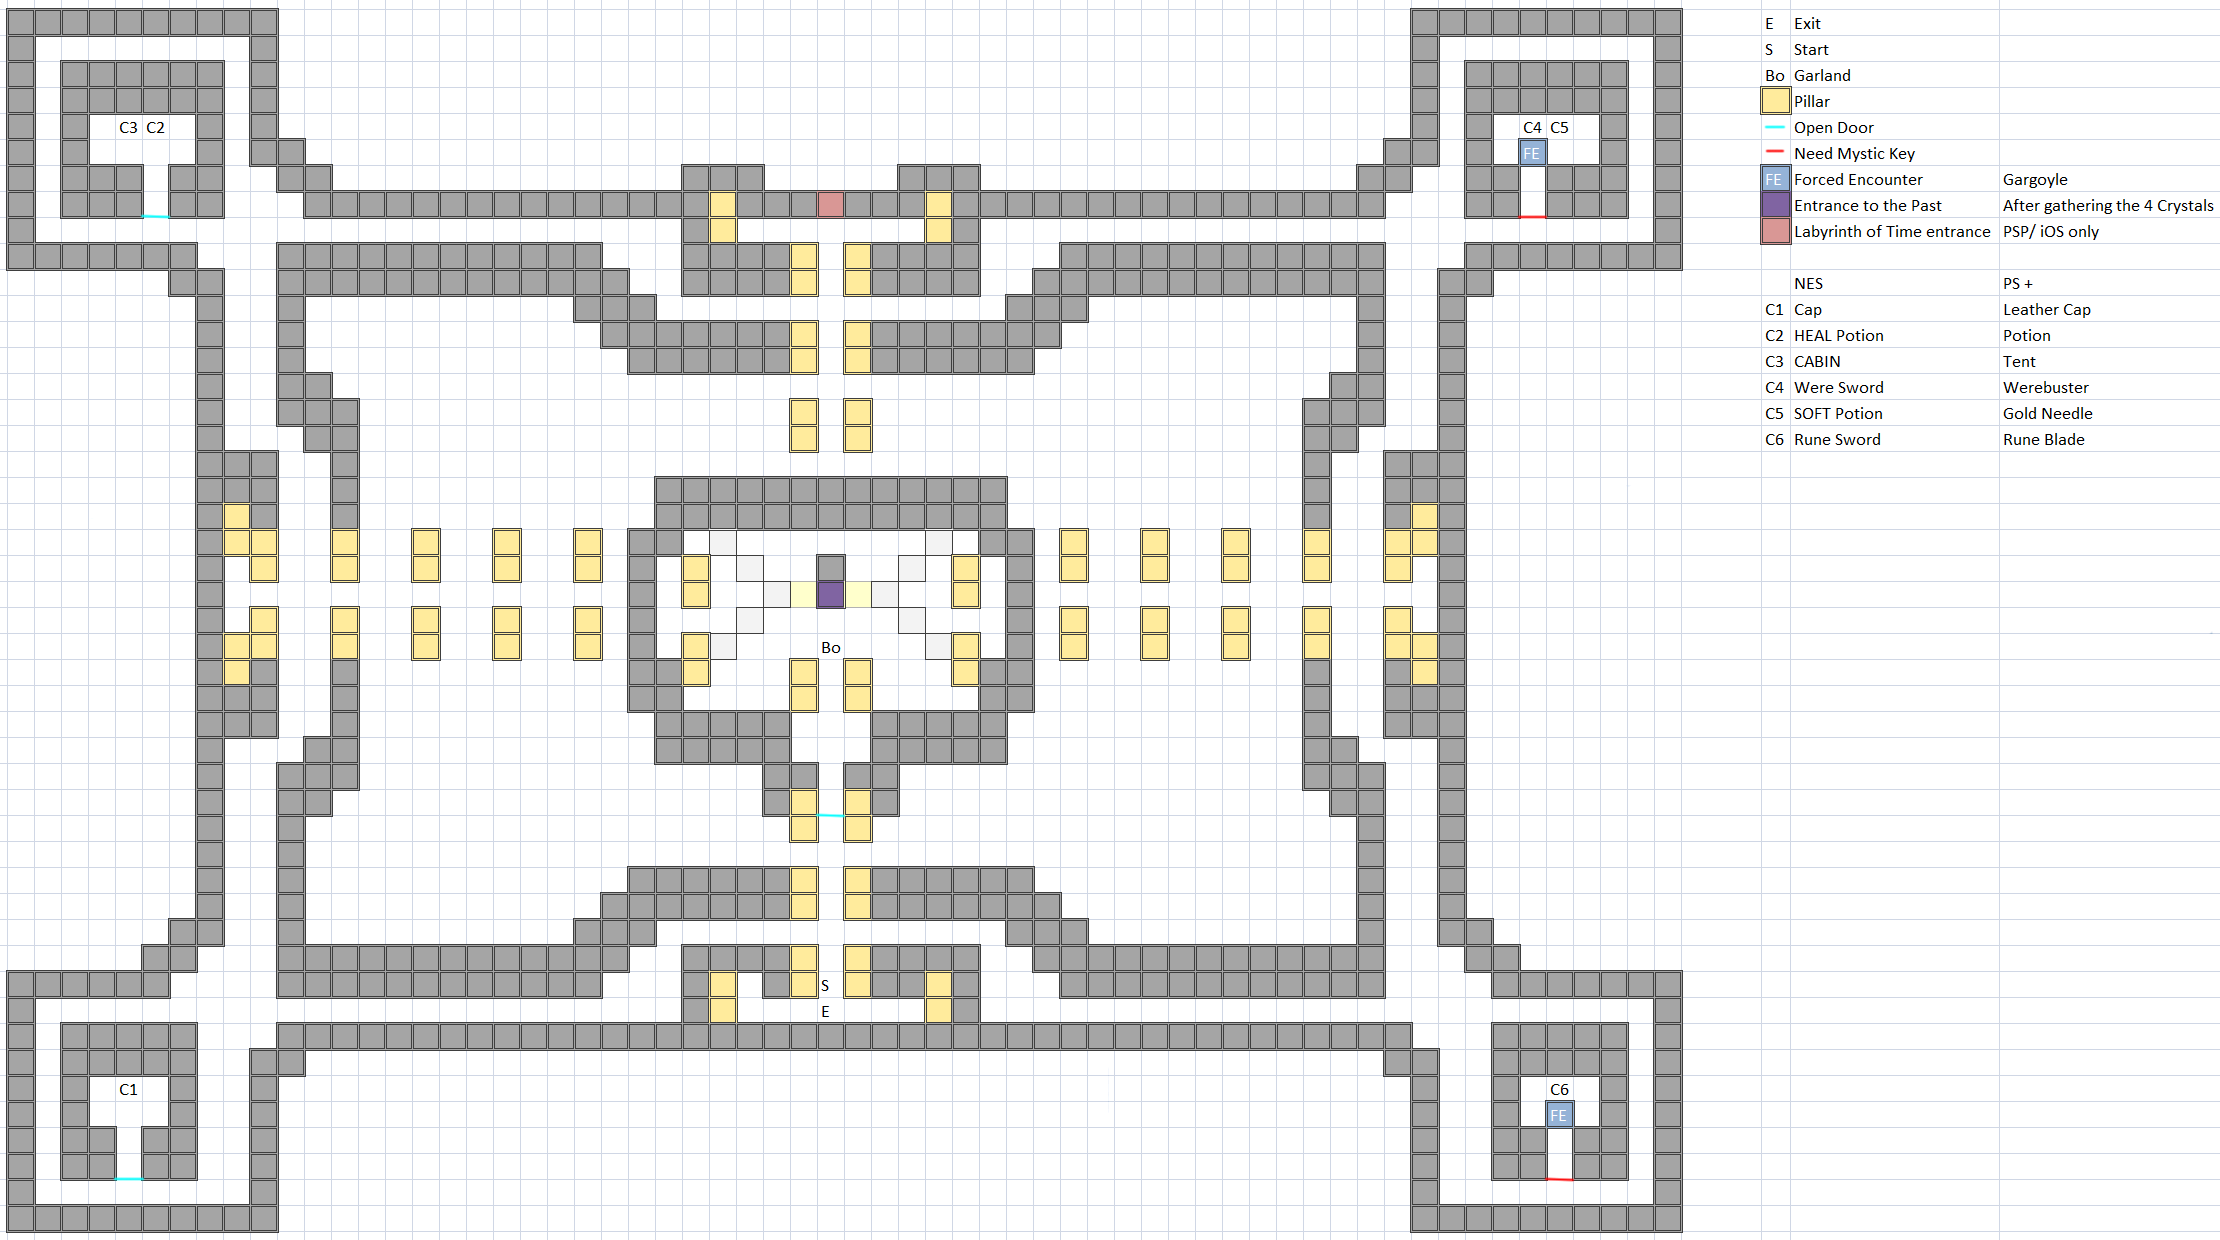
The Temple of Fiends / Chaos Shrine is not too large of an area, if you want to face Garland now and save Princess Sarah simply walk up and talk with him to initiate the battle, however if you want the treasure that you can get now you can choose to do that to. There are 4 rooms at the corners of the temple, however we are only able to access 2 of the 4 rooms those being the lower left and upper left. The lower left room has a Cap / Leather Cap any character can equip it, it provides 1 Defense with -1 Evade and a Weight of 1, I would suggest giving it to your main tank. The upper left room has a HEAL Potion / Potion in the chest in front of the door and a CABIN / Tent in the other chest. When you finish collecting the treasure head back to where the entrance was and head into the room in the center and speak with Garland to fight him.
Boss
GARLAND / Garland (#012)
HP: 106 (NES & PS) / 212 (DoS+)
Attack: 15-30 (NES) / 15 (PS+)
Defense: 10 (NES & PS) / 8 (DoS+)
EXP: 130
Gil: 250
Weak: —
Resist: —
Drop: Longsword (Rare)
Garland is a very simple boss fight so feel free to go all out with your offensive magic and heal anyone who gets below 20 HP.
After you have defeated Garland you will need to walk up to Princess Sarah to have her teleport you back to the Kings room. In gratitude the King will ask for a bridge to be built to help your group traverse to the East so you can go to the town there to get a ship, if you attempt to leave without speaking to Sarah she will stop you and will give you a Lute which currently has no importance yet. Those on NES need to talk to the King for the bridge to appear and the Princess so she can give you the Lute. If you have not reached level 4 I would suggest to do some grinding before continuing, as well as buying at least 3 PURE Potion / Antidotes for the trip.
Gaining our Sea Legs
Suggested Level: 4
Make sure you have rested up at the Inn to get your spell charges / MP back to full after getting to level 4 if you didn't already reach it. Make your way North to reach the newly built bridge and see a small cutscene. You can choose to go to the North to a cave or East to the next town.
If you choose to go North
Enemies
Near Matoya's Cave
| Name | Bestiary | HP | Attack | Defense | EXP | Gil | Weak | Drop | Notes |
|---|---|---|---|---|---|---|---|---|---|
| WOLF / Wolf | #003 | 20 | 8-16 / 8 | 0 | 24 | 6 | |||
| CREEP / Gigas Worm | #007 | 56 | 17-34 / 17 | 8 | 63 | 15 | |||
| GrWOLF / Warg Wolf | #008 | 72 | 14-28 / 14 | 0 | 93 | 22 | Antidote | ||
| ASP / Cobra | #013 | 56 | 6-12 / 6 | 6 | 123 | 50 | Attack may Poison | ||
| OGRE / Ogre | #014 | 100 | 18-36 / 18 | 10 | 195 | 195 | |||
| GrOGRE / Ogre Chief | #015 | 132 | 23-46 / 23 | 14 | 282 | 300 | |||
ASP / Cobra - Has low attack, but has a chance to Poison you with their physical attack.
OGRE / Ogre - Pretty durable as well as powerful and will often be paired with CREEP / Gigas Worm, while good for grinding later it can be a pain to fight before upgrading equipment.
GrOGRE / Ogre Chief - Basically a stronger OGRE / Ogre.
Head North into the mountains and then circle around through the West upward until you see a cave you can enter. This is Matoya's Cave the broom on the outside gives you a hint to access the World Map (B Button + Select). Entering the room you will see Matoya herself, apparently she is missing a crystal eye that was stolen from her, we are unable to help her at the moment. There are 3 chests in here from top to bottom they have a HEAL Potion / Potion, another one and a PURE Potion / Antidote. When you are done leave and make your way to the East.
If you choose to go East
Enemies
| Name | Bestiary | HP | Attack | Defense | EXP | Gil | Weak | Drop | Notes |
|---|---|---|---|---|---|---|---|---|---|
| IMP / Goblin | #001 | 8 | 4-8 / 4 | 4 | 1.5 / 6 | 6 | |||
| GrIMP / Goblin Guard | #002 | 16 | 8-16 / 8 | 6 | 13 / 18 | 18 | Potion | ||
| WOLF / Wolf | #003 | 20 | 8-16 / 8 | 0 | 24 | 6 | |||
| MADPONY / Crazy Horse | #004 | 64 | 10-20 / 10 | 2 | 63 | 15 | Potion | ||
| CREEP / Gigas Worm | #007 | 56 | 17-34 / 17 | 8 | 63 | 15 | |||
| GrWOLF / Warg Wolf | #008 | 72 | 14-28 / 14 | 0 | 93 | 22 | Antidote | ||
| OGRE / Ogre | #014 | 100 | 18-36 / 18 | 10 | 195 | 195 | |||
| IGUANA / Lizard | #016 | 92 | 18-36 / 18 | 12 | 153 | 50 | |||
IGUANA / Lizard - Is very durable and can be tough, though they will always be alone in this area.
Head under the mountains and to the East for a long trek through the forest and then South to the town.
Pravoka
Welcome to Pravoka, you will find that the town is in trouble as they are being attacked by pirates, you can choose to fight them now or after you do some shopping. Either way the Weapon, White & Black Magic shops are on the right side of town while the Armor & Item Shops are on the left.
Inn cost: 50
Weapon Shop
| Item | Cost (NES / PS Normal) | Cost (PS Easy / DoS+) | Attack | Accuracy | User |
|---|---|---|---|---|---|
| Iron Hammer / Hammer | 10 | 8 | 9 | 0 | Fighter / Warrior, White Mage, Ninja |
| Short Sword / Broadsword | 550 | 450 | 15 | 10 | Fighter / Warrior, Red Mage, Ninja |
| Hand Axe / Battle Axe | 550 | 450 | 16 | 5 | Fighter / Warrior, Ninja |
| Scimitar | 200 | 160 | 10 | 10 | Fighter / Warrior, Thief, Red Mage |
NES / PS: If you are using a Fighter / Warrior or Red Mage buy a Short Sword for them, if you have another member that can also equip it don't buy another one as there will be a large list of equipment you will want for the next dungeon. If you are using a Thief don't buy the Scimitar as the next town (which we go to immediately after this) has a better weapon.
DoS+: If you have a Warrior or Red Mage buy a Broadsword for them. If you are using a Thief don't buy the Scimitar as the next town (which we go to immediately after this) has a better weapon, additionally an enemy in the sea has a chance to drop the very same weapon we could buy.
Armor Shop
| Item | Cost (NES / PS Normal) | Cost (PS Easy / DoS+) | Defense | Evade | Weight | User |
|---|---|---|---|---|---|---|
| Wooden Armor / Leather Armor | 50 | 40 | 4 | -8 | 8 | Fighter / Warrior, Black Belt / Monk, Thief, Red Mage |
| Chain Mail | 80 | 65 | 15 | -15 | 15 | Fighter / Warrior, Red Mage, Ninja |
| Iron Armor | 800 | 640 | 24 | -23 | 23 | Fighter / Warrior, Ninja |
| Wooden Shield / Leather Shield | 15 | 12 | 2 | 0 | 0 | Fighter / Warrior, Ninja |
| Gloves / Leather Gloves | 60 | 50 | 1 | -1 | 1 | Everyone |
If you are using a Fighter / Warrior don't buy the Shield here as a better one is sold in the next town (which we go to immediately after this). Since it is pretty cheap you can choose to buy Gloves / Leather Gloves for everyone except your Black Belt / Monk if you want. If you have the spare gil go ahead and buy the Iron Armor for your Fighter / Warrior.
White Magic Shop
| Spell (NES / PS+) | Cost (NES / PS Normal) | Cost (PS Easy / DoS+) | NES / PS effect | DoS+ effect | MP Cost | User |
|---|---|---|---|---|---|---|
| LAMP / Blinda | 400 | 250 | Remove Dark from an ally. | Cures darkness. | 3 | White Mage, Red Mage, Knight |
| MUTE / Silence | 400 | 250 | Prevent enemy from using magic. | Prevents all foes from casting spells. | 5 | White Mage, Red Mage, Knight |
| ALIT / NulShock | 400 | 250 | Lessens damage from Lit attacks. | Reduces lightning damage by half. | 8 | White Mage, Red Mage, Knight |
| INVS / Invis | 400 | 250 | Increase Evade of target by 40. | Raise one ally's evasion (+40). | 3 | White Mage, Knight, Red Wizard |
LAMP / Blinda - Useless spell since the Darkness status doesn't work in all versions of this game.
MUTE / Silence - A good spell to prevent enemies from using their special attacks.
ALIT / NulShock - Not really worth getting unless you are on DoS+ where you will want this for the bonus dungeons if you go for them early.
INVS / Invis - A good spell to help your tank take less hits from an enemy.
Black Magic Shop
| Spell (NES / PS+) | Cost (NES / PS Normal) | Cost (PS Easy / DoS+) | NES / PS effect | DoS+ effect | MP Cost | User |
|---|---|---|---|---|---|---|
| ICE / Blizzard | 400 | 250 | Deal 10-80 damage on one enemy, deal more if enemy is weak to Ice. | Deals ice damage to one foe. | 8 | Red Mage, Black Mage, Ninja |
| DARK / Dark | 400 | 250 | Inflict Dark status. | Blinds all foes with darkness. | 5 | Red Mage, Black Mage, Ninja |
| TMPR / Temper | 400 | 250 | Increase the damage of an ally. (Bugged, doesn't work on NES) | Raise one ally's attack (+14). | 10 | Red Mage, Black Mage, Ninja |
| SLOW / Slow | 400 | 250 | Lower enemies HIT total to 1. | Reduces all foes' number of attacks. | 5 | Red Mage, Black Mage, Ninja |
ICE / Blizzard - You won't have much of a use for this unless on NES where the Black Mage won't have anything to do with level 2 spell charges.
DARK / Dark - Useless spell since Darkness doesn't work on enemies.
TMPR / Temper - Useless on NES due to a bug, very much needed to speed up boss fights on remakes, it stacks up to a total of 255 in battle.
SLOW / Slow - Good for certain bosses to lower their hit count to make them more manageable.
Item Shop
| Item (NES / PS+) | Cost (NES / PS Normal) | Cost (PS Easy / DoS+) | Effect NES / PS | Effect DoS+ |
|---|---|---|---|---|
| HEAL Potion / Potion | 60 | 40 | Heal one ally for 30 HP outside of battle (16-32 in battle). | Restore 50 HP. |
| Ether | — | 150 (Not in Origins) | — | Restore 50 MP. |
| PURE Potion / Antidote | 75 | 50 | Remove poison from an ally. | Cure poison. |
| Eye Drops | — | 50 (Not in Origins) | — | Cures darkness. |
| Phoenix Down | — | 500 (Not in Origins) | — | Revives one KO'd ally. |
| TENT / Sleeping Bag | 75 | 50 | Restores 30 HP and saves game. | Restores 100 HP. |
| CABIN / Tent | 250 | 160 | Restores 60 HP and saves game. | Restores 200 HP and 100 MP. |
When you are finished shopping or chose not to talk to Bikke the leader of the Pirates to initiate the battle.
"Boss"
PIRATE / Pirate x9 (#017)
HP: 6 (NES & PS) / 24 (DoS+)
Attack: 8-16 (NES) / 8 (PS) / 10 (DoS+)
Defense: 0
EXP: 40
Gil: 40
Weak: —
Resist: —
Drop: Leather Shield (Rare)
They are very weak (pathetically so on the NES & Origins versions) that you should have no trouble dispatching them as they should go down in one hit from everyone (except White Mage on later ports).
After you've defeated them Bikke gets scared and offers his apologies and promises not to terrorize the town, as well as giving you control of his ship which will now belong to you, it will be docked outside of Pravoka waiting for you.
Sailing the closed Sea
Enemies
| Name | Bestiary | HP | Attack | Defense | EXP | Gil | Weak | Drop | Notes |
|---|---|---|---|---|---|---|---|---|---|
| SAHAG / Sahagin | #018 | 28 | 10-20 / 10 | 4 | 30 | 30 | Potion | ||
| R.SAHAG / Sahagin Chief | #019 | 64 | 15-30 / 15 | 8 | 105 | 105 | |||
| KYZOKU / Buccaneer | #020 | 50 | 14-28 / 14 | 6 | 60 | 120 | Saber | ||
| SHARK / Shark | #021 | 120 | 22-44 / 22 | 0 | 267 | 66 | |||
| OddEYE / Bigeyes | #022 | 10 | 4-8 / 4 | 0 | 42 | 10 | May Stun / Paralyze with Gaze | ||
SAHAG / Sahagin - Has high agility so it will tend to dodge attacks at low levels (on NES / PS) they tend to come in large groups, but are otherwise not too threatening.
R.SAHAG / Sahagin Chief - Basically a stronger SAHAG / Sahagin.
KYZOKU / Buccaneer - Is much tougher than their "boss" counterpart PIRATE / Pirate and can be a threat early. It is a very good enemy to farm for gil if you don't want do the ship minigame (end of this page).
SHARK / Shark - Is a pretty strong enemy as well as being quite durable, you will want to use LIT / Thunder if you encounter one (or two).
OddEYE / Bigeyes - Has very low HP and high evade, all it will do is Gaze in an attempt to Stun / Paralyze the member it targets.
Now we have access to the sea though all we have access to is the portion of the world we are in, if you didn't go to Matoya's Cave you can go now by passing under the bridge by Coneria / Cornelia. There is one new area we can go to now that we have the Ship (technically two, but we can't do anything in the other area), make your way West back to where Coneria / Cornelia is and from the dock head South until you hit a piece of land and go to the dock on the West and head Southward.
Elfland / Elfheim
Enemies
| Name | Bestiary | HP | Attack | Defense | EXP | Gil | Weak | Drop | Notes |
|---|---|---|---|---|---|---|---|---|---|
| WOLF / Wolf | #003 | 20 | 8-16 / 8 | 0 | 24 | 6 | |||
| CREEP / Gigas Worm | #007 | 56 | 17-34 / 17 | 8 | 63 | 15 | |||
| GrWOLF / Warg Wolf | #008 | 72 | 14-28 / 14 | 0 | 93 | 22 | Antidote | ||
| ASP / Cobra | #013 | 56 | 6-12 / 6 | 6 | 123 | 50 | Attack may Poison | ||
| OGRE / Ogre | #014 | 100 | 18-36 / 18 | 10 | 195 | 195 | |||
| GrOGRE / Ogre Chief | #015 | 132 | 23-46 / 23 | 14 | 282 | 300 | |||
| ARACHNID / Tarantula | #023 | 64 | 5-10 / 5 | 12 | 141 | 50 | Attack may Poison | ||
ARACHNID / Tarantula - Not very powerful, unlike SPIDER / Black Widow this one has a chance to inflict Poison on the party member they attack.
You can enter the castle to find out what the problem for the area is, turns out the Prince has been cursed by the Dark Elf Astos and has been sleeping for 5 years (what?). The Healer next to his bed speaks of a medicine that will wake the Prince up, but he doesn't know where it is. Afterward you can visit the town and look at their shops, the weapon store is under the Inn with the Level 3 Black Magic shop next to the Inn and Level 3 White Magic shop above it. The upper left of the town features the level 4 magic shops with the item shop below them and the Armor shop at the bottom left. A little Easter egg if you check the left most grave near the level 3 White Magic shop in the NES & Origins version it says "Here lies Erdrick." Erdrick being a character in the Dragon Quest / Warrior series, however all other versions say "Here lies Link." the same Link of Legend of Zelda fame.
Inn cost: 100
Weapon Shop
| Item | Cost (NES / PS Normal) | Cost (PS Easy / DoS+) | Attack | Accuracy | User |
|---|---|---|---|---|---|
| Iron Nunchaku | 200 | 160 | 16 | 0 | Black Belt / Monk |
| Large Dagger / Dagger | 175 | 140 | 7 | 10 | Fighter / Warrior, Thief, Red Mage, Black Mage |
| Iron Staff / Crosier | 200 | 160 | 14 | 0 | Fighter / Warrior, Black Belt / Monk, Ninja |
| Sabre / Saber | 450 | 360 | 13 | 5 | Fighter / Warrior, Thief, Red Mage |
| Silver Sword / Mythril Sword | 4,000 | 3,200 (Origins only) | 23 | 15 | Fighter / Warrior, Red Mage, Ninja |
NES / PS: If you are using a Fighter / Warrior or Red Mage buy a Silver / Mythril Sword for them. If you are using a Thief buy the Saber for them. If you have a Black Mage don't buy the Large Dagger / Dagger for them as we can get it for free in the next dungeon.
DoS+: If you are using a Thief you can buy the Saber for them, though I would wait and see if Buccaneers in the sea drop one before you finish level grinding in case you get one for free.
Armor Shop
| Item | Cost (NES / PS Normal) | Cost (PS Easy / DoS+) | Defense | Evade | Weight | User |
|---|---|---|---|---|---|---|
| Iron Armor | 800 | 640 | 24 | -23 | 23 | Fighter / Warrior, Ninja |
| Copper Bracelet / Copper Armlet | 1,000 | 800 | 4 | -1 | 1 | Everyone |
| Iron Shield | 100 | 80 | 4 | 0 | 0 | Fighter / Warrior, Ninja |
| Cap / Leather Cap | 80 | 65 | 1 | -1 | 1 | Everyone |
| Wooden Helmet / Helm | 100 | 80 | 3 | -3 | -3 | Fighter / Warrior, Ninja |
If you are using a Fighter / Warrior buy the Iron Armor if you didn't already from Pravoka, also the Iron Shield & Wooden Helmet and pass the Cap to the next character in line.
White Magic Shop (Level 3)
| Spell (NES / PS+) | Cost (NES / PS Normal) | Cost (PS Easy / DoS+) | NES / PS effect | DoS+ effect | MP Cost | User |
|---|---|---|---|---|---|---|
| CUR2 / Cura | 1,500 | 1,000 | Heal 33-66 HP to one ally. | Restores HP to one ally. | 10 | White Mage, Red Mage, Knight |
| HRM2 / Diara | 1,500 | 1,000 | Deal 40-160 damage to all undead enemies. | Deals damage to all undead foes. | 8 | White Mage |
| AFIR / NulBlaze | 1,500 | 1,000 | Lessens damage from Fire attacks. | Reduces fire damage by half. | 8 | White Mage, Red Mage, Knight |
| HEAL / Heal | 1,500 | 1,000 | Heal 12-24 HP to all allies. | Restore a little HP to entire party. | 10 | White Mage |
CUR2 / Cura - The second tier healing spell, get for your Red Mage if you are using one since they can't learn HEAL / Heal, you can choose to buy this for White Mage, but HEAL / Heal will heal more for the same cost.
HRM2 / Diara - The second tier undead damaging spell White Mages have to deal with undead enemies which are pretty prevalent in this game.
AFIR / NulBlaze - A nice spell to have to reduce Fire elemental damage, though it should be saved for purchase later when you have more gil.
HEAL / Heal - The lowest tier group healing spell for the White Mage which has the same cost as CUR2 / Cura, it will heal more overall than CUR2 / Cura since you are targeting you whole party instead of one member.
White Magic Shop (Level 4)
| Spell (NES / PS+) | Cost (NES / PS Normal) | Cost (PS Easy / DoS+) | NES / PS effect | DoS+ effect | MP Cost | User |
|---|---|---|---|---|---|---|
| PURE / Poisona | 4,000 | 2,500 | Removes Poison from an ally. | Cures poison. | 3 | White Mage, Red Mage |
| FEAR / Fear | 4,000 | 2,500 | Makes enemies more likely to run. | Drives all foes away in terror. | 10 | White Mage |
| AICE / NulFrost | 4,000 | 2,500 | Lessens damage from Ice attacks. | Reduces ice damage by half. | 8 | White Mage, Red Mage |
| AMUT / Vox | 4,000 | 2,500 | Removes Silence from an ally. | Cures silence. | 3 | White Mage, Red Wizard |
PURE / Poisona - You won't really need spell as you can buy more than enough PURE Potion / Antidotes to cover the cost of this spell (if you get Poisoned more than 50 times per play through I don't know what to tell you, also DoS+ can get Antidotes as drops.)
FEAR / Fear - An interesting spell which if used in succession will cause enemies to run away, won't work on undead as they resist it.
AICE / NulFrost - A nice spell to have to reduce Ice elemental damage, though it should be saved for purchase later when you have more gil.
AMUT / Vox - Don't bother with this spell, there are only 3 enemies in the main game that can Silence your party with 1 more on DoS / Anniversary, but those enemies will likely not use Silence (unless you purposely keep them alive long enough). The one on DoS / Anniversary will, but you will have Ribbons by then so it won't work and items that have the effect of spells, also it gets cured after battle making it even more worthless.
Black Magic Shop (Level 3)
| Spell (NES / PS+) | Cost (NES / PS Normal) | Cost (PS Easy / DoS+) | NES / PS effect | DoS+ effect | MP Cost | User |
|---|---|---|---|---|---|---|
| FIR2 / Fira | 1,500 | 1,000 | Deal 30-120 damage to all enemies, deal more if enemy is weak to Fire. | Deals fire damage to all foes. | 15 | Red Mage, Black Mage, Ninja |
| HOLD / Hold | 1,500 | 1,000 | Paralyze an enemy. | Paralyzes one foe. | 10 | Red Mage, Black Mage, Ninja |
| LIT2 / Thundara | 1,500 | 1,000 | Deal 30-120 damage to all enemies, deal more if enemy is weak to Lightning. | Deals lightning damage to all foes. | 15 | Red Mage, Black Mage, Ninja |
| LOK2 / Focara | 1,500 | 1,000 | Decrease enemy evade by 20 (Bugged, raises instead of decrease on NES). | Lowers evasion of all foes (-20). | 10 | Red Mage, Black Mage, Ninja |
FIR2 / Fira - The mid tier Fire damaging spell which is very useful for most of the game with the abundance of undead present, this one hits all enemies instead of one.
HOLD / Hold - Not too useful since it aims at one enemy rather than a group.
LIT2 / Thundara - The mid tier Lightning damaging spell, this one hits all enemies instead of one. You will want this for the Marsh Cave since the enemy guarding an item we need doesn't resist this element while resisting all others.
LOK2 / Focara - An upgrade to LOCK / Focus, but still not useful since you don't want to waste spell charges / MP lowering an enemies evade.
Black Magic Shop (Level 4)
| Spell (NES / PS+) | Cost (NES / PS Normal) | Cost (PS Easy / DoS+) | NES / PS effect | DoS+ effect | MP Cost | User |
|---|---|---|---|---|---|---|
| SLP2 / Sleepra | 4,000 | 2,500 | An enemy may fall sleep. | Puts one foe to sleep. | 15 | Red Mage, Black Mage, Ninja |
| FAST / Haste | 4,000 | 2,500 | Double an allies number of hits. | Doubles one ally's number of attacks. | 15 | Red Mage, Black Mage, Ninja |
| CONF / Confuse | 4,000 | 2,500 | Enemies will go after their own. | Causes foes to turn on each other. | 15 | Red Mage, Black Mage, Ninja |
| ICE2 / Blizzara | 4,000 | 2,500 | Deal 40-160 damage to all enemies, deal more if enemy is weak to Ice. | Deals ice damage to all foes. | 18 | Red Mage, Black Mage, Ninja |
SLP2 / Sleepra - Has higher accuracy than SLEP / Sleep and can bypass enemies and even bosses who resist Sleep due to being Non-Elemental.
FAST / Haste - A very nice buff you will want to get, though it should wait until after Marsh Cave.
CONF / Confuse - A nice crowd control spell to have enemies hit themselves rather than your party.
ICE2 / Blizzara - The mid tier Ice damaging spell, it is slightly more powerful than FIR2 / Fira & LIT2 / Thundara.
Item Shop
| Item (NES / PS+) | Cost (NES / PS Normal) | Cost (PS Easy / DoS+) | Effect NES / PS | Effect DoS+ |
|---|---|---|---|---|
| HEAL Potion / Potion | 60 | 40 | Heal one ally for 30 HP outside of battle (16-32 in battle). | Restore 50 HP. |
| PURE Potion / Antidote | 75 | 50 | Remove poison from an ally. | Cure poison. |
| SOFT Potion / Gold Needle | 800 | 500 | Removes stone from an ally. | Cures stone. |
| Echo Grass | — | 50 (Not in Origins) | — | Cures silence. |
| CABIN / Tent | 250 | 160 | Restores 60 HP and saves game. | Restores 200 HP and 100 MP. |
| HOUSE / Cottage | 3,000 | 2,000 (Origins only) | Recovers 120 HP and saves game, recovers Spell Charges. | Fully restores party's HP and MP. |
The HOUSE is bugged on the NES version if you choose to not save it will not replenish your spell charges, also loading a game after saving from a HOUSE will still deplete your spell charges due it restoring them after saving instead of before so you would need to use a TENT or CABIN after the HOUSE to keep them.
Prepping for the Marsh
The upcoming dungeon Marsh Cave is one of the hardest dungeons in the game relative to the level you would be at so there is some grinding to do. For NES / PS version you want to hover somewhere around Level 9 (10 if you want a Lv 4 spell charge for Red Mage) at least while the DoS+ version you want to be somewhere around 13 (15 if you want Lv 4 magic for Red Mage). I will list what equipment / spells you will want to get in order of importance for the cave to have an easy time based on what you may be using.
NES / PS Normal
Silver / Mythril Swords for Fighter / Warrior & Red Mage (4,000 gil per at Elfland)
Sabre / Saber for Thief (450 gil at Elfland)
Iron Armor for Fighter / Warrior (800 gil at Pravoka & Elfland)
Iron Shield for Fighter / Warrior (100 gil at Elfland)
Wooden Helmet for Fighter / Warrior (100 gil at Elfland)
HEAL & HRM2 for White Mage (1,500 gil per at Elfland)
CUR2 for Red Mage (1,500 gil at Elfland)
FIR2 & LIT2 for Red & Black Mage (1,500 gil per at Elfland)
30 HEAL Potion / Potions (60 gil per)
3 CABIN / Tents (250 gil per at Coneria & Pravoka)
20 PURE Potion / Antidotes (75 gil per)
PS Easy
Mythril Swords for Warrior & Red Mage (3,200 gil per at Elfheim)
Saber for Thief (360 gil at Elfheim)
Steel Plate for Warrior (640 gil at Pravoka & Elfheim)
Iron Shield for Warrior (80 gil at Elfheim)
Helmet for Warrior (80 gil at Elfheim)
Heal1 & Dia2 for White Mage (1,000 gil per at Elfheim)
Cure2 for Red Mage (1,000 gil at Elfheim)
Fire2 & Bolt2 for Red & Black Mage (1,000 gil per at Elfheim)
30 Potions (40 gil per, not needed if Red or White Mage knows Cure1)
20 Antidotes (60 gil per)
DoS+
Broadsword for Warrior & Red Mage (450 gil per at Pravoka)
Iron Armor for Warrior (640 gil at Pravoka & Elfheim)
Iron Shield for Warrior (80 gil at Elfheim)
Helm for Warrior (80 gil at Elfheim)
Heal & Diara for White Mage (1,000 gil per at Elfheim)
Cura for Red Mage (1,000 gil at Elfheim)
Fira & Thundara for Red & Black Mage (1,000 gil per at Elfheim)
30 Potions (40 gil per)
3 Tents (160 gil per at Elfheim)
Saber for Thief (360 gil at Elfheim) if you didn't get one as a drop from Buccaneer
20 Antidotes (50 gil per)
10 Ethers (150 gil per at Pravoka)
Places to grind
- If you want to get more gil than experience I would recommend doing battles on the sea as you will get a lot more gold than exp from those battles (unless SHARK / Shark appears often)
- If you want more experience than gil I would recommend being either close to Elfland / Elfheim or on the left side of the mountains nearby, though you will want to bring PURE Potions / Antidotes due enemies who can poison you.
- If you want to level super fast you will need FIR2 / Fira & HRM2 / Diara. Read the end of the guide.
Treck through the Marsh
Suggested Level: 9-10 (NES / PS), 13-15 (DoS+)
When you feel ready and have rested up make your way though the mountains West of Elfland / Elfheim. There is a path that will lead West which you should pass up the first one as it will lead to a dead end, the second one will lead to the Marsh Cave with a path North which you can go to if you want to though there won't be much to do there, the King inside had his Crown taken by Astos that is hidden in the Marsh Cave and he is unable to retrieve it so he asks for you to get it. Continue South and you will be at the Marsh Cave.
Enemies
Near Marsh Cave
| Name | Bestiary | HP | Attack | Defense | EXP | Gil | Weak | Drop | Notes |
|---|---|---|---|---|---|---|---|---|---|
| GrIMP / Goblin Guard | #002 | 16 | 8-16 / 8 | 6 | 13 / 18 | 18 | Potion | ||
| WOLF / Wolf | #003 | 20 | 8-16 / 8 | 0 | 24 | 6 | |||
| GrWOLF / Warg Wolf | #008 | 72 | 14-28 / 14 | 0 | 93 | 22 | Antidote | ||
| WrWOLF / Werewolf | #009 | 68 | 14-28 / 14 | 6 | 135 | 67 | Attack may Poison, 3 HP Regen per turn (not on NES) | ||
| OGRE / Ogre | #014 | 100 | 18-36 / 18 | 10 | 195 | 195 | |||
| GrOGRE / Ogre Chief | #015 | 132 | 23-46 / 23 | 14 | 282 | 300 | |||
| ARACHNID / Tarantula | #023 | 64 | 5-10 / 5 | 12 | 141 | 50 | Attack may Poison | ||
| GHAST / Ghast | #024 | 56 | 8-16 / 8 | 10 | 117 | 117 | Attack may Stun / Paralyze | ||
| SCORPION / Scorpion | #025 | 84 | 22-44 / 22 | 10 | 225 | 70 | Spider's Silk | Attack may Poison | |
GHAST / Ghast - Will often appear in large groups and are notorious for their chain Stun / Paralysis due to getting multiple attacks.
SCORPION / Scorpion - Is pretty powerful for this point in the game and has a chance to Poison you with its physical attack.
Inside Marsh Cave
| Name | Bestiary | HP | Attack | Defense | EXP | Gil | Weak | Drop | Notes |
|---|---|---|---|---|---|---|---|---|---|
| BONE / Skeleton | #005 | 10 | 10-20 / 10 | 0 | 9 | 3 | Echo Screen | ||
| SPIDER / Black Widow | #006 | 28 | 10-20 / 10 | 0 | 30 | 8 | |||
| GrWOLF / Warg Wolf | #008 | 72 | 14-28 / 14 | 0 | 93 | 22 | Antidote | ||
| WrWOLF / Werewolf | #009 | 68 | 14-28 / 14 | 6 | 135 | 67 | Attack may Poison, 3 HP Regen per turn (not on NES) | ||
| ZOMBIE / Zombie | #010 | 20 | 10-20 / 10 | 0 | 24 | 12 | Staff | ||
| GHOUL / Ghoul | #011 | 48 | 8-16 / 8 | 6 | 93 | 50 | Attack may Stun / Paralyze | ||
| ARACHNID / Tarantula | #023 | 64 | 5-10 / 5 | 12 | 141 | 50 | Attack may Poison | ||
| SCORPION / Scorpion | #025 | 84 | 22-44 / 22 | 10 | 225 | 70 | Spider's Silk | Attack may Poison | |
| SHADOW / Shadow | #026 | 50 | 10-20 / 10 | 0 | 90 | 45 | Attack may cause Darkness | ||
| SCUM / Green Slime | #027 | 24 | 1-2 / 1 | 255 | 84 | 20 | Hi-Potion | Attack may Poison | |
| CRAWL / Crawler | #028 | 84 | 1-2 / 1 | 8 | 186 | 200 | Attack may Stun / Paralyze | ||
| MUCK / Gray Ooze | #029 | 76 | 30-60 / 30 | 7 | 255 | 70 | |||
| GARGOYLE / Gargoyle | #030 | 80 | 12-24 / 12 | 8 | 132 | 80 | |||
| R.BONE / Bloodbones | #031 | 144 | 26-52 / 26 | 12 | 378 | 378 | |||
SHADOW / Shadow - Is not too tough for this point in the game, their attack has a chance to cause the Darkness status which doesn't work so it is nothing to worry about. Oddly encounters with this enemy are programmed to be an ambush or preemptive never a normal battle.
SCUM / Green Slime - Is a physical wall and will likely take 1 damage per hit from every physical attack, its physical attack is weak, but has a chance to Poison the member it hits.
CRAWL / Crawler - Deals very low physical damage, but has a very high chance to Stun / Paralyze the member they hit since they can hit up to 8 times.
MUCK / Gray Ooze - Contrary to SCUM / Green Slime this one has low physical defense, but has pretty high physical attack. It is a rare encounter so you are likely not going to encounter it often.
GARGOYLE / Gargoyle - Doesn't look too strong though its agility is quite high thus it can deal nasty damage when it hits up to 3 times.
R.BONE / Bloodbones - Can be a pretty nasty enemy due to its strength, however it will mostly appear with groups of other undead so a HARM / Dia with FIR2 / Fira should deal a lot of damage to it and its undead allies.
Floor Encounters
| Enemy | Floor Number |
|---|---|
| SHADOW / Shadow | B1 |
| SCUM / Green Slime | All |
| ZOMBIE / Zombie | B1 & B2 |
| GHOUL / Ghoul | B1 & B2 |
| BONE / Skeleton | All |
| CRAWL / Crawler | All |
| ARACHNID / Tarantula | All |
| SPIDER / Black Widow | All |
| MUCK / Gray Ooze | All |
| WrWOLF / Werewolf | All |
| GARGOYLE / Gargoyle | B2 & B3 |
| R.BONE / Bloodbones | B2 & B3 |
| SCORPION / Scorpion | B2 & B3 |
| GrWOLF / Warg Wolf | B2 & B3 |
Map B1
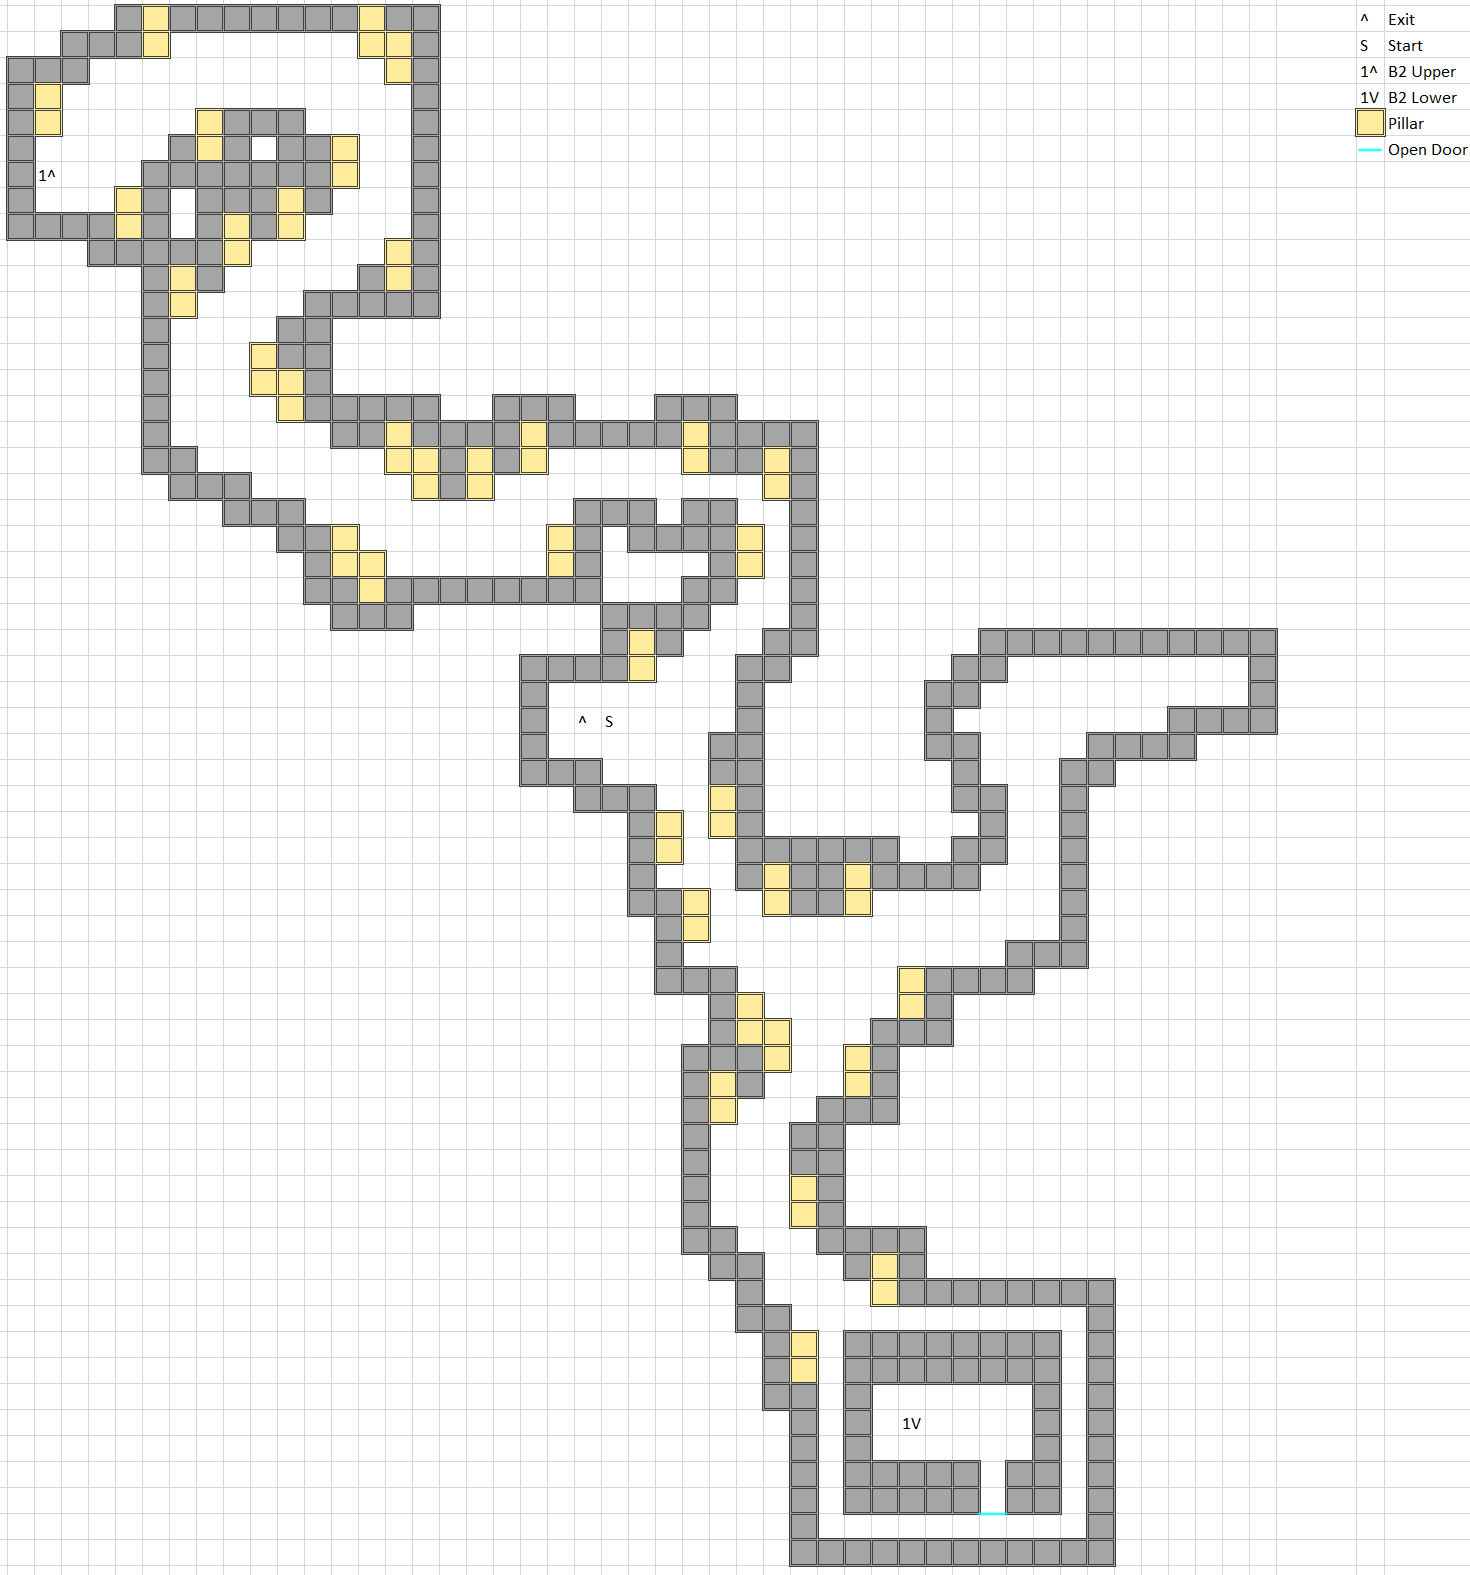
The Marsh Cave is one of a couple of dungeons that contain duplicate chests, these are chests that when opened in one area will be considered open in another and will be emptied. The first floor has two paths you can choose between, the upper path which leads to a small area with treasure or the lower path which progresses though the dungeon while containing some of the same treasure as the upper path.
Map B2
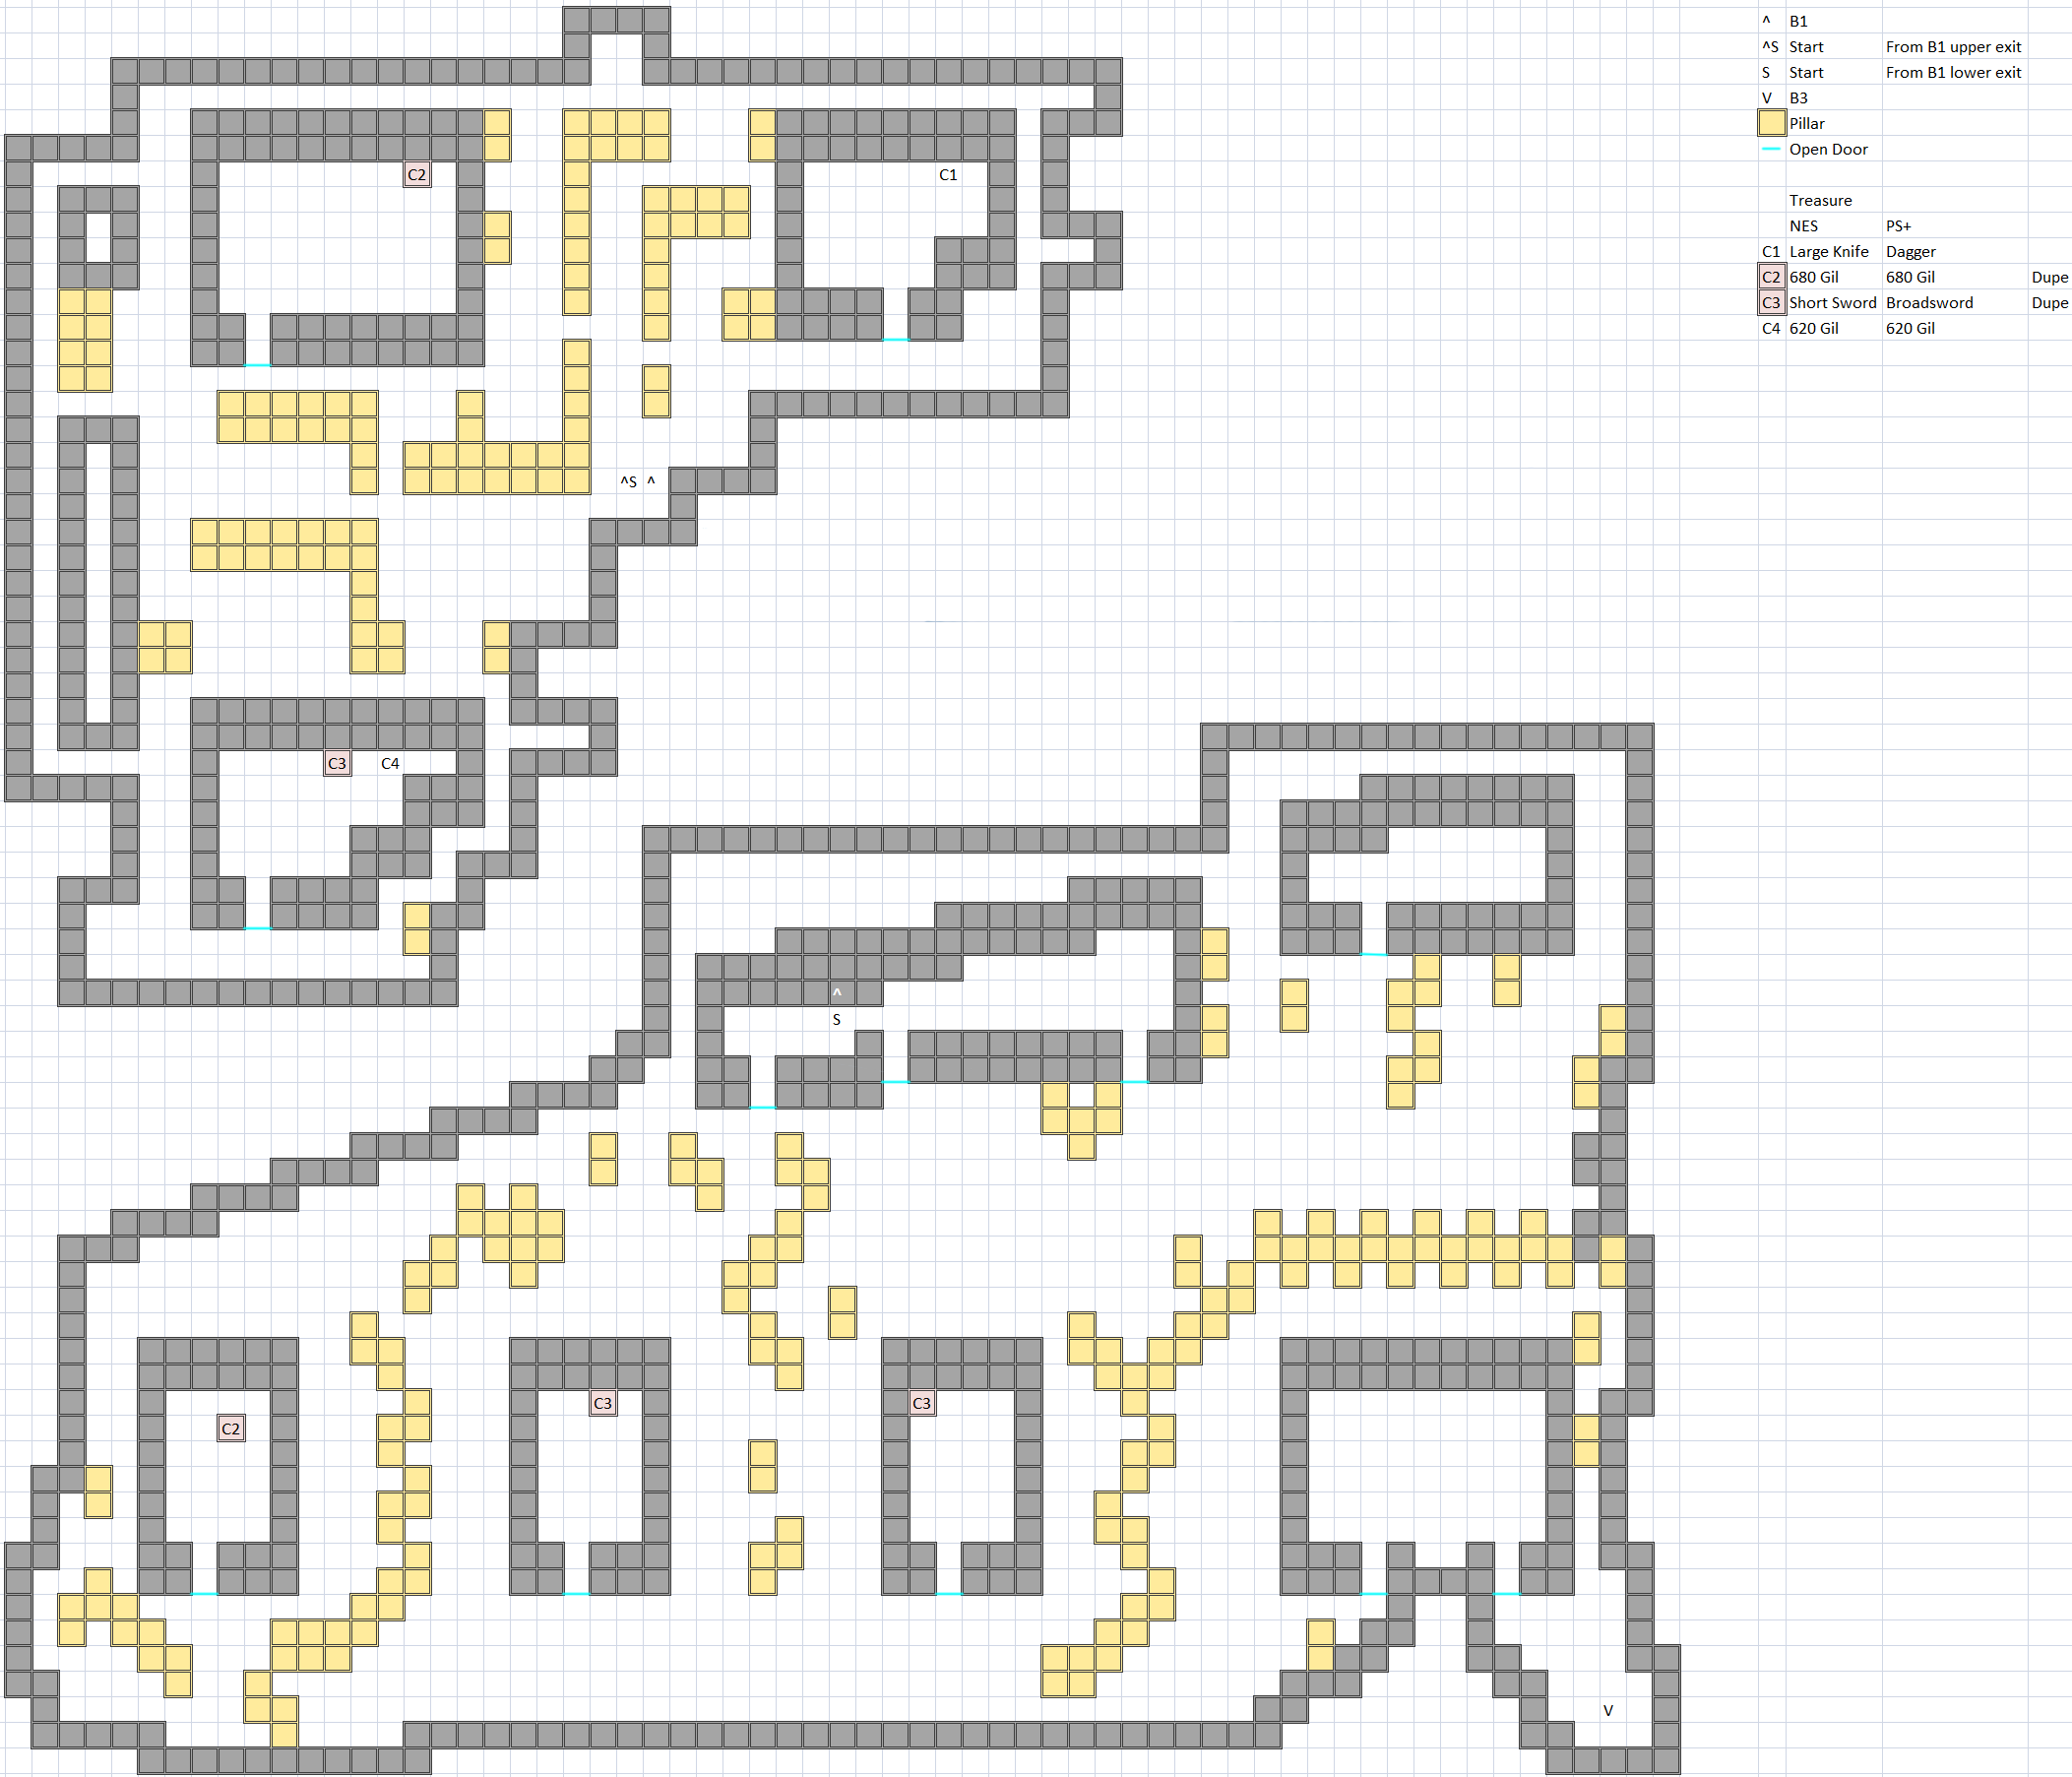
Depending on the path you chose you'll either be on the top left room of this map or the bottom, the top is simply a treasure trove full of chests while the bottom will lead you further into the Marsh Cave. On the upper path you can find a Large Dagger / Dagger for your Black Mage if you are using one, 680 gil and a Short Sword / Broadsword. The Short Sword / Broadsword chest causes 2 other chests to be empty while the 680 gil chests causes 1 chest to be empty. The lower path only has 680 gil & a Short Sword / Broadsword in a chest (as 2 of them are in this area, but due to duplicate chests you can only get 1) so I would recommend going for the upper path first if you are going for all treasures.
Map B3
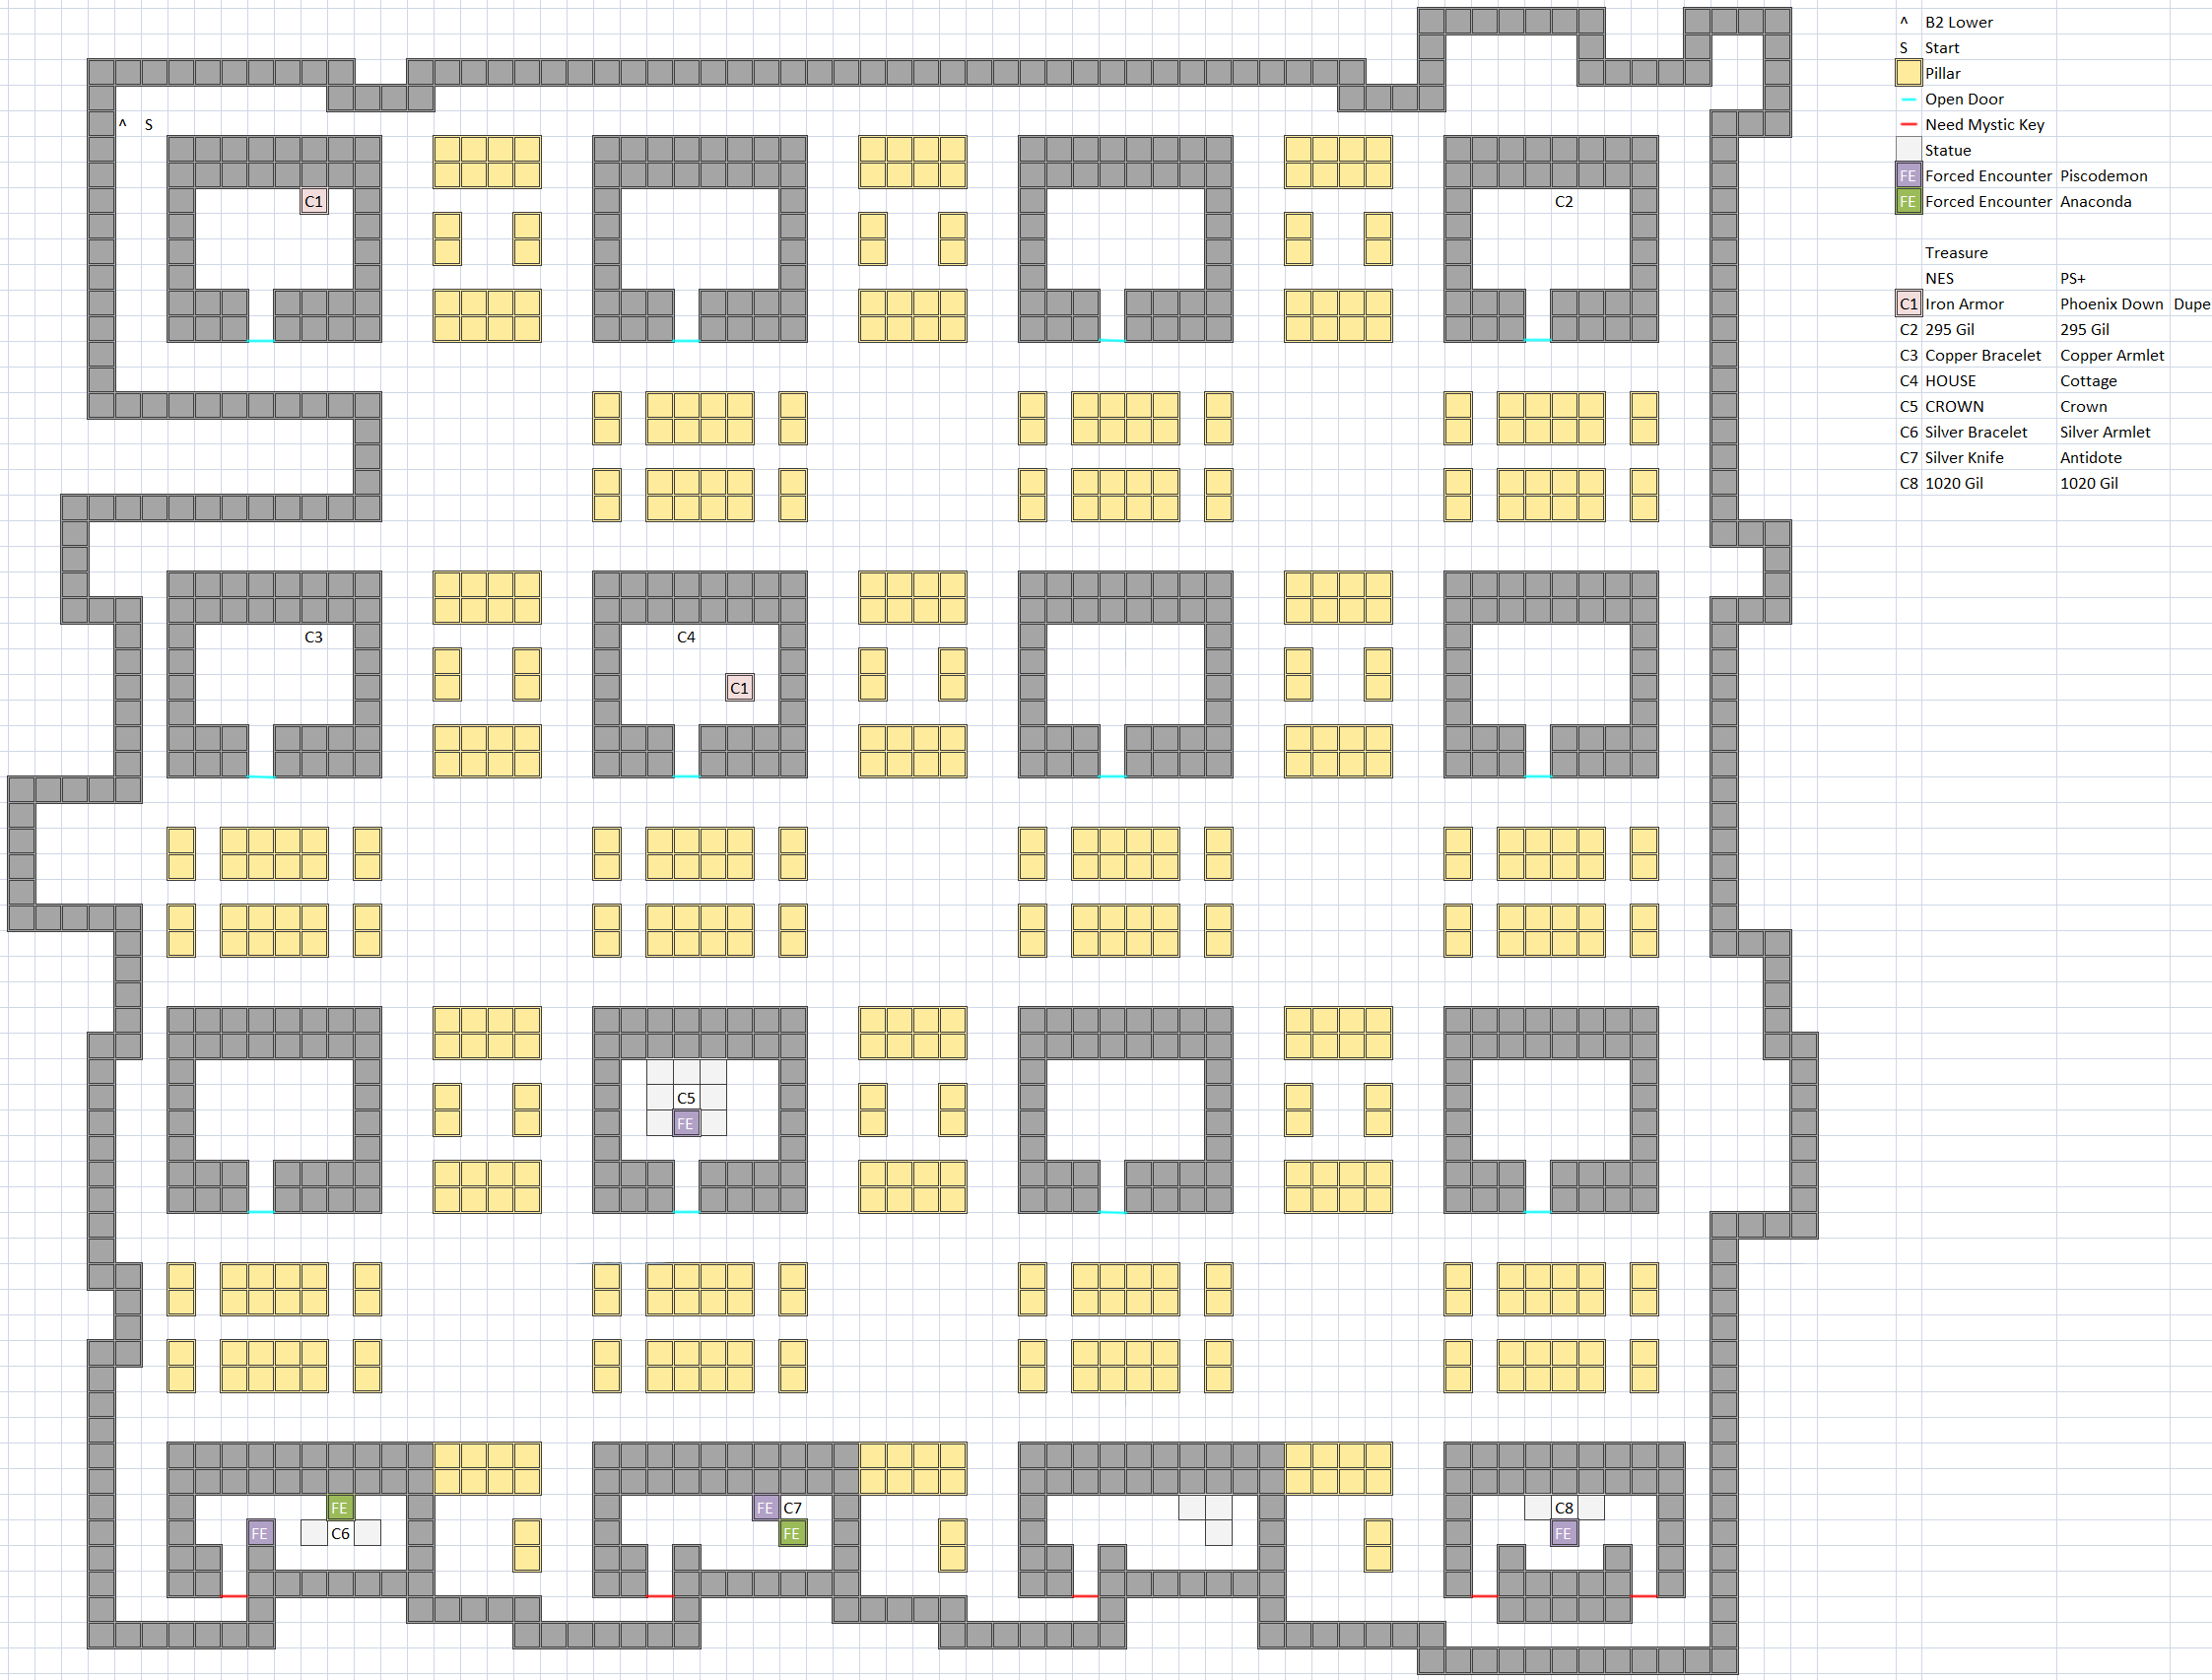
This is a large floor made up with 4 rows and 4 columns of small room, the rooms on the lowest row (4,1-4,4) are all locked for us as we need a special key to unlock them. Room 1,1 contains Iron Armor (NES / PS) or Phoenix Down (DoS+) getting this chests empties one at room 2,2. Room 2,1 contains a Copper Bracelet / Copper Armlet which if you didn't buy one at Elfland / Elfheim you can use this one, preferably on one of your two lower members that need defense since it give more defense than the evade penalty. Room 2,2 contains a HOUSE / Cabin which will be useful for when we leave with the spoils from Room 3,2 which is the one we came here for as it has the Crown we need for the King at Western Keep, there is a fixed encounter tile in front of the treasure chest.
Fixed Encounter
WIZARD / Piscodemon (#032)
HP: 84
Attack: 30-60 (NES) / 30 (PS+)
Defense: 16
EXP: 276
Gil: 300
Weak: —
Resist:
Drop: None
While not exactly a boss this enemy is flagged as unrunable so you will have to defeat it to get the Crown, it will appear in as little as a group of 2 to as much as a group of 4. Despite the name WIZARD on the NES they have no magic attacks and can hit really hard with its physical attack. They are resistance to Fire & Ice so use LIT2 / Thundara while spreading out your attacks to bring them down.
After the battle with the WIZARD / Piscodemon open the chest to collect the Crown and then make your way out of here while collecting the treasure in room 3,3 which contains 385 gil (not listed on my map) and room 1,4 which contains 295 gil. Those on DoS / Anniversary who've played the Ship mini game enough to win an Emergency Exit can use it to quickly get out without having to back track. I would recommended going back to Elfland / Elfheim to restock a bit, if you are using a Red Mage and haven't gotten to Level 10 (NES / PS) or 15 (DoS+) do so and get the FAST / Haste spell, then make your way back to the Western Keep (North from where you went West then South to get to the Marsh Cave) and save outside.
Operation: Fetch Quest
We are ready to begin a long series of events. Enter the Western Keep and speak to the King, turns out he was Astos in disguise and attacks you.
Boss
ASTOS / Astos (#033)
HP: 168 (NES / PS) / 420 (DoS+)
Attack: 26-52 (NES) / 26 (PS) / 30 (DoS+)
Defense: 40 (NES / PS) / 18 (DoS+)
EXP: 2,250
Gil: 2,000
Weak: —
Resist: —
Drop: Mythril Sword (Rare)
Astos can be the first challenging boss since he has actual spells in his repertoire such as RUB / Death which can instantly kill a party member (if unlucky that it connects), SLOW / Slow & SLO2 / Slowga to lower your hit count, SLEP / Sleep to cause a unit to be unable to act, FAST / Haste to increase his hit count as well as FIR2 / Fira & LIT2 / Thundara to damage your entire party. If you bought MUTE / Silence you can shut down Astos' magic use and will have him resort to his physical attack which is not too much to worry about. If you have FAST / Haste use it on your strongest physical attackers to take Astos down, also it would be recommendable to put your mages as the tanks for this battle since Death has a higher chance to miss them.
After defeating Astos you will receive the Crystal Eye which you should go back to Matoya's Cave and give it to her, you may have noticed a room on the Southwest of the screen as you entered the King's room, you can't access that area yet as we need an item that we are getting soon to open the door. When you give Matoya her Crystal Eye back she will give you an HERB / Jolt Tonic in return which will wake up the sleeping Prince of Elfland / Elfheim so make your way back there. When you return to the castle speak to the Healer who will apply the HERB / Jolt Tonic and wake the Prince up, as he wakes up wondering if he's still dreaming he will give you the Mystic Key this item opens up a lot of options for us in terms of items & equipment we can now get. When leaving the castle don't fully go all the way down as you have one tile you can go to the outer perimeter of the castle to a room in the upper right corner which has 4 chests which contain a Silver Hammer / Mythril Hammer a weapon upgrade for your White Mage as it has 12 Attack and 5 Accuracy (which is 3 & 5 more respectively than your Iron Hammer / Hammer), 400 gil (NES / PS) / 800 gil (DoS+), 330 gil (NES / PS) / 700 gil (DoS+), & Copper Gauntlets / Bronze Gloves for your Fighter / Warrior which has 2 Defense with -3 Evade and a Weight of 3 (which is 1 more Defense and 1 less evade than the Glove / Leather Gloves you had).
Now that we are in possession of the Mystic Key we can go to a couple of old areas for some new goodies, let's start with Temple of Fiends / Chaos Shrine the first dungeon of the game. When we were here previously we only had access to the left half of the area, now we have access to the right half. Both areas are guarded by GARGOYLE / Gargoyles the same ones we fought at the Marsh Cave who should pose no threat, note the upper right room you have to fight them twice, once when you enter to get both chests and one more when you have to leave. The lower right room has a Rune Sword / Rune Blade in it this can be equipped by the Fighter / Warrior, Thief & Red Mage it deals extra damage to spellcaster like monsters (not on NES due to a bug) it has 18 Attack and 15 Accuracy and is one of the strongest weapons the Thief can equip. The upper right room has a Were Sword / Werebuster in the chest leading into the room which is exactly like the Rune Blade except a Thief can't equip this, the Were Sword / Werebuster deals extra damage to enemies who are were type enemies (not on NES due to bug), and a SOFT Potion / Gold Needle. Those on NES / Origins can sell the swords if you have the Silver Sword / Mythril Sword for Fighter / Warrior & Red Mage.
Next area for our trip is Castle Coneria / Cornelia, at the castle take the Eastern path from where you start to enter the treasure room, you could've come here earlier, but these doors were locked by the Mystic Key. The left room has an Iron Armor, an Iron Shield (NES / PS) / Tent (DoS+) & TNT / Nitro Powder...why they would have that in the castle is beyond me, but it is important due to the fanfare. The right room contains a Iron Staff (NES / PS) / Cottage (DoS+), a Sabre / Saber & Silver Knife / Mythril Knife if you were using a Black Mage this is a nice upgrade for them, the Mythril Knife has 10 Attack and 15 accuracy (3 & 5 more respectively than the Large Dagger / Dagger found from the Marsh Cave). If you haven't done so yet since Astos sell excess equipment and rest up at Coneria / Cornelia and then head back to the Western Keep where we fought Astos.
At Western Keep you should've noticed the room Southwest from where we fought Astos, previously we didn't have the Mystic Key to access it though now we do so follow the path East of where the throne room is and circle around to the room at the bottom. The treasure room has 3 chests all guarded from the bottom, if you don't want to fight the enemies open the chests from the sides. The left chest contains a Power Staff which you can give to your Black Mage if you have one, though while more powerful than the Silver Knife / Mythril Knife (12 vs. 10) it does not provide boosted accuracy thus having lower damage (15 vs. 0), it is better sold since you can get a lot of gil for it. The middle chest contains a Falchon / Falchion if you already have the Rune Sword / Rune Blade you won't need this weapon other than extra gil for selling. The right chest contains Iron Gauntlets / Steel Gloves for the Fighter / Warrior this gives 4 Defense with -5 Evade and a Weight of 5, equip it on them as it is better than the Copper Gauntlets / Bronze Gloves.
| Name | Bestiary | HP | Attack | Defense (NES / PS+) | EXP | Gil | Weak | Drop | Notes |
|---|---|---|---|---|---|---|---|---|---|
| MUMMY / Mummy | #034 | 80 | 30-60 / 30 | 20 | 300 | 300 | Attack may Sleep | ||
| IMAGE / Wraith | #035 | 86 | 22-44 / 22 | 12 / 4 | 231 | 231 | Crosier | Attack may Stun / Paralyze | |
MUMMY / Mummy - Guards the left and right chests since you have no reason to hold back use FIR2 / Fira and HARM / Dia or HRM2 / Diara (if you bought it) to take care of them, their physical attack has a chance to sleep the member it hits.
IMAGE / Wraith - Guards the middle chest, their physical attack has a chance to stun / paralyze the member it hits. Strategy is the same as MUMMY / Mummy for it.
With that done either rest at Elfland / Elfheim or make you way to the Marsh Cave and use a HOUSE / Cottage outside (NES players use a Tent afterward to keep your spell charges) and make you way back to B3 of the cave. With the Mystic Key we now have access to the bottom row of rooms we didn't on our previous visit. Room 4,1 has a WIZARD / Piscodemon encounter one tile right of the entrance so go around that, the chest has a new fixed encounter with COBRA / Anaconda if you approach from the top. The chest contains a Silver Bracelet / Silver Armlet which can be equipped by everyone, it gives 15 Defense with -1 Evade and a Weight of 1, you can give it to any member who doesn't already surpass 15 Defense already and needs it (including Black Belt / Monk if they aren't Lv. 15 on NES). Room 4,2 has a WIZARD / Piscodemon encounter to the left of the chest and COBRA / Anaconda encounter on the bottom, on NES you have to pick one of these two encounters while Origins onward can skip the encounters by taking the extra tile to the right, this chest contains a Silver Knife (NES / PS) / Antidote (DoS+). Room 4,4 has a fixed encounter with WIZARD / Piscodemon that you can't avoid, the chest contains 1,020 gil.
| Name | Bestiary | HP | Attack | Defense (NES / PS+) | EXP | Gil | Weak | Drop | Notes |
|---|---|---|---|---|---|---|---|---|---|
| COBRA / Anaconda | #036 | 80 | 22-44 / 22 | 12 / 10 | 165 | 50 | Attack may Poison | ||
COBRA / Anaconda - Is basically a stronger ASP / Cobra, you shouldn't have problems dealing with these enemies.
When you finish make you way back to Elfland / Elfheim buy enough SOFT Potion / Gold Needles so that you have at least 5 and restock on HEAL Potion / Potions and get up to 60 also restock on PURE Potion / Antidotes and Ethers at Pravoka for Origins players using MP and DoS+. Sell the extra equipment you have no use for and rest at the Inn at Coneria / Cornelia.
Onto new Venture
After you've restocked on items and have the TNT / Nitro Power sail along the coast of Coneria / Cornelia and follow it West then North until you see a place to dock your ship. Head West and South until you see mountains and head into the cave. This is the Dwarf Cave / Mount Duergar you could've explored here earlier, but you wouldn't have much to do. Head up from the entrance to a room with 2 chests the bottom having 575 gil and the other having 450 gil. The other room at the top has a Dwarf who is looking for a material called ADAMANT / Adamantite, those using a Fighter / Warrior will want to remember this NPC for later if you choose to class change. With the Mystic Key we have access to the room on the bottom left which is a treasure trove with 7 chests. The top left corner contains a CABIN / Tent and an Iron Helmet / Great Helm which can be equipped by the Fighter / Warrior and has 5 Defense with -5 Evade and a Weight of 5 (2 more defense and 2 less evade than the previous Wooden Helmet / Helm). The center of the room contains a Dragon Sword / Wyrmkiller the best weapon the Thief will have until near the end of the game, it has 1 more attack than the Rune Blade and the same accuracy, its special effect is added damage to Dragon type monsters (not on NES due to bug), a Silver Knife (NES / PS) / Ether (DoS+) and a Wooden Helmet (NES / PS) / Potion (DoS+). The right side of the room contains a Silver Armor / Mythril Mail which has 18 Defense -8 Evade and a Weight of 8, the Fighter / Warrior should have a better piece of armor (Iron Armor), but those using a Red Mage can finally give him a better armor than the Chain Mail, 575 Gil and a HOUSE / Cottage. After ransacking the treasury talk to the Dwarf outside of this room and he'll ask to use the TNT / Nitro Powder to open the canal so the West can be traveled through since it was blocked off. Those on DoS+ will notice a whirlpool as the camera scrolls down, like the cave you saw near the Chaos Shrine this is another bonus dungeon we can go to later as like the previous one it is blocked by a statue. Make your way back to the Ship and sail to the newly opened path to see the town of Melmond.
Melmond
Enemies around here from the dock upward are the same as those from Elfland / Elfheim. Those under the docks and to the West however have some new enemies.
Enemies
| Name | Bestiary | HP | Attack | Defense | EXP | Gil | Weak | Drop | Notes |
|---|---|---|---|---|---|---|---|---|---|
| SPIDER / Black Widow | #006 | 28 | 10-20 / 10 | 0 | 30 | 8 | |||
| GrWOLF / Warg Wolf | #008 | 72 | 14-28 / 14 | 0 | 93 | 22 | Antidote | ||
| GHOUL / Ghoul | #011 | 48 | 8-16 / 8 | 6 | 93 | 50 | Attack may Stun / Paralyze | ||
| OGRE / Ogre | #014 | 100 | 18-36 / 18 | 10 | 195 | 195 | |||
| GrOGRE / Ogre Chief | #015 | 132 | 23-46 / 23 | 14 | 282 | 300 | |||
| ARACHNID / Tarantula | #023 | 64 | 5-10 / 5 | 12 | 141 | 50 | Attack may Poison | ||
| GHAST / Ghast | #024 | 56 | 8-16 / 8 | 10 | 117 | 117 | Attack may Stun / Paralyze | ||
| SHADOW / Shadow | #026 | 50 | 10-20 / 10 | 0 | 90 | 45 | Attack may cause Darkness | ||
| HYENA / Hyenadon | #037 | 120 | 22-44 / 22 | 4 | 288 | 72 | Power Plus | ||
| TIGER / Lesser Tiger | #038 | 132 | 22-44 / 22 | 8 | 438 | 108 | X-Potion | ||
HYENA / Hyenadon - Is not too terribly strong of an enemy, they are an uncommon encounter though.
TIGER / Lesser Tiger - Can be somewhat of a threat if it comes in groups of 3, they are a pretty rare encounter though.
The town of Melmond is a pretty bleak place, the townspeople speak of a Vampire that destroyed the Clinic and Item Shop so you will not be able to stock up on items here. At the Northeast of the town you meet the "famous" Dr. Unne, at the moment he has nothing of importance for us. If you want to use the Magic for your White & Black Mage you must be level 12 on NES / PS and 19 on DoS+.
Inn cost: 100
Weapon Shop
| Item | Cost (NES / PS Normal) | Cost (PS Easy / DoS+) | Attack | Accuracy | User |
|---|---|---|---|---|---|
| Iron Staff / Crosier | 200 | 160 | 14 | 0 | Fighter / Warrior, Black Belt / Monk, Ninja |
| Sabre / Saber | 450 | 360 | 13 | 5 | Fighter / Warrior, Thief, Red Mage |
| Long Sword / Longsword | 3,000 | 1,200 | 20 | 10 | Fighter / Warrior, Red Mage, Ninja |
| Falchon / Falchion | 450 | 360 | 15 | 10 | Fighter / Warrior, White Mage, Ninja |
DoS+: While the Longsword seems like a good purchase for your Warrior or Red Mage we can get the same weapon NES / PS players have had since before Marsh Cave if you are using either of those 2 classes.
Armor Shop
| Item | Cost (NES / PS Normal) | Cost (PS Easy / DoS+) | Defense | Evade | Weight | User |
|---|---|---|---|---|---|---|
| Steel Armor / Knight's Armor | 45,000 | 36,000 | 34 | -33 | 33 | Fighter / Warrior |
| Silver Bracelet / Silver Armlet | 5,000 | 4,000 | 15 | -1 | 1 | Everyone |
| Iron Helmet / Great Helm | 450 | 360 | 5 | -5 | 5 | Fighter / Warrior, Ninja |
| Copper Gauntlets / Bronze Gloves | 200 | 160 | 2 | -3 | 3 | Fighter / Warrior, Ninja |
| Iron Gauntlets / Steel Gloves | 750 | 600 | 4 | -5 | 5 | Fighter / Warrior, Ninja |
While the Steel Armor / Knight's Armor may seem like a worthwhile armor to have it's better to save gil as we will eventually get armor that is as powerful without the large weight hindrance. The Silver Bracelet / Silver Armlet is definitely worth the cost as everyone can equip it, those on NES whose Monk isn't at level 15 will get a slight boost to defense with a minimal evade drop.
White Magic Shop
| Spell (NES / PS+) | Cost (NES / PS Normal) | Cost (PS Easy / DoS+) | NES / PS effect | DoS+ effect | MP Cost | User |
|---|---|---|---|---|---|---|
| CUR3 / Curaga | 8,000 | 4,000 | Heal 66-132 HP to one ally. | Restores a lot of HP to one ally. | 20 | White Mage, Red Mage |
| LIFE / Life | 8,000 | 4,000 | Revives a slain ally with 1 HP (Doesn't work in battle on NES). | Revives one KO'd ally. | 20 | White Mage, Red Wizard |
| HRM3 / Diaga | 8,000 | 4,000 | Deal 60-240 damage to all undead enemies. | Deals damage to all undead foes. | 25 | White Mage |
| HEL2 / Healara | 8,000 | 4,000 | Restore 24-58 HP to all allies. | Restores HP to entire party. | 25 | White Mage |
CUR3 / Curaga - The third tier single target healing spell, a nice spell to get for party members who take a big hit and need healing fast.
LIFE / Life - Necessary on NES & PS where you don't have Phoenix Downs to revive members who die and don't want to walk back to a Clinic, do know that it won't work in-battle on the NES version. Remakes can decide if you want it or Phoenix Down for reviving dead members.
HRM3 / Diaga - The third tier undead damaging spell White Mages have, this one is a bit overkill as not many undead have the HP to warrant buying unless on NES and you want to beat the next bosses in one round with a Red or Black Mage using FIR3 / Firaga.
HEL2 / Healara - The second tier party healing spell for White Mages. HEL2 on NES is bugged as one would expect, however it's bugged in a good way, in battle it functions like the HEL3 spell instead, but outside it acts like it normally would.
Black Magic Shop
| Spell (NES / PS+) | Cost (NES / PS Normal) | Cost (PS Easy / DoS+) | NES / PS effect | DoS+ effect | MP Cost | User |
|---|---|---|---|---|---|---|
| FIR3 / Firaga | 8,000 | 4,000 | Deal 50-200 damage to all enemies, deal more if enemy is weak to Fire. | Deals fire damage to all foes. | 30 | Red Mage, Black Mage |
| BANE / Scourge | 8,000 | 4,000 | Can instantly kill all enemies. | Instantly kills all foes. | 28 | Black Mage, Red Wizard |
| SLO2 / Slowra | 8,000 | 4,000 | Lowers an enemy HIT count to 1. | Reduces one foe's number of attacks. | 18 | Red Mage, Black Mage |
| WARP / Teleport | 8,000 | 4,000 | Move the party back one floor. | Transport party to previous floor. | 5 | Black Mage |
FIR3 / Firaga - The high tier Fire damaging spell which is very useful for most of the game with the abundance of undead present.
BANE / Scourge - An instant death spell that doesn't have too high of a hit rate so it will often miss.
SLO2 / Slowra - Is good for lowering 1 enemies hit count since it will hit more often than SLOW / Slow, unlike SLOW / Slow it is counted as Non-Elemental so it can bypass enemies who have Time resistance.
WARP / Teleport - Will take you back 1 floor when used in a dungeon.
Those who have a Fighter / Warrior or a Red Mage will want to explore an area we can access with the Ship. From the dock at Melmond head South until you see the bottom tip of the island that looks like tail and head West until you see land and sail under it to dock your Ship.
Enemies
Crescent Island
| Name | Bestiary | HP | Attack | Defense | EXP | Gil | Weak | Drop | Notes |
|---|---|---|---|---|---|---|---|---|---|
| SCORPION / Scorpion | #025 | 84 | 22-44 / 22 | 10 | 225 | 70 | Spider's Silk | Attack may Poison | |
| COBRA / Anaconda | #036 | 80 | 22-44 / 22 | 12 / 10 | 165 | 50 | Attack may Poison | ||
| BULL / Minotaur | #039 | 164 | 22-44 / 22 | 4 | 489 | 489 | Knife | ||
| GIANT / Hill Gigas | #040 | 240 | 38-76 / 38 | 12 | 879 | 879 | Tent | ||
| TROLL / Troll | #042 | 184 | 24-48 / 24 | 12 | 621 | 621 | 9 HP Regen per turn (not on NES) | ||
| PEDE / Ankheg | #050 | 222 | 39-78 / 39 | 20 | 1194 | 300 | Attack may Poison | ||
BULL / Minotaur - Can hit pretty hard and can hit twice per attack.
GIANT / Hill Gigas - Is basically a stronger OGRE / Ogre.
TROLL / Troll - Is about as dangerous as BULL / Minotaur with the added weakness of Fire, they regenerate 9 HP every round they are up (not on NES).
PEDE / Ankheg - Is quite dangerous as they can hit very hard and up to 3 times as well as possible Poison with their attack.
When you leave your ship head West and hug the lake as you go counterclockwise and head into the town. Don't be afraid to go all out with your magic since you can rest in the town if you need to.
Crescent Lake
This area we aren't supposed to visit yet technically as we need to finish the Earth Cave / Cavern of Earth to get more access of the map, but you can shop here since the stores allow you to buy stuff barring the level 6 magic shops which we shouldn't worry about yet. You can visit the Circle of Sages on the Eastern part of town if you want to get info on what to do.
Inn cost: 200
Weapon Shop
| Item | Cost (NES / PS Normal) | Cost (PS Easy / DoS+) | Attack | Accuracy | User |
|---|---|---|---|---|---|
| Silver Knife / Mythril Knife | 800 | 640 | 10 | 5 | Fighter / Warrior, Thief, Red Mage, Black Mage |
| Silver Sword / Mythril Sword | 4,000 | 3,200 | 23 | 15 | Fighter / Warrior, Red Mage, Ninja |
| Silver Hammer / Mythril Hammer | 2,500 | 2,000 | 12 | 5 | Fighter / Warrior, White Mage, Ninja |
| Silver Axe / Mythril Axe | 4,500 | 3,600 | 25 | 10 | Fighter / Warrior, Ninja |
DoS+: The Mythril Sword which we didn't have access to is finally in our grasp and is a much better weapon to use until you class change (if you choose to do so).
Armor Shop
| Item | Cost (NES / PS Normal) | Cost (PS Easy / DoS+) | Defense | Evade | Weight | User |
|---|---|---|---|---|---|---|
| Silver Armor / Mythril Mail | 7,500 | 6,000 | 18 | -8 | 8 | Fighter / Warrior, Red Mage, Ninja |
| Silver Shield / Mythril Shield | 2,500 | 2,000 | 8 | 0 | 0 | Fighter / Warrior |
| Buckler | 2,500 | 2,000 | 2 | 0 | 0 | Fighter / Warrior, Thief, Red Mage |
| Silver Helmet / Mythril Helm | 2,500 | 2,000 | 8 | -3 | 3 | Fighter / Warrior, Ninja |
| Silver Gauntlets / Mythril Gloves | 2,500 | 2,000 | 6 | -3 | 3 | Fighter / Warrior, Ninja, Red Wizard |
With the exception of Silver Armor / Mythril Mail all Silver / Mythril equipment is an upgrade for the Fighter / Warrior, if you have a Thief or Red Mage the Buckler is an option of a shield for them to increase their defense.
White Magic Shop
| Spell (NES / PS+) | Cost (NES / PS Normal) | Cost (PS Easy / DoS+) | NES / PS effect | DoS+ effect | MP Cost | User |
|---|---|---|---|---|---|---|
| SOFT / Stona | 20,000 | 13,000 | Removes Stone from an ally. | Cures Stone. | 10 | White Mage |
| EXIT / Exit | 20,000 | 13,000 | Takes the party out of a dungeon. | Transports party out of dungeon. | 25 | White Wizard, Red Wizard |
| FOG2 / Protera | 20,000 | 13,000 | Increase all allies Absorb by 12. | Raises party's defense (+12). | 20 | White Mage, Red Wizard |
| INV2 / Invisira | 20,000 | 13,000 | Increase all allies Evade by 40. | Raises party's evasion (+40). | 25 | White Mage, Red Wizard |
SOFT / Stona - You won't often find yourself using anywhere near enough SOFT Potion / Gold Needles to make this spell worth getting.
EXIT / Exit - Is very nice for getting out of dungeons without the hassle of backtracking, and is also the only way NES players are able to leave the endgame dungeon.
FOG2 / Protera - A good spell for buffing the groups defense, more useful on DoS+ where there are bosses worth using it for.
INV2 / Invisira - A nice spell to buff the groups evade making more hits less likely to hit, I would not recommend buying since there is an item that casts this as a spell for free.
Black Magic Shop
| Spell (NES / PS+) | Cost (NES / PS Normal) | Cost (PS Easy / DoS+) | NES / PS effect | DoS+ effect | MP Cost | User |
|---|---|---|---|---|---|---|
| LIT3 / Thundaga | 20,000 | 13,000 | Deal 60-240 damage to all enemies, deal more if enemy is weak to Thunder. | Deals lightning damage to all foes. | 35 | Black Mage, Red Wizard |
| RUB / Death | 20,000 | 13,000 | Can instantly kill an enemy. | Instantly kills one foe. | 30 | Black Mage |
| QAKE / Quake | 20,000 | 13,000 | Can instantly kill all enemies. | Calls an earthquake to swallow foes. | 32 | Black Mage |
| STUN / Stun | 20,000 | 13,000 | Paralyze most enemies with less than 300 HP. | Paralyzes one foe. | 20 | Black Mage |
LIT3 / Thundaga - The high tier Lightning damaging spell which is good to have another multi target option on a different spell charge / magic level.
RUB / Death - The least accurate instant death spell, I wouldn't recommend it over doing damage which would secure a kill over this.
QAKE / Quake - The worst of the instant death spells because a lot of enemies resist Quake and thus is not worth getting.
STUN / Stun - An upgrade to HOLD / Hold though just as worthless.
Item Shop
| Item (NES / PS+) | Cost (NES / PS Normal) | Cost (PS Easy / DoS+) | Effect NES / PS | Effect DoS+ |
|---|---|---|---|---|
| HEAL Potion / Potion | 60 | 40 | Heal one ally for 30 HP outside of battle (16-32 in battle). | Restore 50 HP. |
| Hi-Potion | — | 150 | — | Restores 150 HP. |
| Ether | — | 150 | — | Restore 50 MP. |
| Phoenix Down | — | 500 | — | Revives one KO'd ally. |
| PURE Potion / Antidote | 75 | — | Removes poison from an ally. | Cures poison. |
| CABIN / Tent | 250 | 160 | Restores 60 HP and saves game. | Restores 200 HP and 100 MP. |
| HOUSE / Cottage | 3,000 | — | Recovers 120 HP and saves game, recovers Spell Charges. | Fully restores party's HP and MP. |
When you finish upgrading your equipment head back to Melmond to continue your quest.
Crystal of Earth shine forth!
Suggested Level: 12 (NES / PS), 19 (DoS+)
From Melmond head West while hugging the South side of the continent, you will eventually come to an opening to the South and a choice of going West, the West leads to Titan's Tunnel / Giant's Cave though we won't be able to go far as the Titan blocking the path wants a Ruby. Follow the path South and follow in between the mountains to enter the Earth Cave / Cavern of Earth.
Earth Cave / Cavern of Earth
Enemies
| Name | Bestiary | HP | Attack | Defense (NES / PS+) | EXP | Gil | Weak | Drop | Notes | |
|---|---|---|---|---|---|---|---|---|---|---|
| SPIDER / Black Widow | #006 | 28 | 10-20 / 10 | 0 | 30 | 8 | ||||
| GrWOLF / Warg Wolf | #008 | 72 | 14-28 / 14 | 0 | 93 | 22 | Antidote | |||
| WrWOLF / Werewolf | #009 | 68 | 14-28 / 14 | 6 | 135 | 67 | Attack may Poison, 3 HP Regen per turn (not on NES) | |||
| ASP / Cobra | #013 | 56 | 6-12 / 6 | 6 | 123 | 50 | Attack may Poison | |||
| OGRE / Ogre | #014 | 100 | 18-36 / 18 | 10 | 195 | 195 | ||||
| GrOGRE / Ogre Chief | #015 | 132 | 23-46 / 23 | 14 | 282 | 300 | ||||
| ARACHNID / Tarantula | #023 | 64 | 5-10 / 5 | 12 | 141 | 50 | Attack may Poison | |||
| GHAST / Ghast | #024 | 56 | 8-16 / 8 | 10 | 117 | 117 | Attack may Stun / Paralyze | |||
| GARGOYLE / Gargoyle | #030 | 80 | 12-24 / 12 | 8 | 132 | 80 | ||||
| WIZARD / Piscodemon | #032 | 84 | 30-60 / 30 | 16 | 300 | 276 | ||||
| MUMMY / Mummy | #034 | 80 | 30-60 / 30 | 20 | 300 | 300 | Attack may Sleep | |||
| IMAGE / Wraith | #035 | 86 | 22-44 / 22 | 12 / 4 | 231 | 231 | Crosier | Attack may Stun / Paralyze | ||
| COBRA / Anaconda | #036 | 80 | 22-44 / 22 | 12 / 10 | 165 | 50 | Attack may Poison | |||
| BULL / Minotaur | #039 | 164 | 22-44 / 22 | 4 | 489 | 489 | Knife | |||
| GIANT / Hill Gigas | #040 | 240 | 38-76 / 38 | 12 | 879 | 879 | Tent | |||
| TROLL / Troll | #042 | 184 | 24-48 / 24 | 12 | 621 | 621 | 9 HP Regen per turn (not on NES) | |||
| SPECTER / Wight | #043 | 52 | 20-40 / 20 | 20 | 150 | 150 | Attack may Stun / Paralyze | |||
| OOZE / Ochre Jelly | #044 | 76 | 32-64 / 32 | 6 | 252 | 70 | ||||
| COCTRICE / Cockatrice | #045 | 50 | 1-2 / 1 | 4 | 186 | 200 | Gold Needle | Attack may Petrify | ||
BULL / Minotaur - Can hit pretty hard and can hit twice per attack.
GIANT / Hill Gigas - Is basically a stronger OGRE / Ogre.
TROLL / Troll - Is about as dangerous as BULL / Minotaur with the added weakness of Fire, they regenerate 9 HP every round they are up (not on NES).
OOZE / Ochre Jelly - Is a very rare encounter though shouldn't offer too much of a problem.
COCTRICE / Cockatrice - Is the most dangerous enemy you'll face as they can come in large groups (as little as 2 to as much as 6) if they ambush you while appearing in a large group you may consider your run dead, unless on PR where they can still target a Petrified character, as their physical attack, while very weak, has a chance to Petrify your characters.
Floor Encounters
| Enemy | Floor Number |
|---|---|
| COBRA / Anaconda | B1 |
| BULL / Minotaur | B1 & B2 |
| ASP / Cobra | B1 & B2 |
| GrOGRE / Ogre Chief | B1-B3 |
| OGRE / Ogre | B1-B3 |
| GARGOYLE / Gargoyle | B1 & B2 |
| ARACHNID / Tarantula | B1 & B2 |
| MUMMY / Mummy | B1 & B3 |
| GrWOLF / Warg Wolf | B2 & B3 |
| WrWOLF / Werewolf | B2 & B3 |
| TROLL / Troll | B2 |
| GIANT / Hill Gigas | B2 |
| WIZARD / Piscodemon | B3 |
| SPECTER / Wight | B3 |
| GHAST / Ghast | B3 |
| IMAGE / Wraith | B3 |
| COCTRICE / Cockatrice | B3 |
| OOZE / Ochre Jelly | B3 |
Map B1
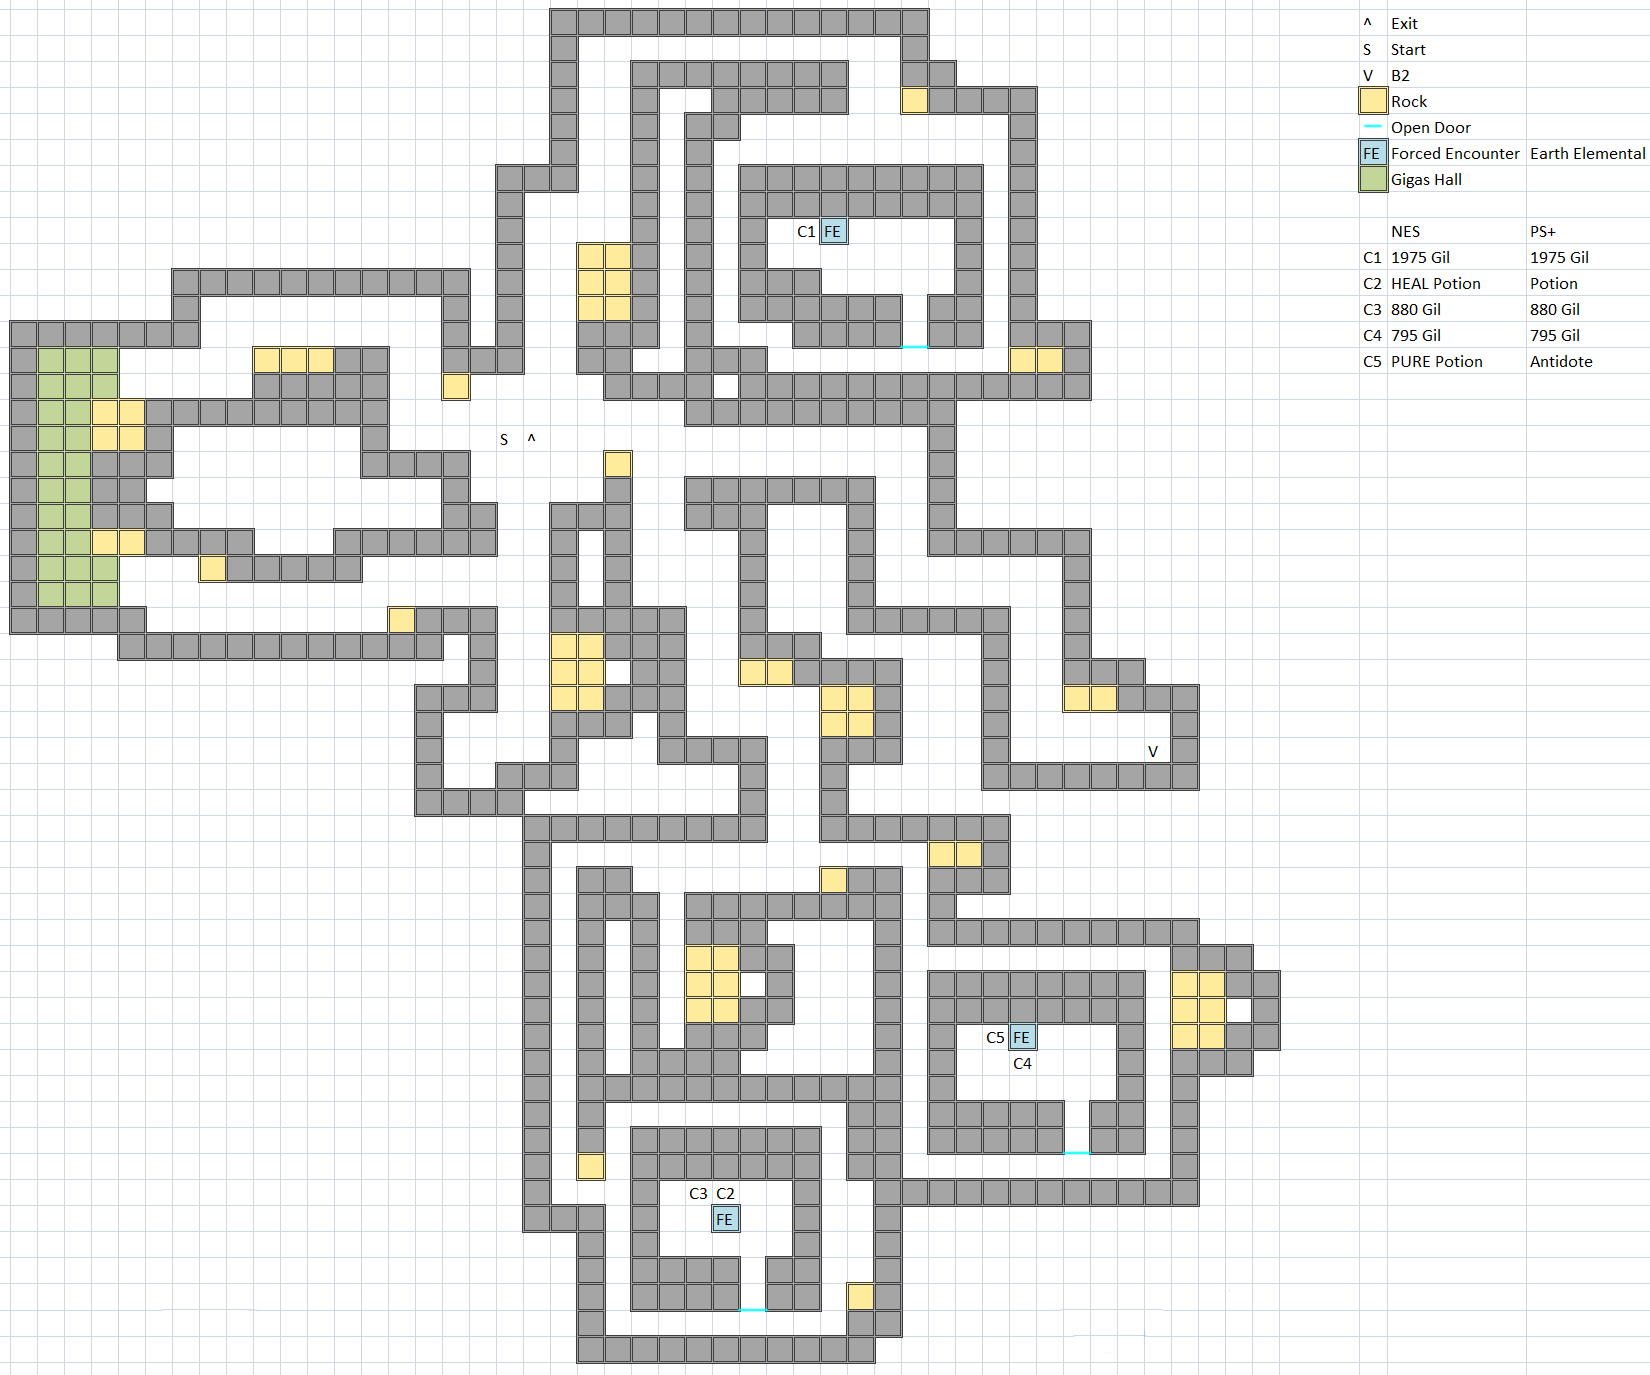
The Earth Cave / Cavern of Earth entrance sports 4 paths you can go through, the path to the left has a lot of fixed encounter points which will always feature a GIANT / Hill Gigas and occasionally an IGUANA / Lizard (for those who missed the bestiary entry at Pravoka). The North and second South paths have treasure which is guarded on a certain side by an EARTH / Earth Elemental.
| Name | Bestiary | HP | Attack | Defense | EXP | Gil | Weak | Drop | Notes |
|---|---|---|---|---|---|---|---|---|---|
| EARTH / Earth Elemental | #041 | 288 | 66-132 / 66 | 20 | 1,536 | 768 | Remedy |
EARTH / Earth Elemental - Has a very strong physical attack, thankfully it will always be by itself here. Do note that this enemy is flagged as unrunable so be sure you are committed to fighting it.
The path East will lead to the next floor.
Map B2
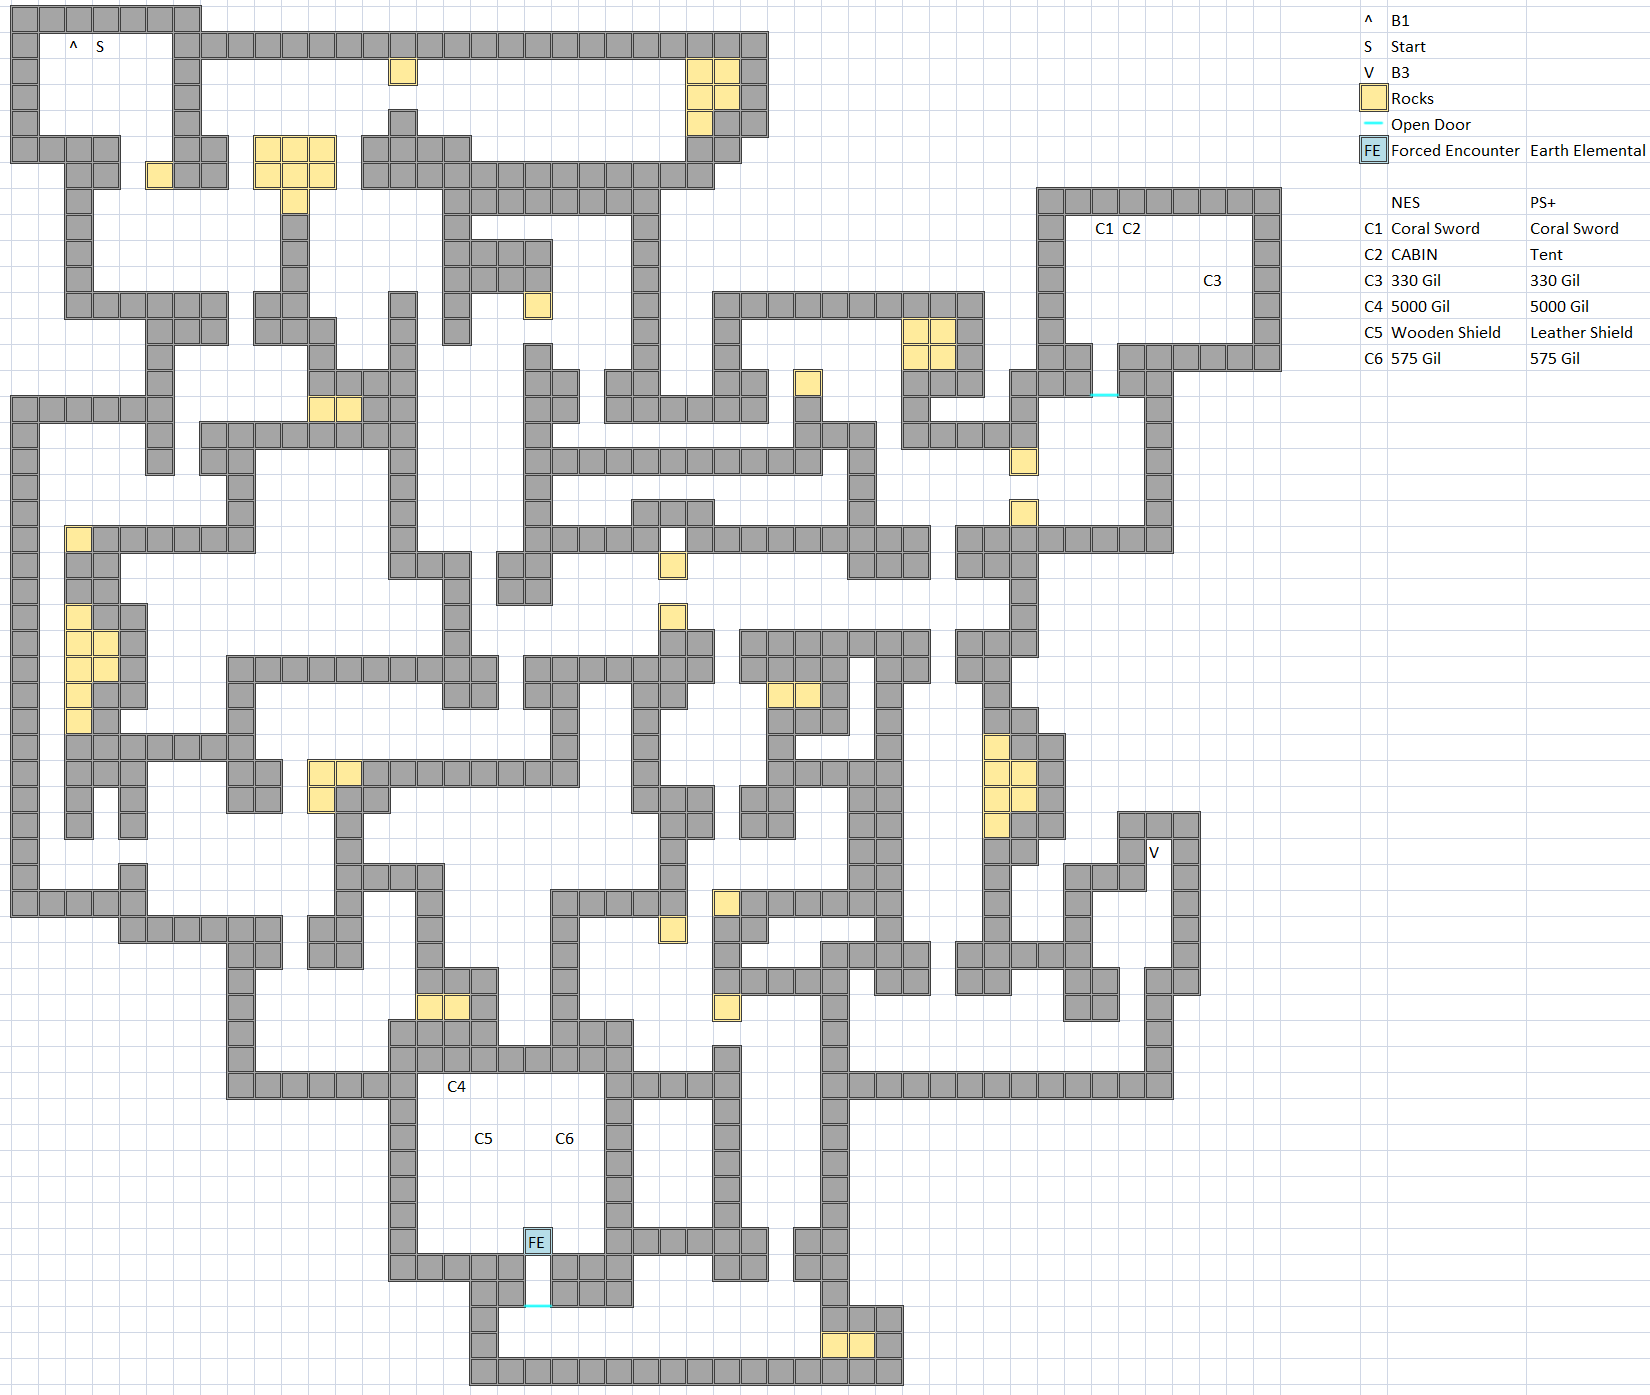
This floor features a labyrinth like maze which often have dead ends, the room at the East has 3 treasures none of which are guarded while the Southern room that branches near the stairs is guarded by an EARTH / Earth Elemental when you enter the room so you will have to fight it twice if you are going for the treasures. The Coral Sword from the Eastern room is another weapon the Thief can equip, though the Dragon Sword / Wyrmkiller has the exact same stats, the only difference (for non NES players) is that the Coral Sword deals extra damage to aquatic enemies.
Map B3
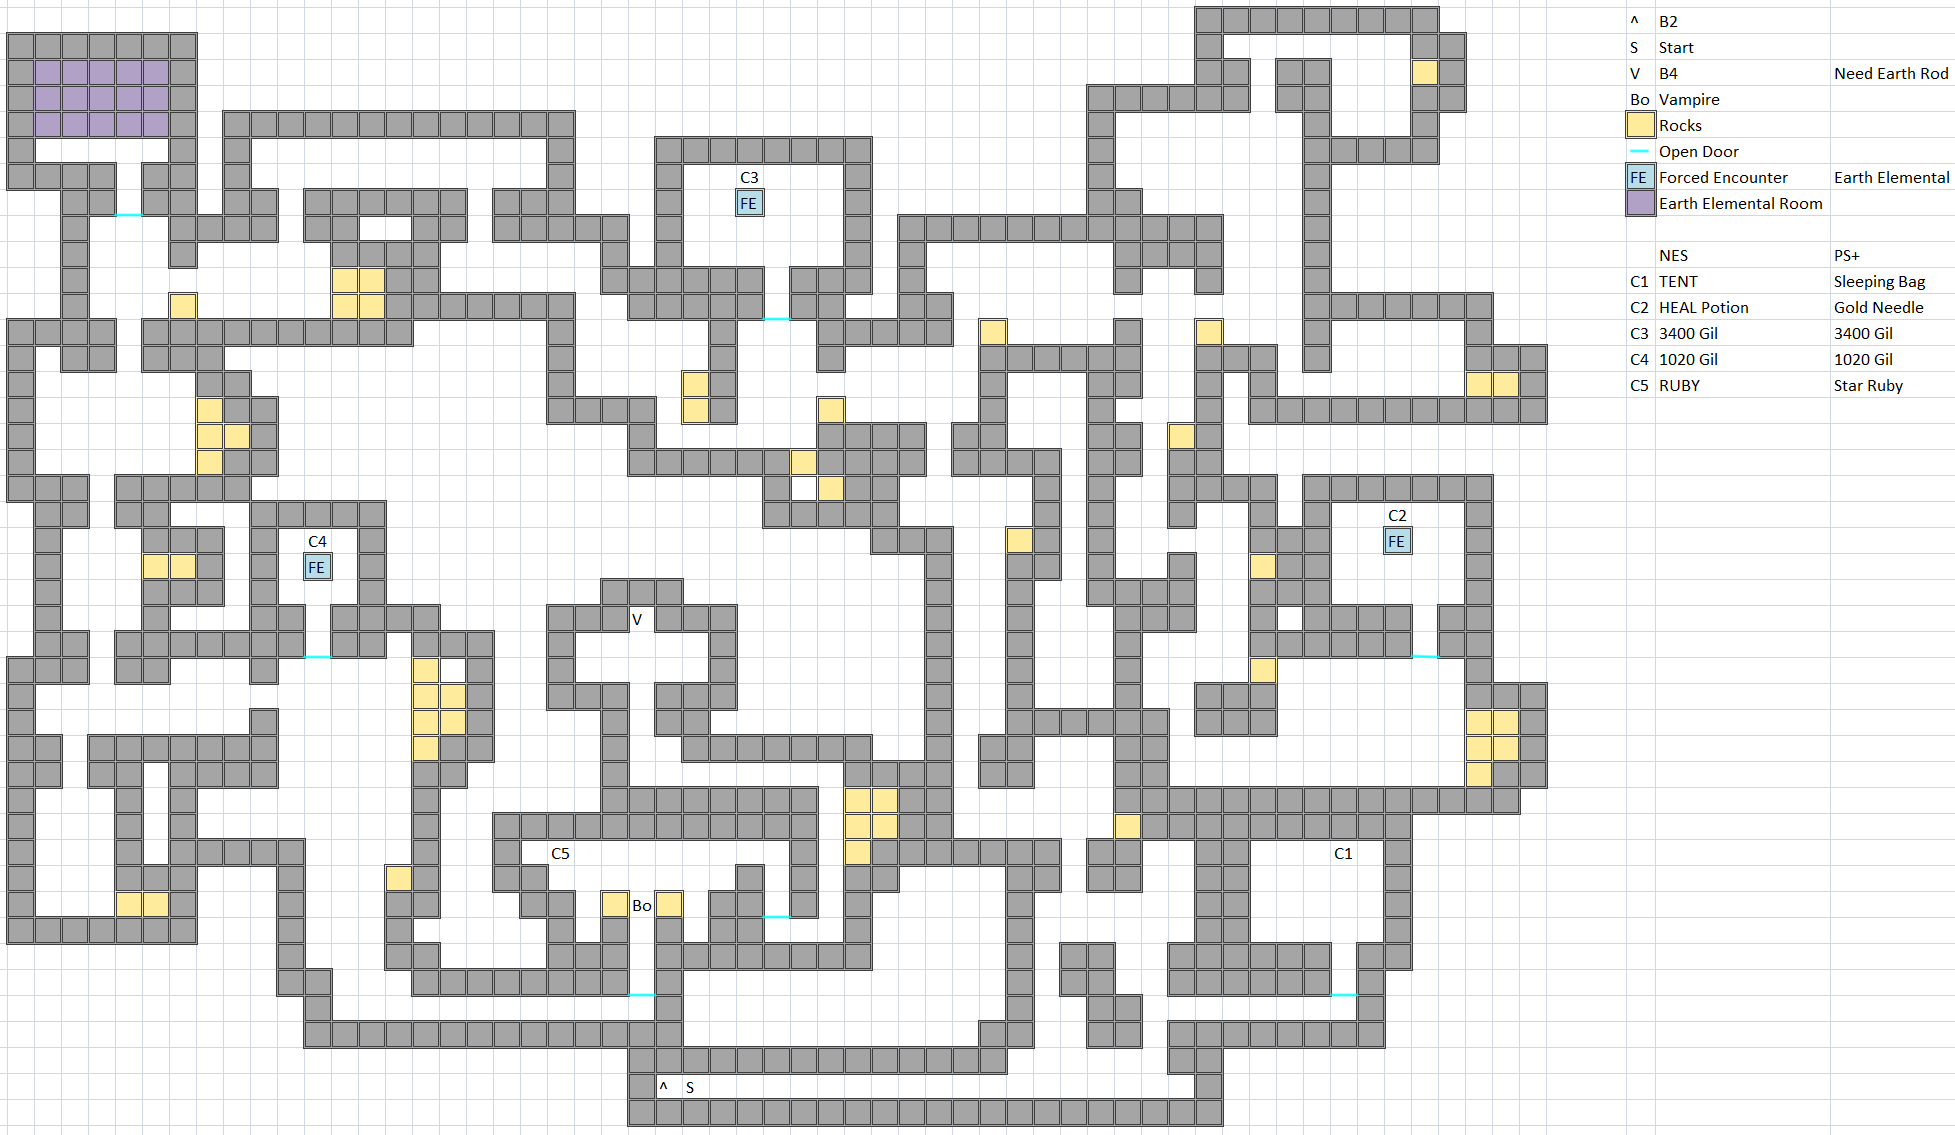
This floor features many dangerous enemies ranging from Stun locking undead via SPECTER / Wight + GHAST / Ghast in large groups & IMAGE / Wraith, an enemy that is unrunable WIZARD / Piscodemon and the enemy that may give you a game over if unlucky COCTRICE / Cockatrice (uncommon encounter). Of the 3 floors we've been to this one is more linear compared to the other 2 since there's not too many branching paths. For NES players the chest labeled C4 on the map forces you to fight the EARTH guarding it as you can't go around it. Make your way to the center room to face the mini boss of the area.
Mini Boss
VAMPIRE / Vampire (#046)
HP: 156 (NES) / 280 (PS+)
Attack: 76-152 (NES) / 76 (PS+)
Defense: 10 (NES) / 26 (PS+)
EXP: 1,200
Gil: 2,000
Weak:
Resist:
Drop: None
Pretty much a pushover for the point of the game he is at, more so due to having a weakness to Fire and HARM / Dia spells the battle shouldn't last more than one round. In the off chance he lives, he has a DAZZLE / Gaze attack that may Stun / Paralyze a party member, he will recover 14 HP every round he's alive (not on NES).
After you defeat the Vampire open the chest near him to get the Star Ruby. You can continue to the end of the room, but without a certain item we can't proceed forward so backtrack out of the cave and head back to where the path branched and go West to the Titan's Tunnel / Giant's Cave.
Titan's Tunnel / Giant's Cave
Enemies
| Name | Bestiary | HP | Attack | Defense | EXP | Gil | Weak | Drop | Notes |
|---|---|---|---|---|---|---|---|---|---|
| GrWOLF / Warg Wolf | #008 | 72 | 14-28 / 14 | 0 | 93 | 22 | Antidote | ||
| OGRE / Ogre | #014 | 100 | 18-36 / 18 | 10 | 195 | 195 | |||
| GrOGRE / Ogre Chief | #015 | 132 | 23-46 / 23 | 14 | 282 | 300 | |||
| ARACHNID / Tarantula | #023 | 64 | 5-10 / 5 | 12 | 141 | 50 | Attack may Poison | ||
| TIGER / Lesser Tiger | #038 | 132 | 22-44 / 22 | 8 | 438 | 108 | X-Potion | ||
With the Star Ruby in hand make your way to the Titan who will eat the Ruby and then walk off, the path South from where he was blocking has a couple of treasures which have (from left to right) a Silver Helmet / Mythril Helm, 450 gil, 620 gil & a Great Axe. Head North to leave the cave and follow the path outside leading to another cave, this being the Sage's Cave. Follow the path ignoring the first door which has a room full of pots that have nothing inside them, speak to the old man who tells you the Vampire wasn't the main cause for the land rotting, a more fearsome foe who lies deeper is the cave is the real cause. He will then give you the Earth Rod which will allow us to traverse further into the Earth Cave / Cavern of Earth.
With the gil obtained from the Earth Cave / Cavern of Earth you may want to restock on items and if you want you can buy the Steel Armor / Knight's Armor from Melmond for your Fighter / Warrior, additionally those on the NES version using a Fighter with a Silver Sword as his weapon may want to grind to level 14 so that his HIT% is 64 so he can get an extra attack off, a good spot to do some grinding is in the path left of B1 of the Earth Cave as all encounters will have a GIANT and can be done quickly with little worry of healing. When you have finished your resupplying head back to B3 where we fought the VAMPIRE / Vampire and continue to the end of the hall and use the Earth Rod to open the path to B4, NES & PS players have to actually use the ROD as an item from the menu.
Earth Cave / Cavern of Earth revisit
Enemies
| Name | Bestiary | HP | Attack | Defense (NES / PS+) | EXP | Gil | Weak | Drop | Notes | |
|---|---|---|---|---|---|---|---|---|---|---|
| GrIMP / Goblin Guard | #002 | 16 | 8-16 / 8 | 6 | 13 / 18 | 18 | Potion | |||
| WrWOLF / Werewolf | #009 | 68 | 14-28 / 14 | 6 | 135 | 67 | Attack may Poison, 3 HP Regen per turn (not on NES) | |||
| ARACHNID / Tarantula | #023 | 64 | 5-10 / 5 | 12 | 141 | 50 | Attack may Poison | |||
| GHAST / Ghast | #024 | 56 | 8-16 / 8 | 10 | 117 | 117 | Attack may Stun / Paralyze | |||
| WIZARD / Piscodemon | #032 | 84 | 30-60 / 30 | 16 | 300 | 276 | ||||
| MUMMY / Mummy | #034 | 80 | 30-60 / 30 | 20 | 300 | 300 | Attack may Sleep | |||
| IMAGE / Wraith | #035 | 86 | 22-44 / 22 | 12 / 4 | 231 | 231 | Crosier | Attack may Stun / Paralyze | ||
| BULL / Minotaur | #039 | 164 | 22-44 / 22 | 4 | 489 | 489 | Knife | |||
| GIANT / Hill Gigas | #040 | 240 | 38-76 / 38 | 12 | 879 | 879 | Tent | |||
| EARTH / Earth Elemental | #041 | 288 | 66-132 / 66 | 20 | 1,536 | 768 | Remedy | |||
| TROLL / Troll | #042 | 184 | 24-48 / 24 | 12 | 621 | 621 | 9 HP Regen per turn (not on NES) | |||
| SPECTER / Wight | #043 | 52 | 20-40 / 20 | 20 | 150 | 150 | Attack may Stun / Paralyze | |||
| OOZE / Ochre Jelly | #044 | 76 | 32-64 / 32 | 6 | 252 | 70 | ||||
| COCTRICE / Cockatrice | #045 | 50 | 1-2 / 1 | 4 | 186 | 200 | Gold Needle | Attack may Petrify | ||
Floor Encounters
| Enemy | Floor Number |
|---|---|
| WIZARD / Piscodemon | B4 |
| SPECTER / Wight | B4 |
| GHAST / Ghast | B4 |
| IMAGE / Wraith | B4 & B5 |
| TROLL / Troll | B4 & B5 |
| COCTRICE / Cockatrice | B4 |
| GrIMP / Goblin Guard | B4 |
| WrWOLF / Werewolf | B4 |
| GIANT / Hill Gigas | B4 & B5 |
| OOZE / Ochre Jelly | B4 & B5 |
| ARACHNID / Tarantula | B4 & B5 |
| BULL / Minotaur | B5 |
| MUMMY / Mummy | B5 |
| EARTH / Earth Elemental | B5 |
Map B4
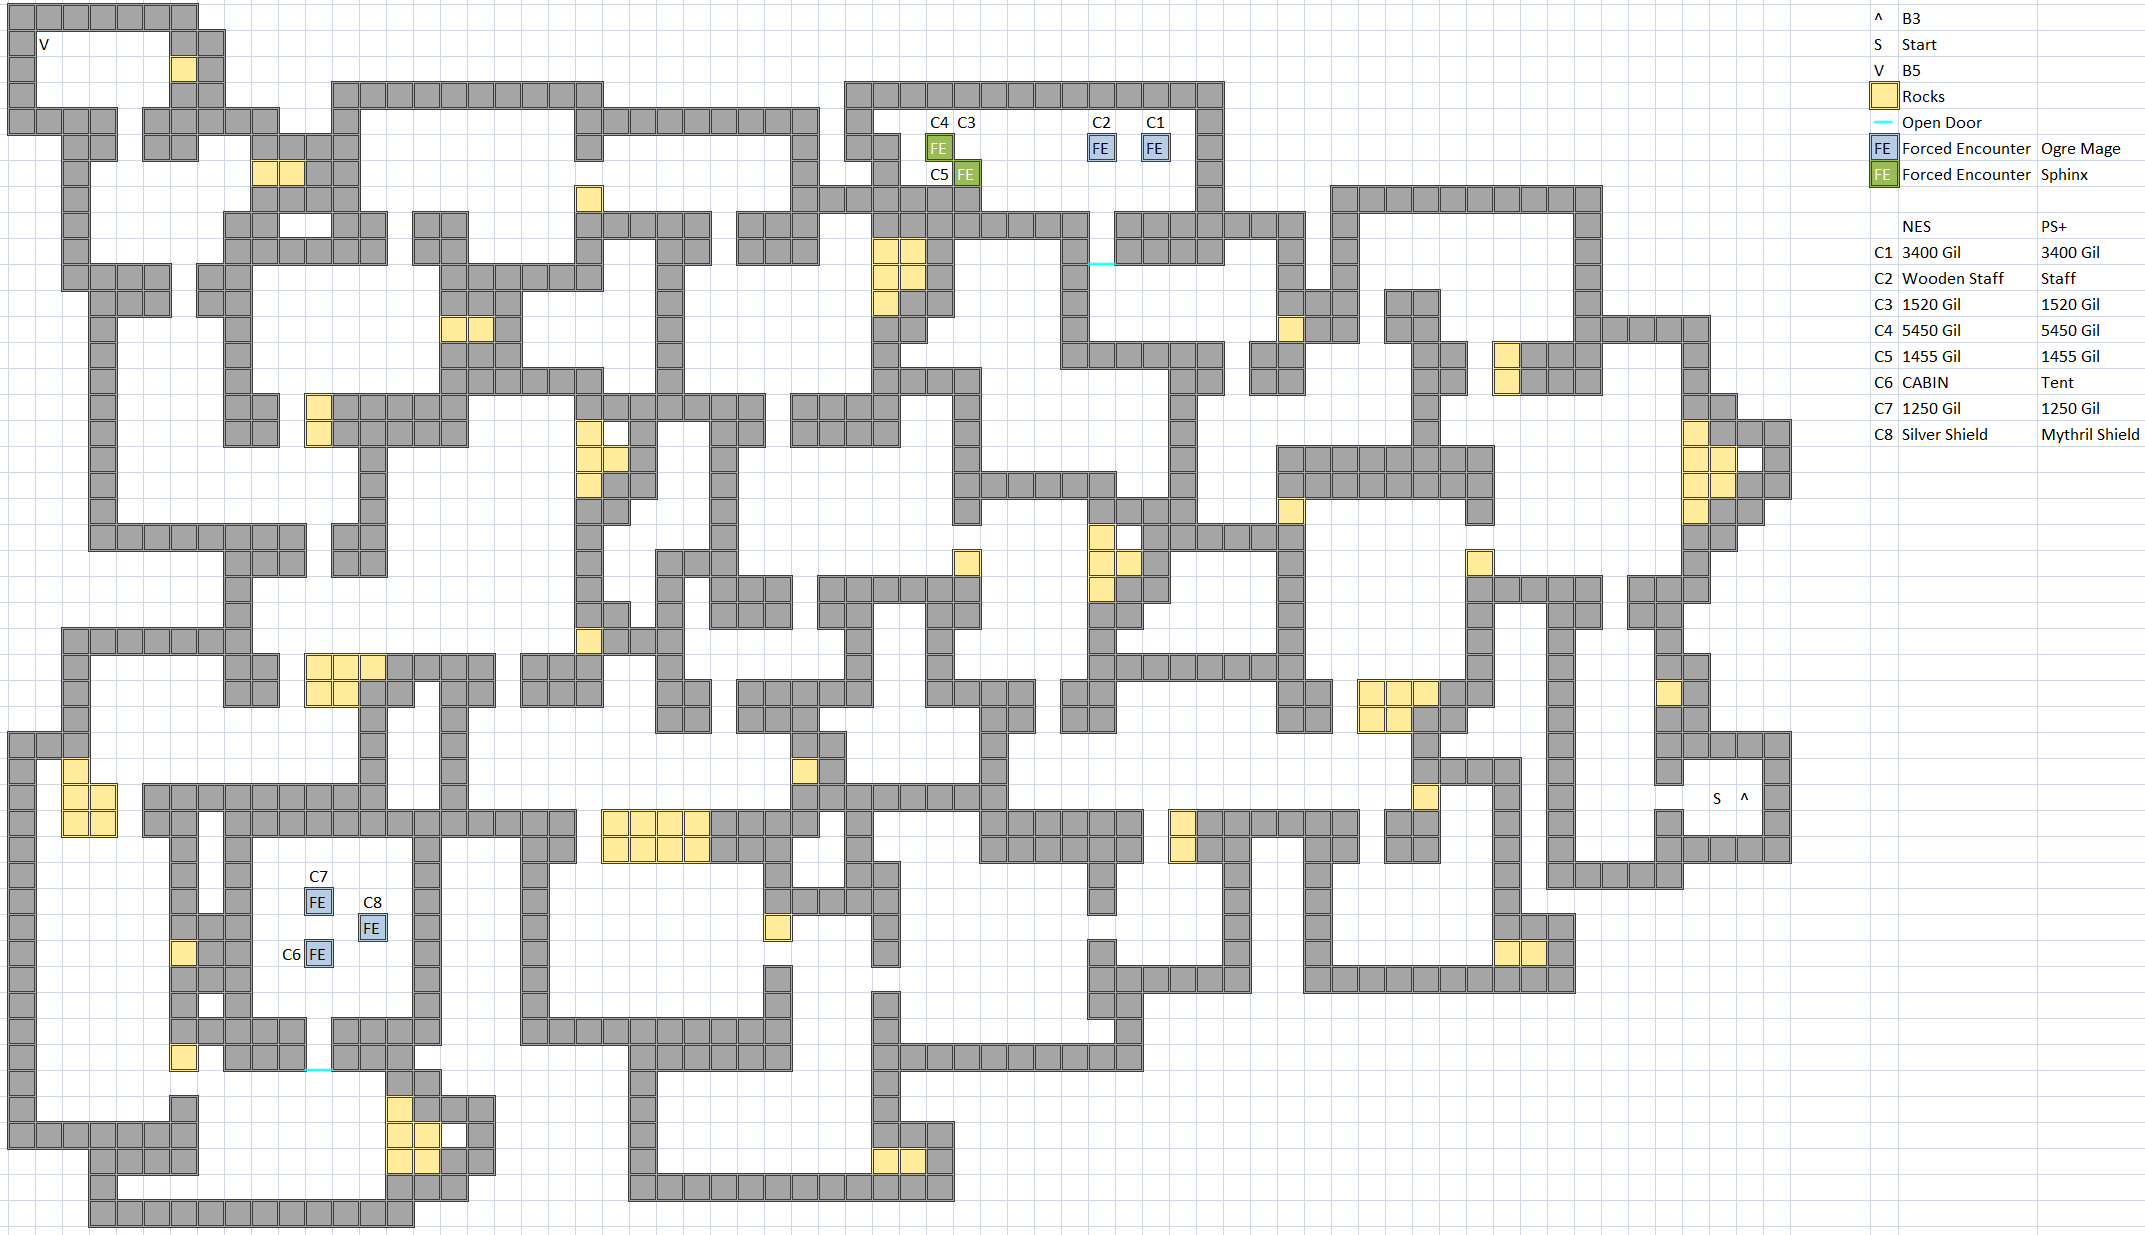
This floor has a couple of branching paths few leading to a dead end. The chests on this floor are guarded by new enemies all of which you can choose to skip except for one SPHINX / Sphinx encounter as it's between 2 chests.
| Name | Bestiary | HP | Attack | Defense | EXP | Gil | Weak | Drop | Notes |
|---|---|---|---|---|---|---|---|---|---|
| WzOGRE / Ogre Mage | #047 | 144 | 23-46 / 23 | 10 | 723 | 723 | Eye Drops | 7 HP Regen per turn (not on NES) | |
| SPHINX / Sphinx | #048 | 228 | 23-46 / 23 | 12 | 1,160 | 1,160 | |||
WzOGRE / Ogre Mage - Has an array of spells at their disposal such as RUSE / Blink which they will often use to increase their evasion to take less damage, DARK / Dark, SLEP / Sleep, HOLD / Hold & ICE / Blizzard.
SPHINX / Sphinx - Is not too tough when compared to other enemies in the Earth Cave / Cavern of Earth as their attack is pretty low though they have pretty high HP.
Map B5
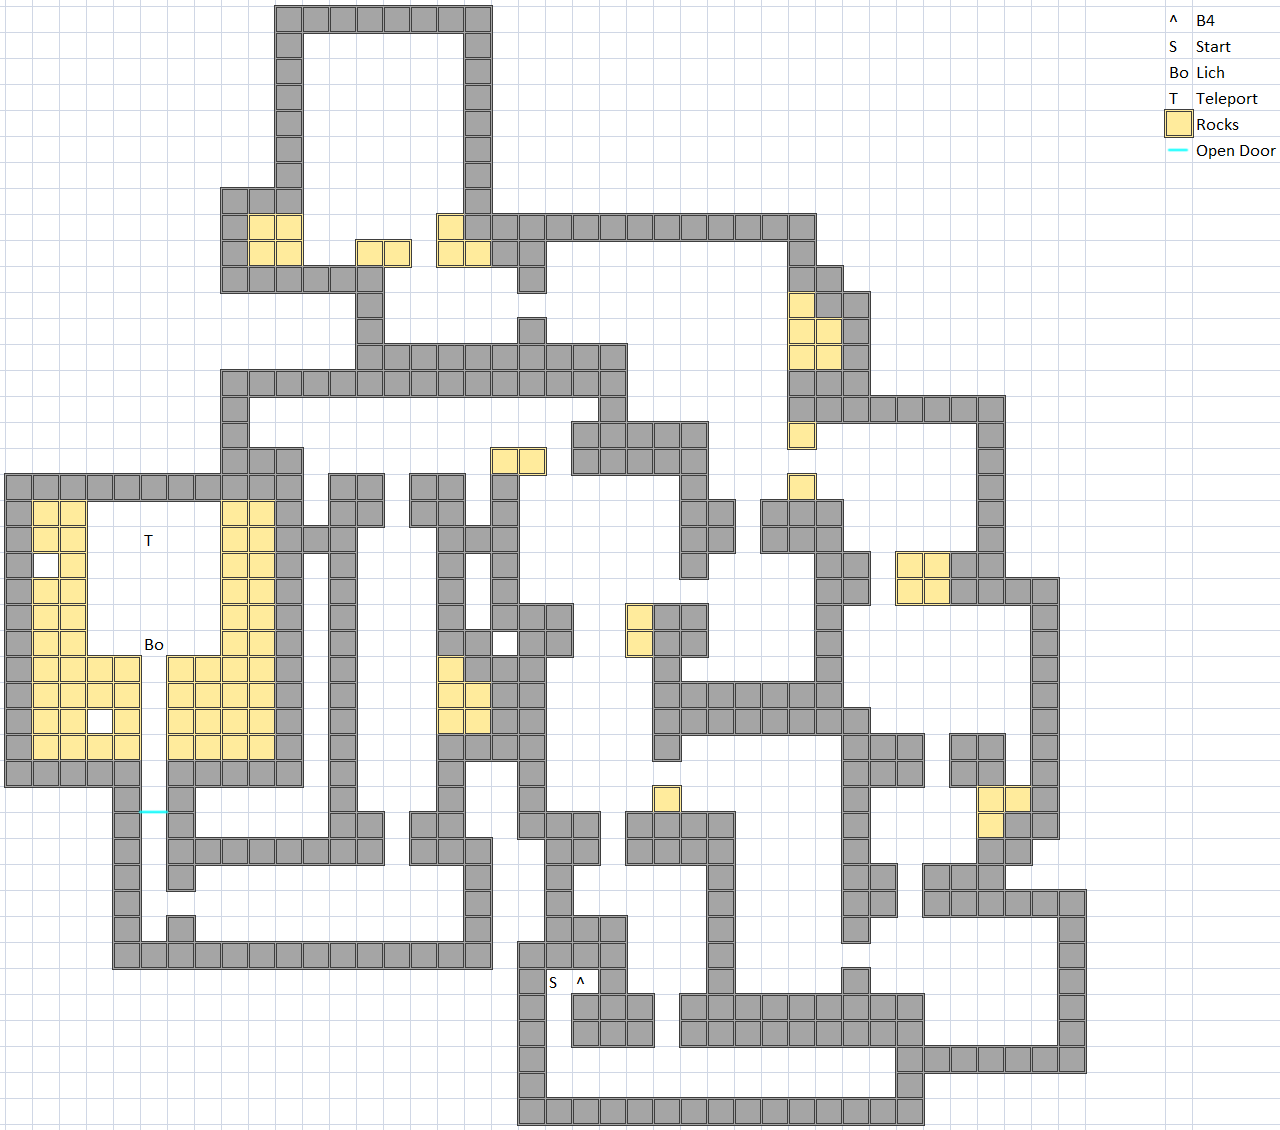
A very small floor with no treasure on it, keep towards the West side of the room and you will meet the first of the elemental Fiends.
Fiend of Earth
LICH / Lich (#049)
HP: 400 (NES) / 800 (PS) / 1,200 (DoS+)
Attack: 40-80 (NES) / 40 (PS+)
Defense: 40
EXP: 2,200
Gil: 3,000
Weak:
Resist:
Drop: Dry Ether (Rare)
This can be a hard fight and is advised to try and get AICE / NulFrost up as quick as possible hopefully before his first attack as it can be quite devastating to your party. Lichs spell cycle goes ICE2 / Blizzara > SLP2 / Sleepra > FAST / Haste > LIT2 / Thundara > HOLD / Hold > FIR2 / Fira > SLOW / Slow > SLEP / Sleep, he will occasionally do a physical attack which has a chance to Stun / Paralyze you though he will often use a spell in the order listed above. If you have FIR2 / Fira or FIR3 / Firaga you will want to use those as often as possible if you can, otherwise cast FAST / Haste on your strongest attackers.
After Lich has been defeated the Earth Crystal will be restored to its shining glory, those on DoS+ will notice a statue of Lich gets removed from a certain area, that is the entrance of the Earthgift Shrine. It is located in the cave near the Chaos Shrine you saw as you were heading there, I would not recommend going there yet at least not before Class Change so remember it for later. Take the teleporter behind Lich and make your way back to Melmond and then rest at the Inn and prepare for the next area. If your Red Mage got to level 15 (NES / PS) or 22 (DoS+) you can buy FIR3 / Firaga & CUR3 / Curaga at Melmond for them.
When you are done get on your ship and head to Crescent Lake, if you didn't already go there before from Melmond sail South until you see the tip of the island at the top of your screen then head West to where you will be able to dock your ship. When you leave your ship head West and hug the lake as you go counterclockwise and head into the town. While we aren't able to use the magic you can buy here yet (some require class change) there is a key item we can get here. Go to the Eastern side of town to meet the Circle of Sages, you can talk to all of them if you want, but the one you want to talk to is the first sage from the center two on the right he will give you the Canoe.
With the Canoe we now have access to 3 areas we can go to, the developers intend you to go to Gurgu Volcano / Mount Gulg first, though you can also choose the Ice Cave / Cavern of Ice or Castle of Ordeals / Citadel of Trials, personally I always go for class change as early as possible which you will need to go to the Ice Cave / Cavern of Ice and Castle of Ordeals / Citadel of Trials.
River encounters
With the Canoe in hand we can now travel in rivers, on the NES version there are 2 separate tables for battles in rivers, Southern Hemisphere (bottom half of the map) & Northern Hemisphere (upper half of the map). All versions after the NES have these encounters bugged and thus you are able to fight the tougher Northern Hemisphere encounters on the Southern and vice versa.
Southern (NES only)
| Name | Bestiary | HP | Attack | Defense | EXP | Gil | Weak | Drop | Notes |
|---|---|---|---|---|---|---|---|---|---|
| CARBINE / Piranha | #051 | 92 | 22-44 / 22 | 0 | 240 | 20 | |||
| GATOR / Crocodile | #053 | 184 | 42-84 / 42 | 16 | 816 | 900 | |||
| OCHO / Ochu | #055 | 208 | 20-40 / 20 | 24 | 1,224 | 102 | Attack may Poison | ||
| HYDRA / Hydra | #057 | 212 | 30-60 / 30 | 14 | 915 | 150 | |||
CARBINE / Piranha - Aren't too tough though appear in large groups.
GATOR / Crocodile - Is pretty powerful, you will want to deal with them first.
OCHO / Ochu - Has a lot of HP and isn't very strong, the only thing dangerous about it is that its physical attack can Poison.
HYDRA / Hydra - Can hit pretty hard, but otherwise isn't too tough compared to other enemies.
Northern (NES, all continents on remakes)
| Name | Bestiary | HP | Attack | Defense | EXP | Gil | Weak | Drop | Notes |
|---|---|---|---|---|---|---|---|---|---|
| CARBINE / Piranha | #051 | 92 | 22-44 / 22 | 0 | 240 | 20 | |||
| R.CARBINE / Red Piranha | #052 | 172 | 37-74 / 37 | 20 | 546 | 46 | |||
| GATOR / Crocodile | #053 | 184 | 42-84 / 42 | 16 | 816 | 900 | |||
| FrGATOR / White Croc | #054 | 288 | 56-112 / 56 | 20 | 1,890 | 2,000 | |||
| OCHO / Ochu | #055 | 208 | 20-40 / 20 | 24 | 1,224 | 102 | Attack may Poison | ||
| NAOCHO / Neochu | #056 | 344 | 35-70 / 35 | 32 | 3,189 | 500 | Attack may Poison | ||
| HYDRA / Hydra | #057 | 212 | 30-60 / 30 | 14 | 915 | 150 | |||
R.CARBINE / Red Piranha - Are tougher than their counterpart and do not have the Lightning weakness.
FrGATOR / White Croc - Is a very dangerous enemy specially on remakes, a Thundara spell will not be able to kill it. A Thundaga is recommended, otherwise aim for it first.
NAOCHO / Neochu - Is a stronger OCHO / Ochu, it is the strongest River encounter in terms of HP and defense though it shouldn't be too tough to defeat. Like its counterpart its physical attack can Poison.
Into the Frying Pan
Suggested Level: 15 (NES / PS), 22 (DoS+)
The difficulty of Gurgu Volcano / Mount Gulg depends more so on when you get to it, if you do it before class changing it will be a bit difficult without gear from the Ice Cave / Cavern of Ice & Castle of Ordeals / Citadel of Trials, if you do it after you should have little difficulty. To get to the Volcano from Crescent Lake follow the river and head West at the first intersection, then head North and follow the path and turn East then North then West when the path branches, then head West and make your way to the volcano in the center of the area.
Enemies
| Name | Bestiary | HP | Attack | Defense | EXP | Gil | Weak | Drop | Notes | |
|---|---|---|---|---|---|---|---|---|---|---|
| GrOGRE / Ogre Chief | #015 | 132 | 23-46 / 23 | 14 | 282 | 300 | ||||
| IGUANA / Lizard | #016 | 92 | 18-36 / 18 | 12 | 153 | 50 | ||||
| SCORPION / Scorpion | #025 | 84 | 22-44 / 22 | 10 | 225 | 70 | Spider's Silk | Attack may Poison | ||
| MUCK / Gray Ooze | #029 | 76 | 30-60 / 30 | 7 | 255 | 70 | ||||
| HYENA / Hyenadon | #037 | 120 | 22-44 / 22 | 4 | 288 | 72 | Power Plus | |||
| BULL / Minotaur | #039 | 164 | 22-44 / 22 | 4 | 489 | 489 | Knife | |||
| GIANT / Hill Gigas | #040 | 240 | 38-76 / 38 | 12 | 879 | 879 | Tent | |||
| WzOGRE / Ogre Mage | #047 | 144 | 23-46 / 23 | 10 | 723 | 723 | Eye Drops | 7 HP Regen per turn (not on NES) | ||
| SPHINX / Sphinx | #048 | 228 | 23-46 / 23 | 12 | 1,160 | 1,160 | ||||
| PEDE / Ankheg | #050 | 222 | 39-78 / 39 | 20 | 1194 | 300 | Attack may Poison | |||
| R.GOYLE / Horned Devil | #058 | 94 | 10-20 / 10 | 32 | 387 | 387 | Attack may Stun / Paralyze | |||
| PERILISK / Pyrolisk | #059 | 44 | 20-40 / 20 | 4 | 432 | 500 | Gold Needle | Gaze can petrify or instantly kill | ||
| FIRE / Fire Elemental | #060 | 276 | 50-100 / 50 | 20 | 1,620 | 800 | ||||
| R.HYDRA / Fire Hydra | #061 | 182 | 20-40 / 20 | 14 | 1,215 | 400 | Red Fang | |||
| GREY W / Lava Worm | #062 | 280 | 50-100 / 50 | 31 | 1,671 | 400 | ||||
| CEREBUS / Hellhound | #063 | 192 | 30-60 / 30 | 8 | 1,182 | 600 | ||||
| AGAMA / Fire Lizard | #064 | 296 | 31-62 / 31 | 18 | 2,472 | 1,200 | ||||
| R.GIANT / Fire Gigas | #065 | 300 | 73-146 / 73 | 20 | 1,506 | 1,506 | ||||
| Red D / Red Dragon | #066 | 248 | 75-150 / 75 | 30 | 2,904 | 4,000 | ||||
R.GOYLE / Horned Devil - The difficulty lies in what version you are playing, if NES you really don't want to see it as they will often use FIR2 which can be deadly for your party. From Origins onward they no longer are as threatening since they don't have Fira and will mostly stick to physical attacks which can paralyze as well as the spell Hold and Fire on a single member.
PERILISK / Pyrolisk - Is more dangerous than its cousin COCTRICE / Cockatrice, but not in the same sense the Pyrolisk won't petrify with its physical attack instead it has a Gaze that will do that, in addition it has SQUINT / Gaze which can instantly kill a member.
FIRE / Fire Elemental - Like its cousin EARTH / Earth Elemental has a strong physical attack and it also flagged as unrunable so keep your HP up incase you run into him when he's not guarding a chest.
R.HYDRA / Fire Hydra - Doesn't deal a lot of damage with its physical attack, but can use CREMATE / Blaze to hit your entire party.
GREY W / Lava Worm - Has a strong physical attack, but is quite slow so it should be dead before it gets to attack.
CEREBUS / Hellhound - Is not physically strong and it has access to SCORCH / Blaze, but it will not deal too much damage. If it is encountered with WzOGRE / Ogre Mage the battle can be unrunable.
AGAMA / Fire Lizard - Is not a big threat due to it always being by itself, it has HEAT / Blaze to hit your entire party, but it should be dead before it gets the chance to use it.
R.GIANT / Fire Gigas - Is basically a stronger GIANT / Hill Gigas.
Red D / Red Dragon - Is a very dangerous enemy, having a strong physical attack it has a mighty Blaze attack which will deal heavy damage to your party without AFIR / NulBlaze up.
Floor Encounters
| Enemy | Floor Number |
|---|---|
| SPHINX / Sphinx | B1 |
| R.GOYLE / Horned Devil | B1 & B2 |
| WzOGRE / Ogre Mage | All |
| GrOGRE / Ogre Chief | All |
| HYENA / Hyenadon | B1-B3 |
| PEDE / Ankheg | B1 & B2 |
| SCORPION / Scorpion | B1 |
| BULL / Minotaur | B1, B4 & B5 |
| MUCK / Gray Ooze | B1 & B2 |
| GIANT / Hill Gigas | B2 & B3 |
| IGUANA / Lizard | B2 & B3 |
| PERILISK / Pyrolisk | B2 & B3 |
| R.HYDRA / Fire Hydra | B2-B4 |
| FIRE / Fire Elemental | B2, B3 & B5 |
| CEREBUS / Hellhound | B3-B5 |
| GREY W / Lava Worm | B4 & B5 |
| R.GIANT / Fire Gigas | B4 & B5 |
| AGAMA / Fire Lizard | B4 & B5 |
| Red D / Red Dragon | B4 & B5 |
Map B1
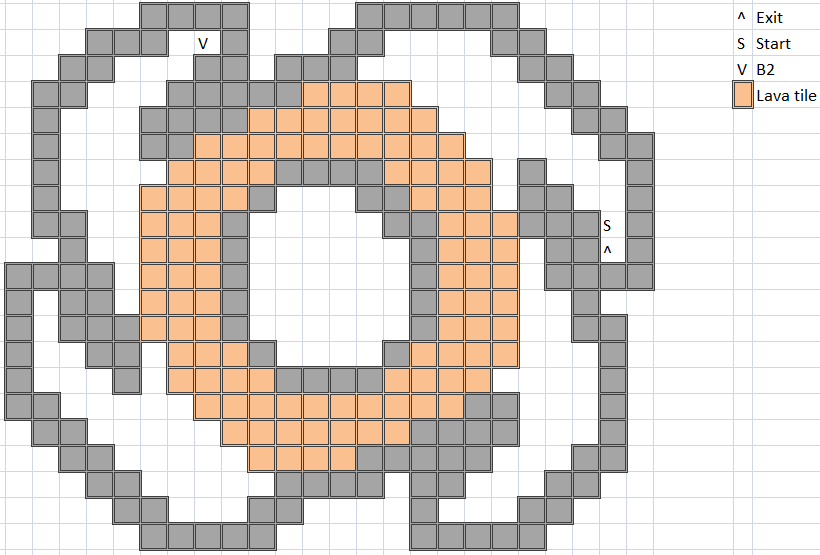
Not really much to this area, it introduces the dungeon gimmick of lava damage tiles which deal 1 HP damage per step and you will not get into encounters while in lava.
Map B2
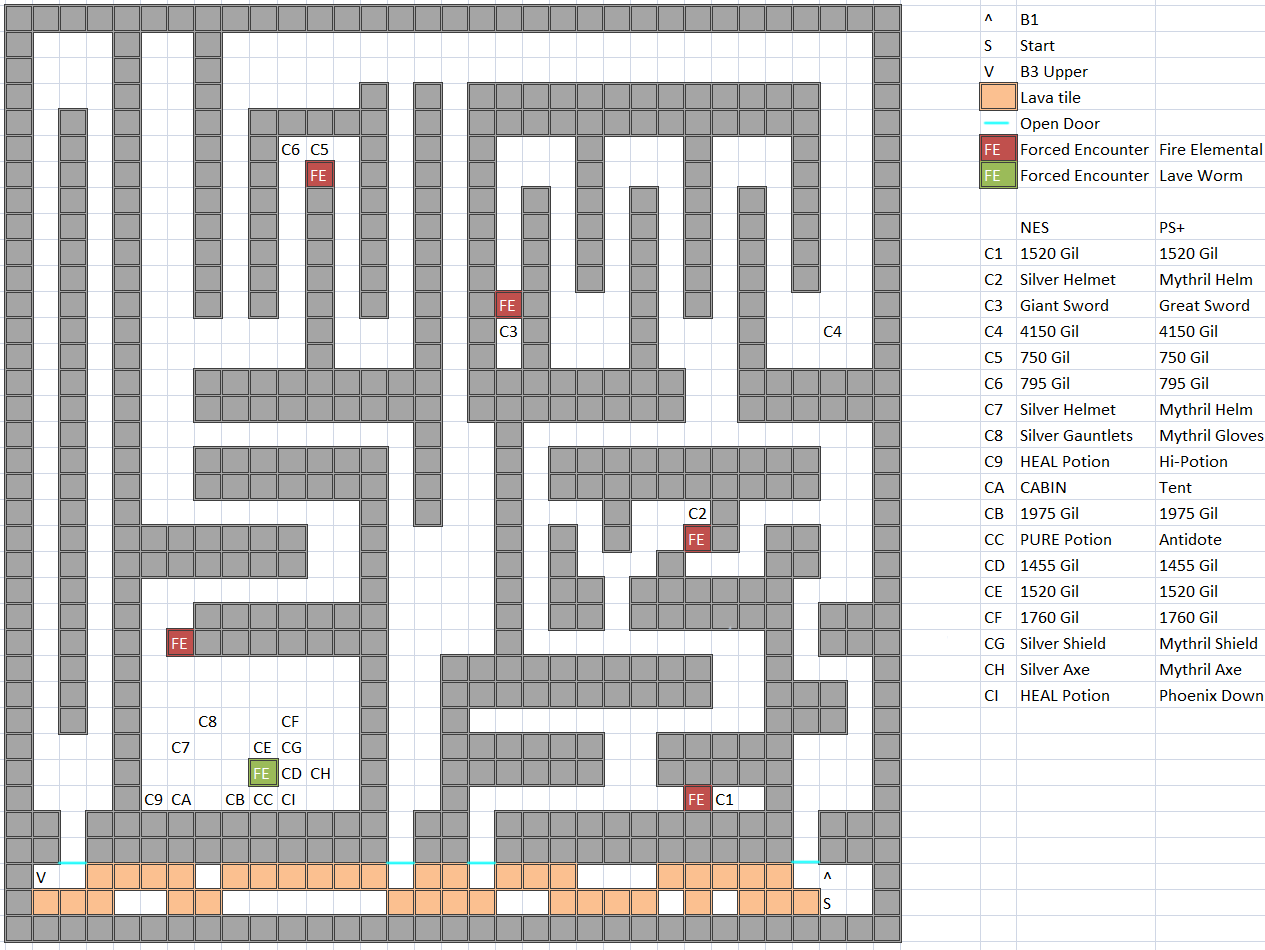
This floor has a large treasure trove which has some chest that are guarded by FIRE / Fire Elemental with one being guarded by a GREY W / Lava Worm. The only new equipment here is the Giant Sword / Great Sword it can be equipped by Fighter / Warrior, Red Mage & Ninja, however it is weaker than the Silver Sword / Mythril Sword (21 vs 23), but has more accuracy (20 vs 15), it also has the special effect of dealing more damage to giant type enemies (not on NES), when you finish getting treasure go down the stairs.
Map B3
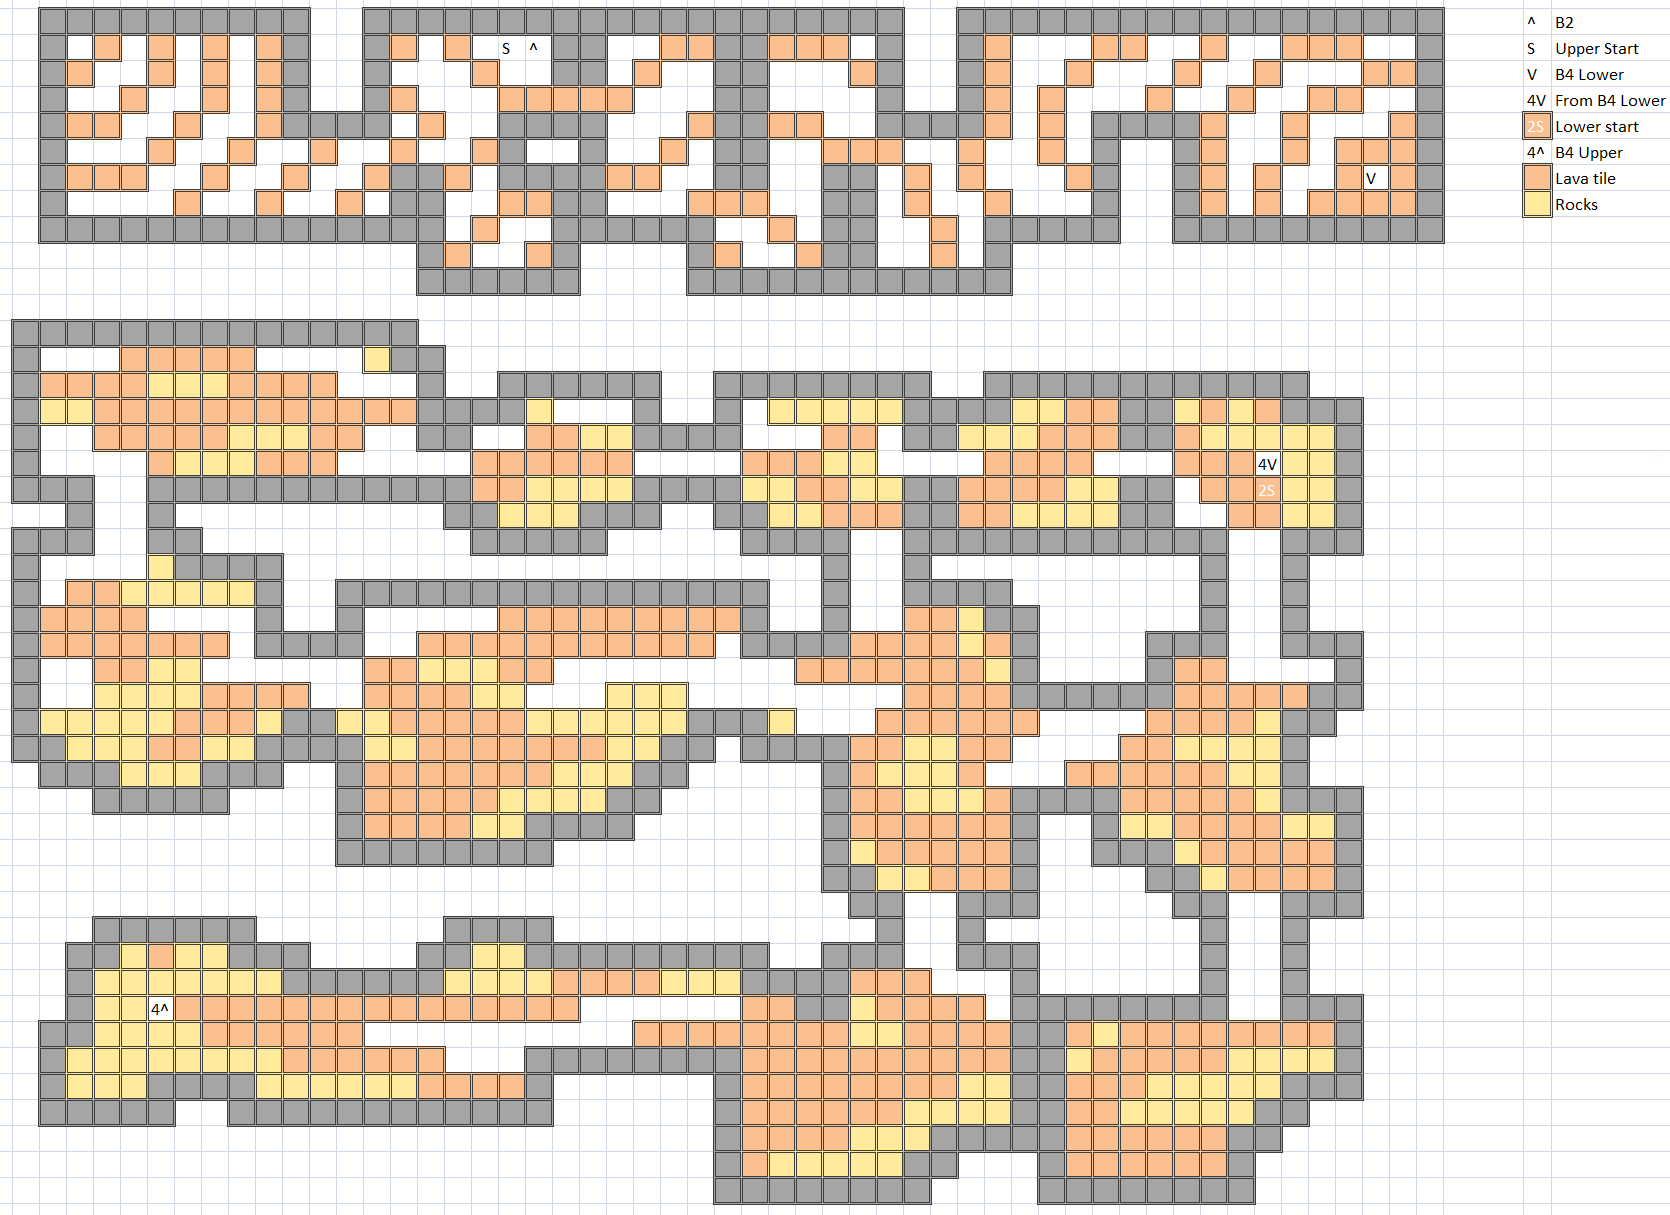
From B2 you will start on the upper map which is basically navigating to the stairs leading to B4.
Map B4
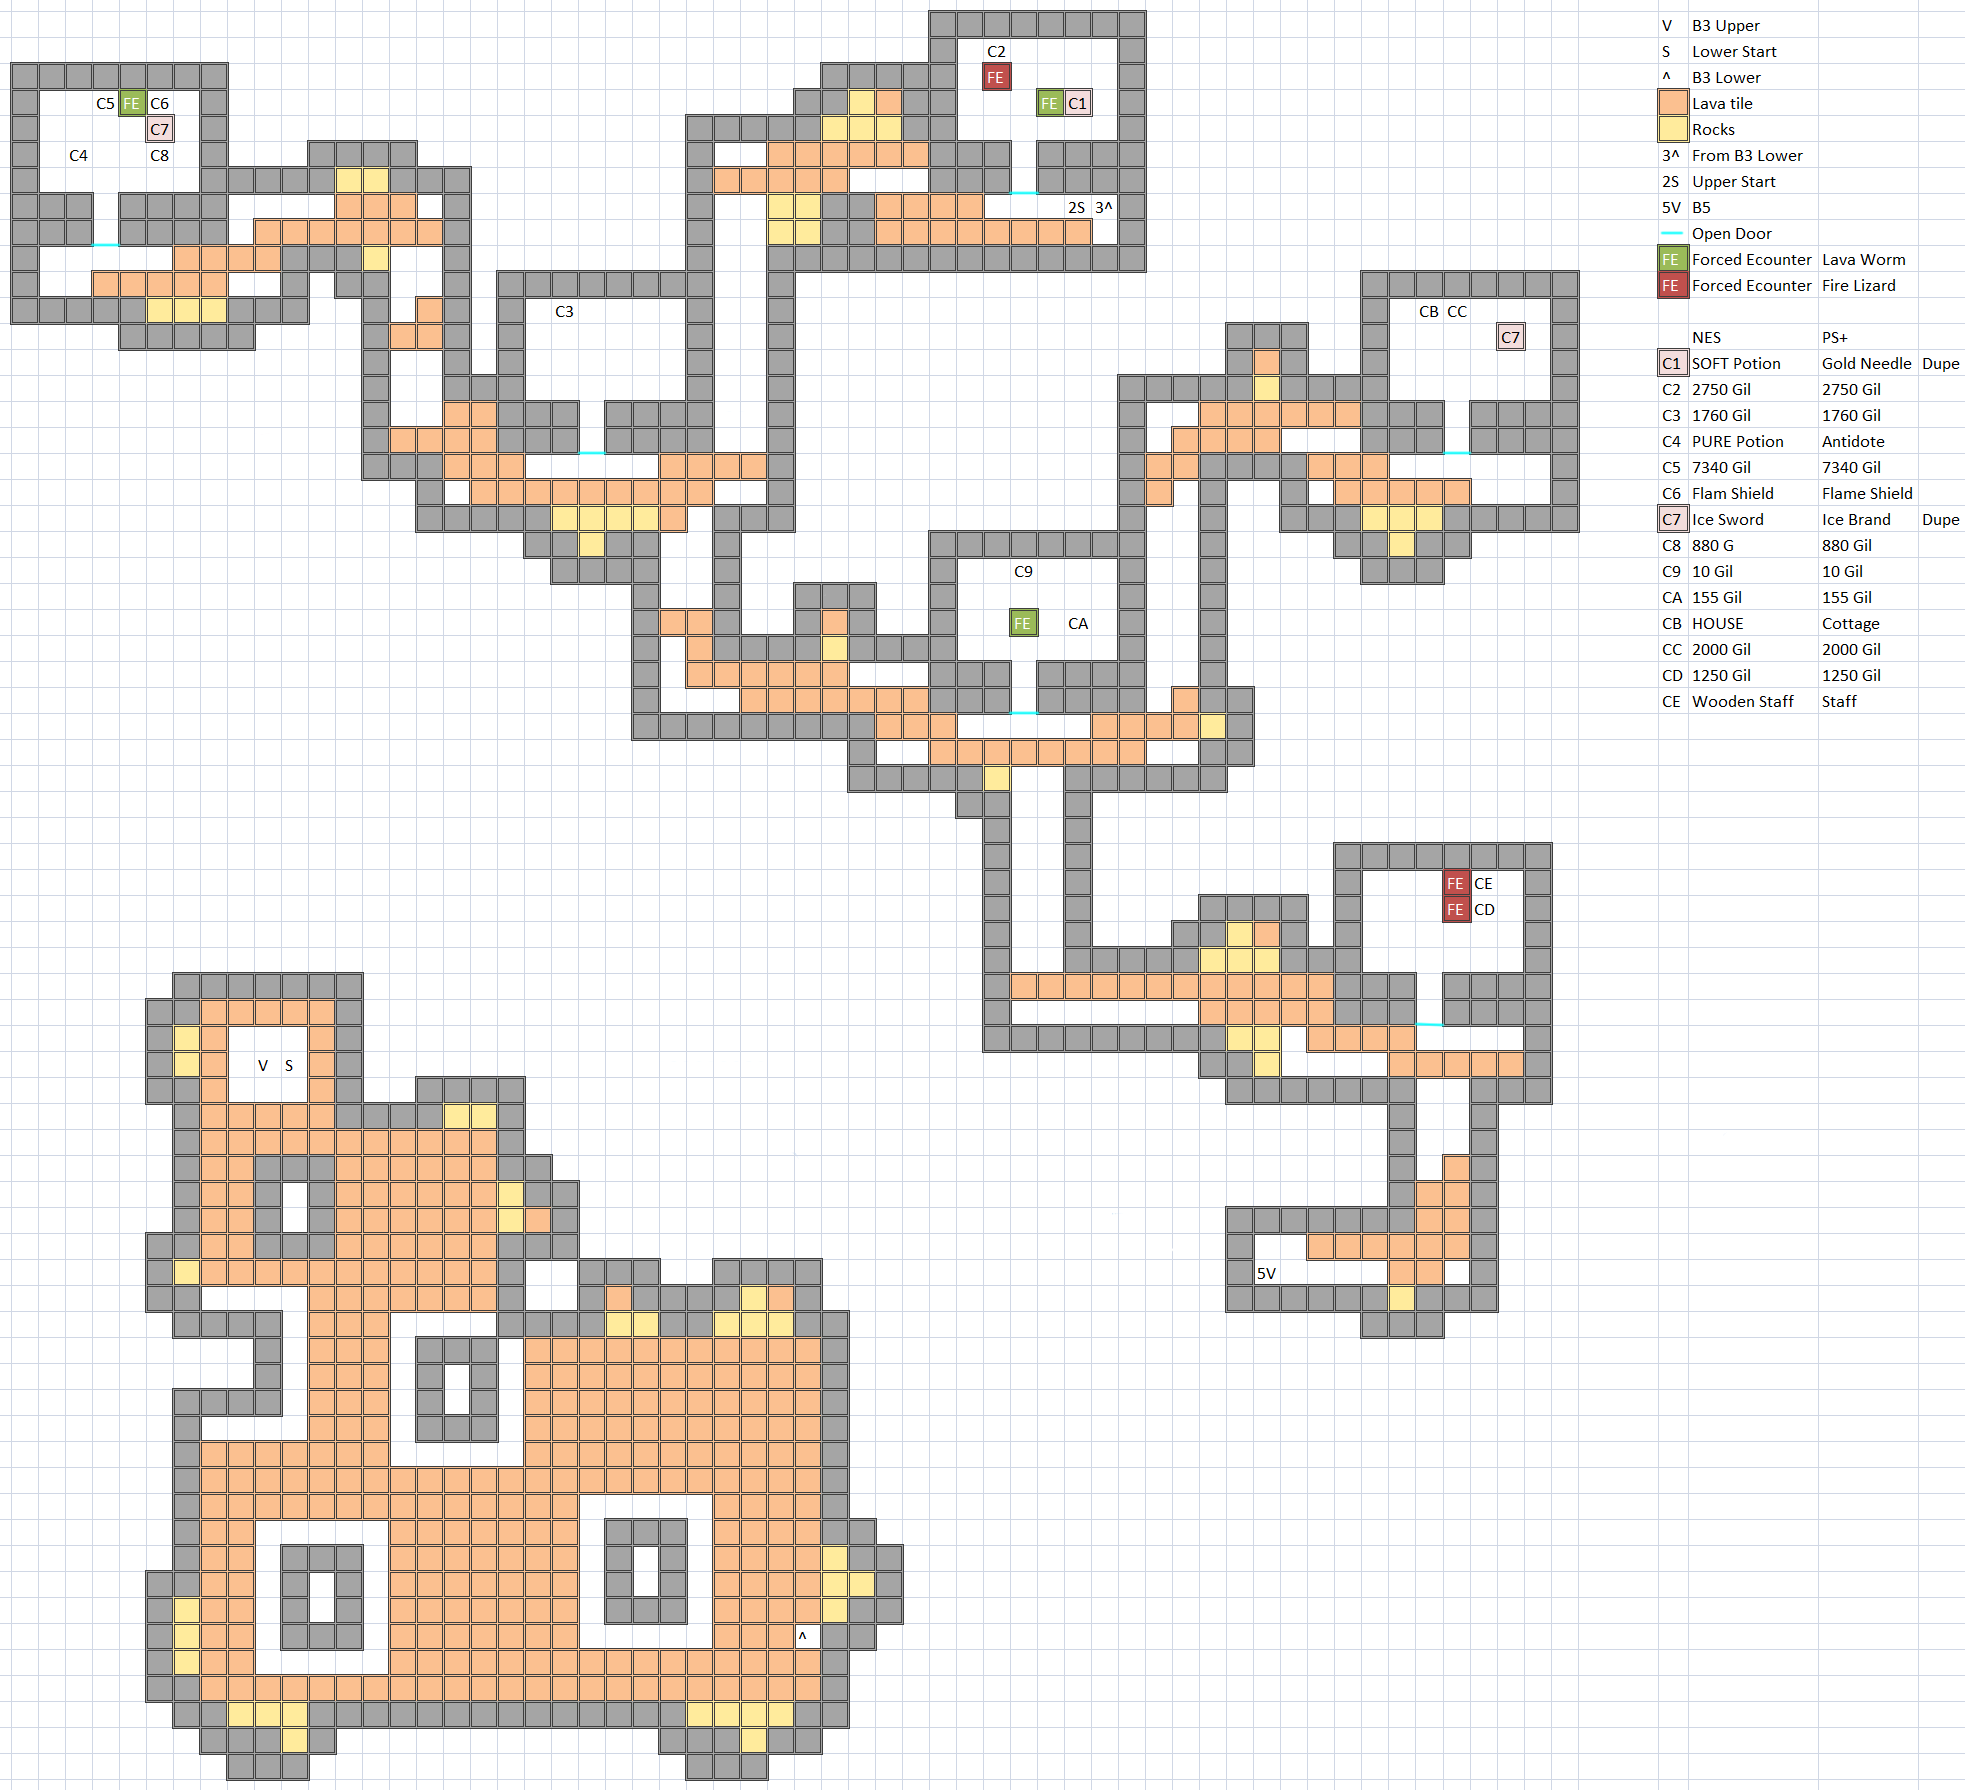
You will originally start on the lower portion coming from B3 which is a heavily filled lava room, the stairs here lead to the lower map from B3 (points up) which is a straight shoot to the next set of stairs that lead back to the upper portion of B4. Back on this floor in the upper portion is a large amount of treasure rooms most having a GREY W / Lava Worm or AGAMA / Fire Lizard guarding the chest. New equipment here is the Ice Sword / Ice Brand which is stronger than the Silver Sword / Mythril Sword (and even Flame Sword if you went to Ice Cave / Cavern of Ice first) being equipable by Fighter / Warrior, Red Mage & Ninja having an Attack of 29 and Accuracy of 25, it will deal Ice elemental damage when attacking (not on NES). There are technically 2 Ice Sword / Ice Brands on this floor, but only one can be obtained due to dupe chests. Another new equipment here is the Ice Shield which can be equipped by Fighter / Warrior & Ninja, it is better than the Silver Shield / Mythril Shield by 6 points of defense (Flame Shield has the same defense) it also reduces damage from ice element attacks (which does work on NES(!)). This doesn't stack with AICE / NulFrost so remember that for later gear, if you did Ice Cave / Cavern of Ice it would be better to have the armor and shield of a different element.
Map B5
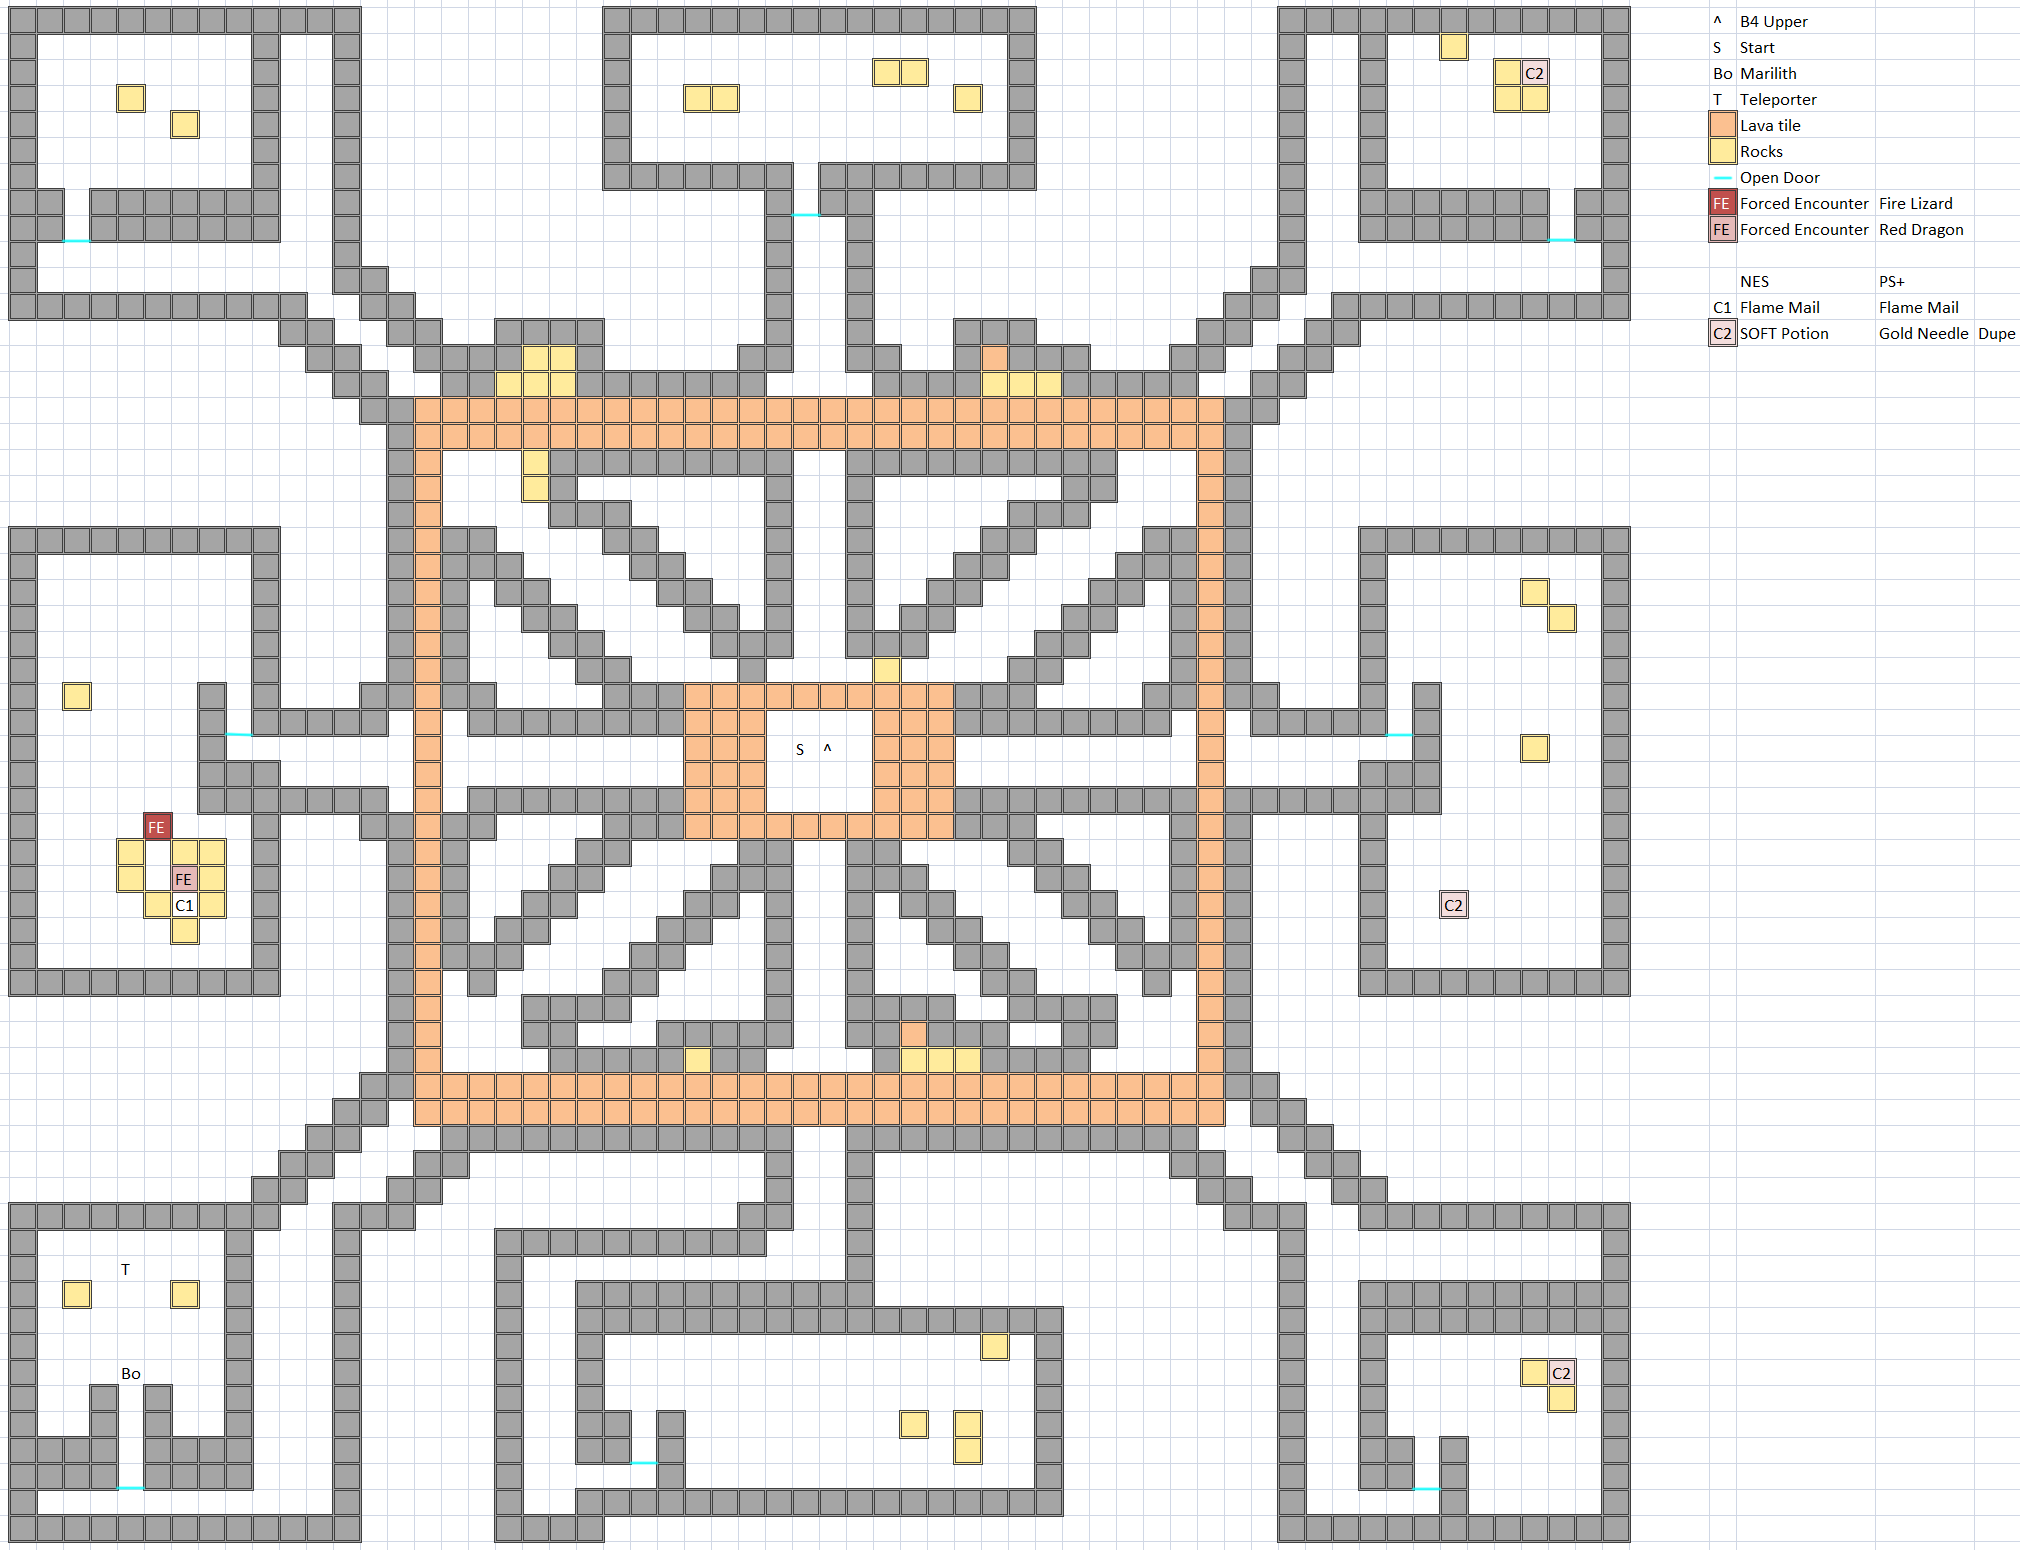
If you collected the SOFT Potion / Gold Needle from the previous floor only one chest will be left for you to get here, head West and enter the room defeat the AGAMA / Fire Lizard blocking the way and heal up before facing the Red D / Red Dragon guarding the chest, in this one lies the Flame Mail which can be equipped by Fighter / Warrior & Ninja if you were using the Steel Armor / Knight Armor this provides the same amount of defense, but removes a lot of weight so you can dodge more attacks, additionally like the shield from the previous floor it provides ice resistance, if you did Ice Cave / Cavern of Ice first you can use the Ice Shield in combination to receive less damage from fire & ice attacks. The Fiend of Fire waits for your challenge in the bottom left room
Fiend of Fire
KARY / Marilith (#067)
HP: 600 (NES) / 1,200 (PS) / 1,440 (DoS+)
Attack: 40-80 (NES) / 40 (PS+)
Defense: 50
EXP: 2,475
Gil: 3,000
Weak:
Resist:
Drop: Golden Apple (Rare)
She has a pretty strong physical attack (6 arms = 6 hits) which is what she will often do, she does have a spell cycle which goes
FIR2 / Fira > DARK / Dark > FIR2 / Fira > DARK / Dark > FIR2 / Fira > HOLD / Hold > FIR2 / Fira > HOLD / Hold
So it is recommended to start the battle with AFIR / NulBlaze. She is vulnerable to Silence to stop her magic and Slow to reduce her damage.
After KARY / Marilith has been defeated the Fire Crystal will be restored to its shining glory, those on DoS+ will notice a statue of Marilith gets removed from a certain area, that is the entrance of the Hellfire Chasm. It is located on the Cardia Islands that has 2 holes and no forest around it, it is the lower hole. You can choose to do it and the other dungeon after you have class changed and done the shopping for spells.
Beware of Frostbite
Suggested Level: 15 (NES / PS), 22 (DoS+)
The Ice Cave / Cavern of Ice is the next area where you can experience a game over, personally I would go through 2 trips on the NES version due to the abundance of enemies that can wipe your party (and no saving whenever you want). First trip being to go straight for the FLOATER and a second trip later to go for treasure. To get to the Ice Cave / Cavern of Ice from the port where you put the Ship follow the coast North hugging the the Western edge and enter the small opening Northward, you can dock your ship at the small port or use the river to dock you ship. Follow the path until you get to an intersection, then go North, East along the path, ignore the upper route you see and continue West. At the next intersection DoS+ players can go South, however this is a bonus dungeon that we have no access to due to the Fiend we need to defeat. From that intersection head West and follow the path to arrive at the Ice Cave / Cavern of Ice.
Enemies
| Name | Bestiary | HP | Attack | Defense | EXP | Gil | Weak | Drop | Notes |
|---|---|---|---|---|---|---|---|---|---|
| GHAST / Ghast | #024 | 56 | 8-16 / 8 | 10 | 117 | 117 | Attack may Stun / Paralyze | ||
| R.BONE / Bloodbones | #031 | 144 | 26-52 / 26 | 12 | 378 | 378 | |||
| WIZARD / Piscodemon | #032 | 84 | 30-60 / 30 | 16 | 300 | 276 | |||
| MUMMY / Mummy | #034 | 80 | 30-60 / 30 | 20 | 300 | 300 | Attack may Sleep | ||
| IMAGE / Wraith | #035 | 86 | 22-44 / 22 | 12 | 231 | 231 | Crosier | Attack may Stun / Paralyze | |
| SPECTER / Wight | #043 | 52 | 20-40 / 20 | 20 | 150 | 150 | Attack may Stun / Paralyze | ||
| COCTRICE / Cockatrice | #045 | 50 | 1-2 / 1 | 4 | 186 | 200 | Gold Needle | Attack may Petrify | |
| FROST D / White Dragon | #068 | 200 | 53-106 / 53 | 8 | 1,701 | 2,000 | |||
| FrWOLF / Winter Wolf | #069 | 92 | 25-50 / 25 | 0 | 402 | 200 | Ice Shield | ||
| SORCERER / Mindflayer | #070 | 112 | 1-2 / 1 | 12 | 822 | 999 | Phoenix Down | Attack may instantly kill | |
| FrGIANT / Ice Gigas | #071 | 336 | 60-120 / 60 | 16 | 1,752 | 1,752 | |||
| WRAITH / Specter | #072 | 114 | 40-80 / 40 | 12 | 432 | 432 | Attack may Stun / Paralyze | ||
| GrPEDE / Remorazz | #073 | 320 | 73-146 / 73 | 24 | 2,244 | 1,000 | |||
| MAGE / Dark Wizard | #074 | 105 | 26-52 / 26 | 40 | 1,095 | 1,095 | Red Curtain | ||
FROST D / White Dragon - A pretty scary monster to run into specially if there are two, not only is its physical attack strong it can do BLIZZARD / Icestorm which can deal major damage to your entire party.
FrWOLF / Winter Wolf - While physically weak and frail it can be dangerous since they can appear in large groups and have FROST / Icestorm to hit your entire party which due to massive numbers can deal a lot of damage without AICE / NulFrost up, it's not as strong as FROST D / White Dragons BLIZZARD / Icestorm.
SORCERER / Mindflayer - The most dangerous encounter in this area, do not let that low attack value fool you it can hit up to 3 times and its physical attack has the chance to instantly kill the member it hits which happens more often than you'd expect, even with instant death protection it will still go through due to it being counted as a non elemental attack. Additionally they have TRANCE / Mind Blast which can paralyze your entire party leaving you at their mercy. If you get the chance you will want to run from this battle for now.
FrGIANT / Ice Gigas - Basically a stronger GIANT / Hill Gigas, if they are paired with FrWOLF / Winter Wolf (which they usually are) the battle will be flagged as unrunable.
WRAITH / Specter - A pretty powerful undead enemy that has a chance to stun / paralyze the member it hits, it will tend to come grouped with other undead enemies in an attempt to stun lock you into submission.
GrPEDE / Remorazz - Is quite powerful, though it will appear by itself so it shouldn't be too much trouble to dispatch.
MAGE / Dark Wizard - Another dangerous enemy, this one has access to FIR3 / Firaga & LIT3 / Thundaga which can do major damage to your party specially since they can come in up to groups of 4. They also have BANE / Scourge & RUB / Death to instantly kill your party or one member, there's also SLO2 / Slowra & STUN / Stun which they will rarely use, like SORCERER / Mindflayer you will want to run if you get the chance.
Floor Encounters
| Enemy | Floor Number |
|---|---|
| WIZARD / Piscodemon | B1 |
| COCTRICE / Cockatrice | B1 |
| MUMMY / Mummy | B1 |
| R.BONE / Bloodbones | B1 & B3 |
| WRAITH / Specter | All |
| IMAGE / Wraith | B1 & B2 |
| SPECTER / Wight | B1 & B2 |
| GHAST / Ghast | B1 & B2 |
| FROST D / White Dragon | All |
| SORCERER / Mindflayer | B2 & B3 |
| MAGE / Dark Wizard | B2 & B3 |
| FrGIANT / Ice Gigas | B2 & B3 |
| FrWOLF / Winter Wolf | B2 & B3 |
| GrPEDE / Remorazz | B3 |
Map B1
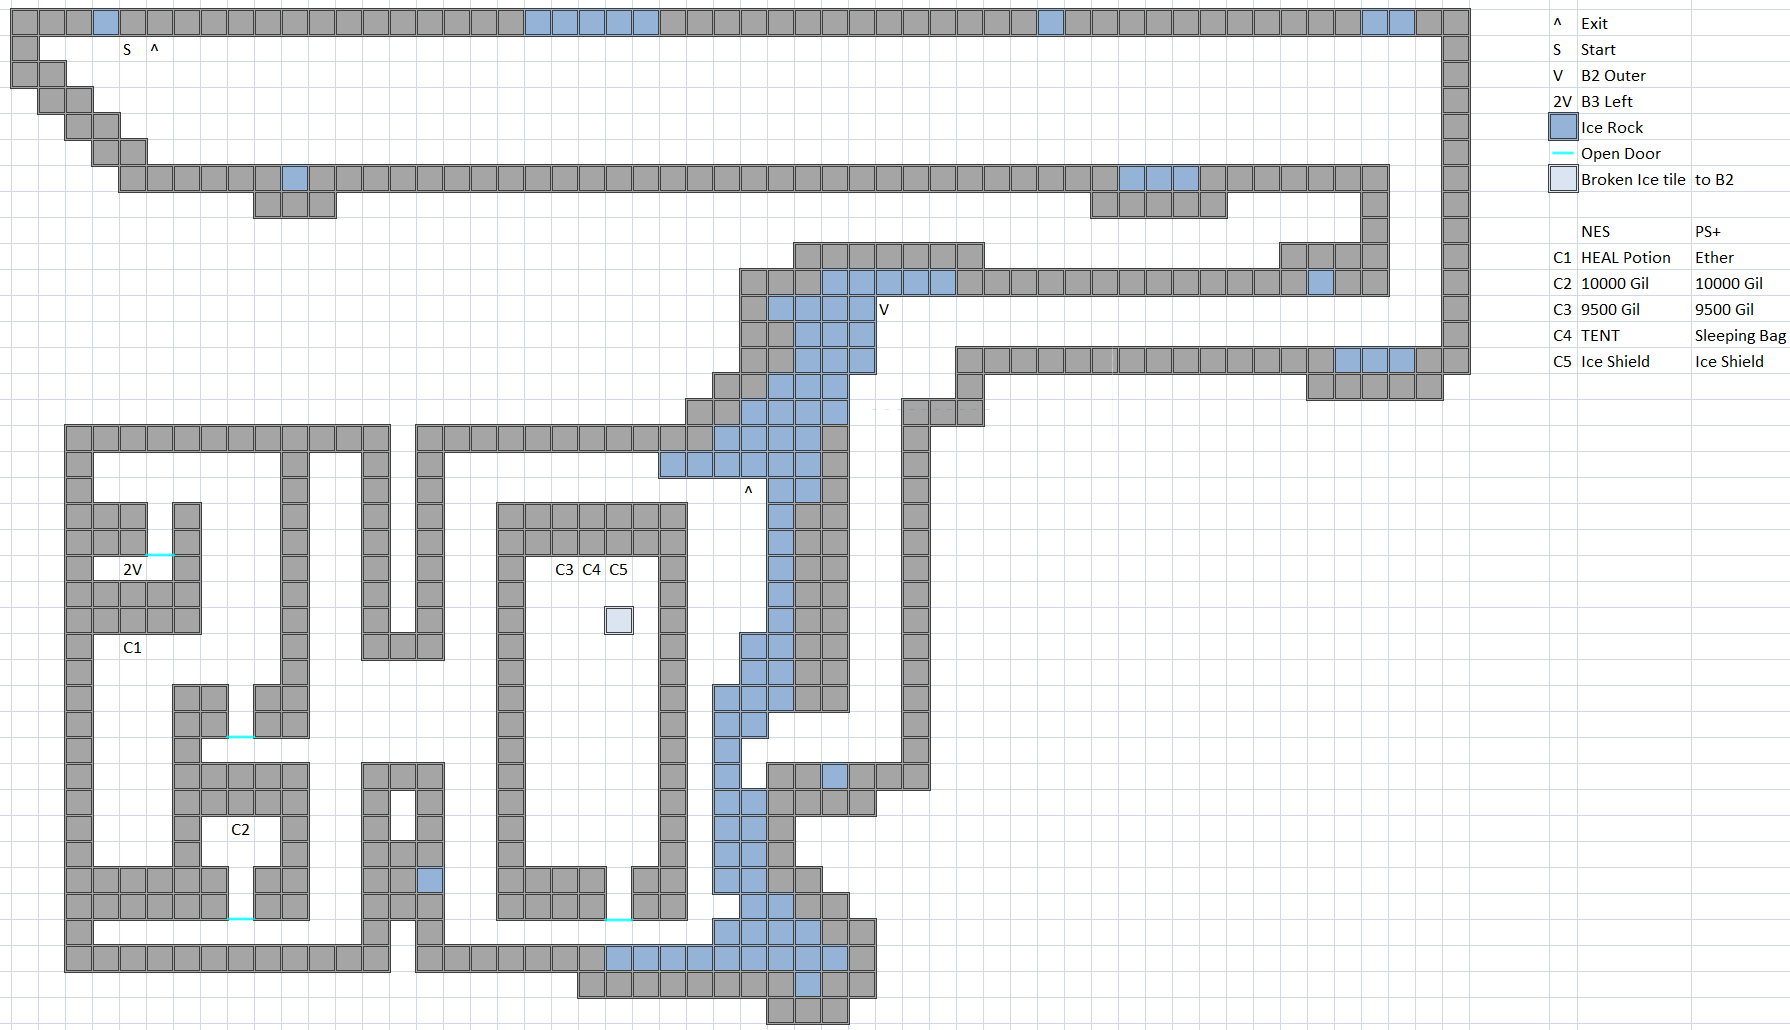
You start on the large stretch at the top left and must make your way to the stairs leading to B2.
Map B2
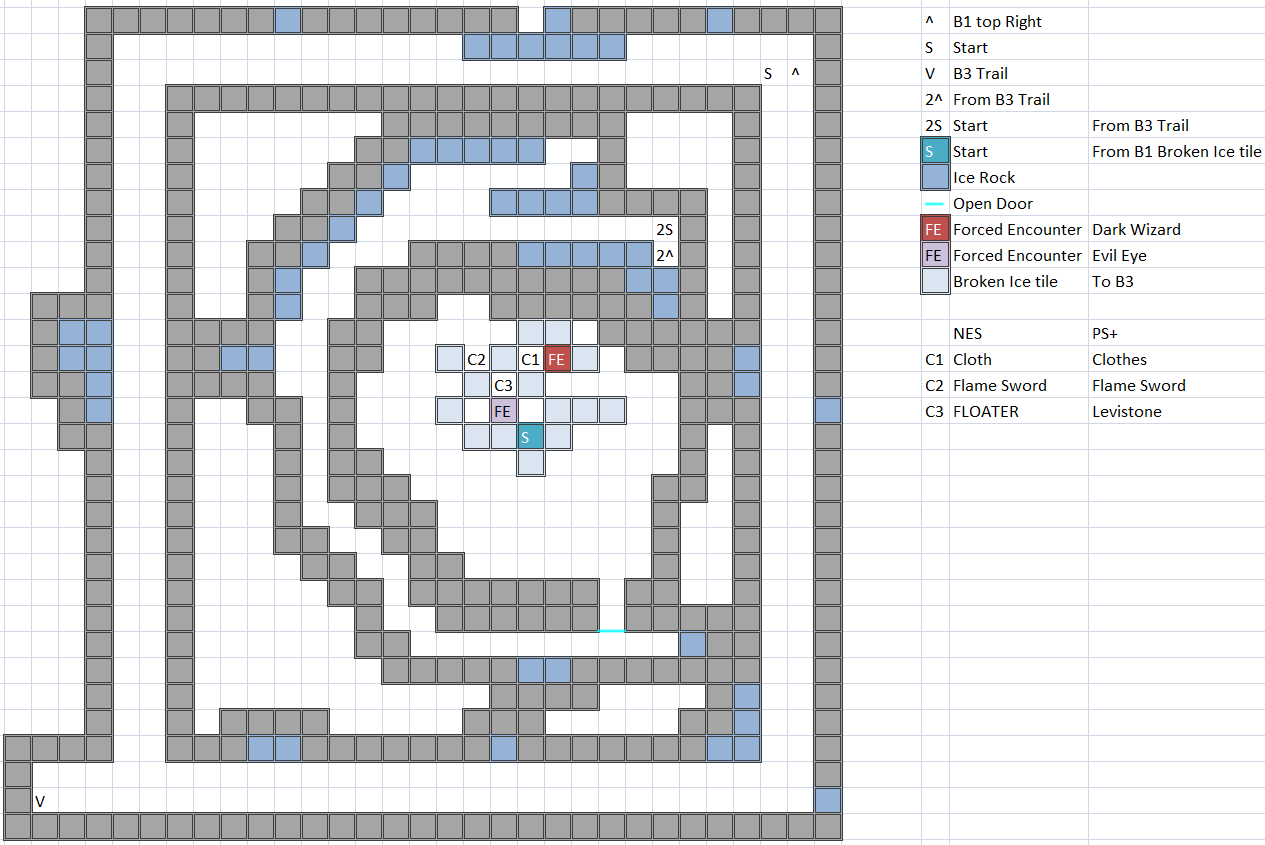
You start in the outer rim, regardless which way you take to the stairs at the lower left is basically the same length. This leads to a very small trail (not mapped) which leads to the inner room. The chest on the right is guarded, but given enemy you fight (MAGE / Dark Wizard) it's not worth going for Clothes which is a basic armor piece, if you are going for all treasures I would suggest running from the battle. The Flame Sword from the other chest we can get to is a weapon that can be used by Fighter / Warrior, Red Mage & Ninja with 26 Attack and 20 Accuracy which is 3 Attack and 5 Accuracy higher than the Silver / Mythril Sword so give it to your better attacker, it can also deal fire elemental damage when attacking (not on NES). You will have no choice but to fall down one of the broken ice tiles to continue.
Map B3
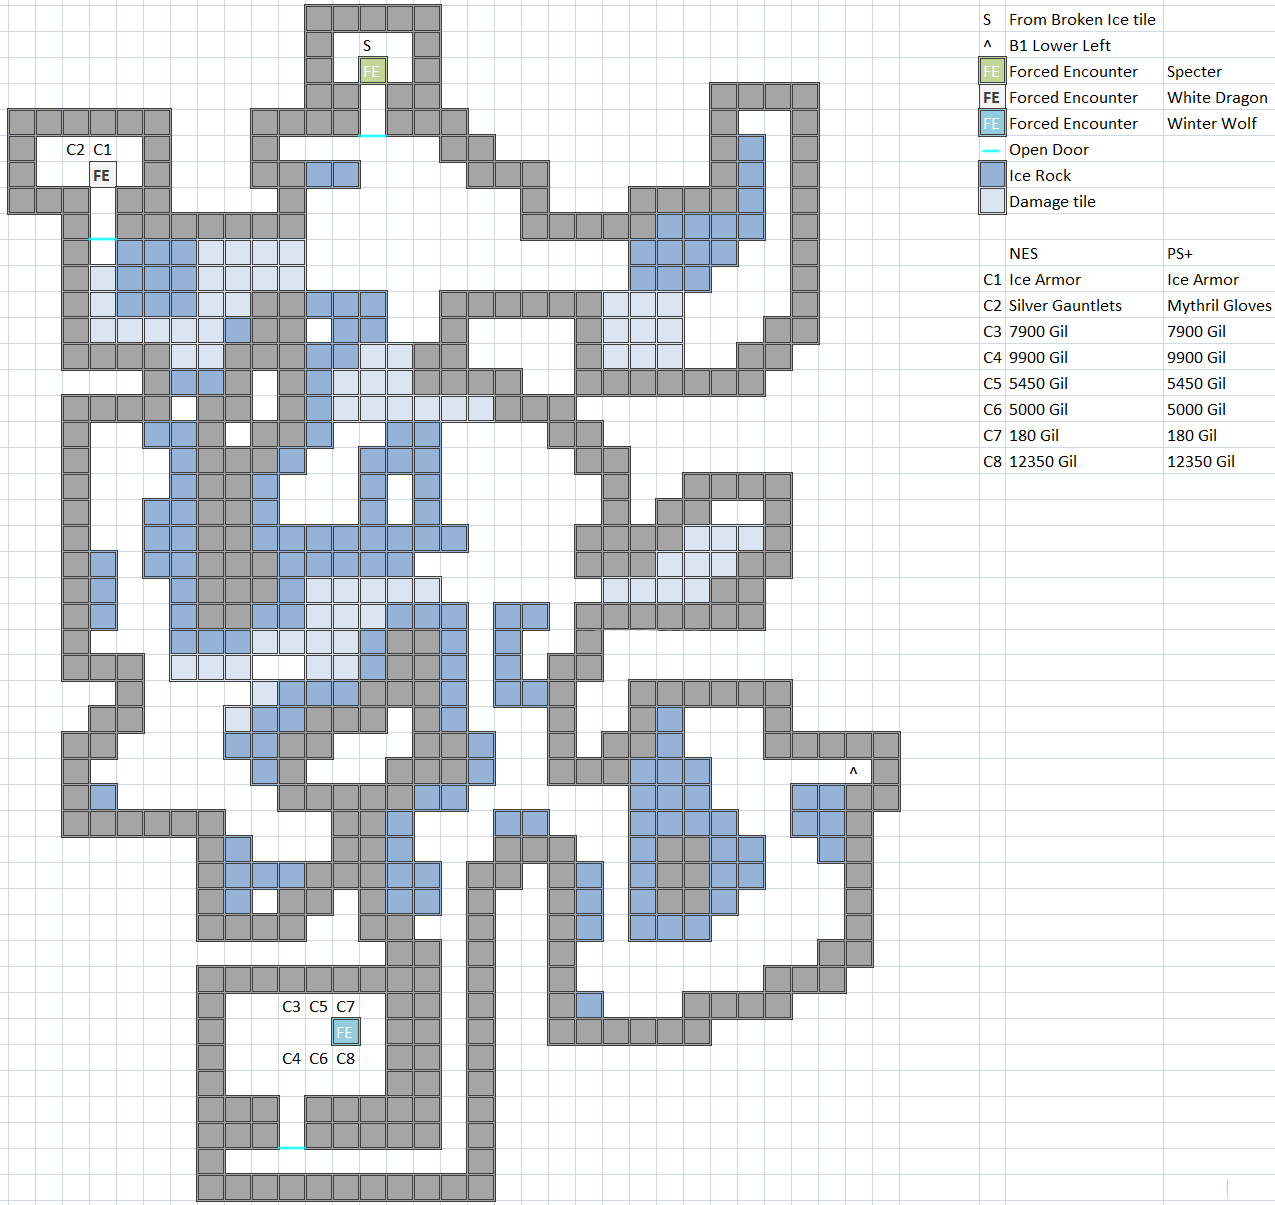
The area you start at has a forced encounter tile right below you which you have to step on as it's in front of the door which will have a WRAITH / Specter with possible other undead that could stun lock you. This floor has ice spike tiles that damage you when you walk over them which also makes it possible to not run into encounters on them, the upper left room is guarded by a FROST D / White Dragon in front of the chest so make sure to heal up before stepping on it. The chest it is guarding has an Ice Armor which can be equipped by Fighter / Warrior & Ninja it has 34 Defense with -10 Evade and a Weight of 10, if you were still using Iron Armor or Steel Armor / Knight's Armor this has better defense as well as not weighing too much so your Evade will increase, it also reduces damage from fire element attacks (which does work on NES(!)). This doesn't stack with AFIR / NulBlaze so remember that for later gear, if you did Gurgu Volcano / Mount Gulg it would be better to have the armor and shield of a different element. The room in the lower left is filled mostly with gil the last 2 chests being guarded in between by Winter Wolf who you may want to avoid. The stairs at the lower right of the room lead back to B1, but you will be on the lower left side.
The room with 3 chests features an Ice Shield which has 12 Defense with no Evade and a weight of 0, it is better than the Silver / Mythril Shield if you still have it, it can be equipped by Fighter / Warrior & Ninja. The tile below this chest will to the center room in B2 that we didn't have access to, but if you are playing on a physical NES cart I would suggest taking the stairs you see outside of the room to leave the cave and save because losing all the progress you made can be devastating especially if you don't want to go through getting everything again. When ready drop down through the tile to end up back in the center of B2 in front of the FLOATER / Levistone, do note that it is guarded by a mini boss.
Mini Boss
EYE / Evil Eye (#075)
HP: 162
Attack: 30-60 (NES) / 30 (PS+)
Defense: 30
EXP: 3,325
Gil: 3,325
Weak: —
Resist:
Drop: None
EYE / Evil Eye has a slew of abilities at its disposal, it will mainly use the spell list more often than the skill list with physical attack being a rare sight.
Prior to Dawn of Souls its spell list went: XXXX / Kill > BRAK / Break > RUB / Death > LIT2 / Thundara > HOLD / Hold > MUTE / Silence > SLOW / Slow > SLEP / Sleep
With the skill cycle going by: Gaze (Stone) > Gaze (Death) > Gaze (Paralyze) > Gaze (Damage)
Dawn of Souls changed the spell cycle to go: Thundara > Hold > Silence > Kill > Slow > Break > Sleep > Death
With the skill cycle going by: Gaze (Damage) > Gaze (Paralyze) > Gaze (Stone) > Gaze (Death)
This is the first enemy that has MUTE / Silence to shut down your magic use (and Drink command on NES), but it's so far down on its list that it should never be able to get that far unless you let it get enough turns. Physical attacks should be more than enough to kill it within the first turn before it gets to attack.
After defeating EYE / Evil Eye the FLOATER / Levistone is yours for the taking, drop down a broken ice tile and make your way back to B1 and go to the exit. Navigate through the river and sail back to the original port (to get to Crescent Lake). If you chose to sell stuff at Crescent Lake and have a Thief you plan on class changing soon do not sell the equipment you got from the Ice Cave / Cavern of Ice as the Ninja can use all of them. From the dock leading to Crescent Lake head South while hugging the continent, skip the first river spot you can dock by and dock at the second one that's closer to the desert and use the Canoe to get on that piece of land and walk in the desert to get your Airship, NES players have to use the FLOATER to get their Airship.
Road to Adulthood
Suggested Level: 15 (NES / PS), 22 (DoS+)
This portion talks about doing class change it is recommended that you have done the Ice Cave / Cavern of Ice as you will need the Airship to fully class change, if you did get the Airship leave it where it is if you are following this guide. From the dock leading to Crescent Lake head South while hugging the continent, skip the first river spot you can dock by and sail close to the second one that's closer to the desert, from here head straight South until you hit another continent, then head straight West until you hit another part of this continent. Follow the continent West while hugging it and you will eventually come to an open spot go in and hug the Southern portion while going North and East and dock you ship in the river head West and South to enter the Castle of Ordeals / Citadel of Trials.
Enemies
Outside
| Name | Bestiary | HP | Attack | Defense | EXP | Gil | Weak | Drop | Notes |
|---|---|---|---|---|---|---|---|---|---|
| SPHINX / Sphinx | #048 | 228 | 23-46 / 23 | 12 | 1,160 | 1,160 | |||
| OCHO / Ochu | #055 | 208 | 20-40 / 20 | 24 | 1,224 | 102 | Attack may Poison | ||
| HYDRA / Hydra | #057 | 212 | 30-60 / 30 | 14 | 915 | 150 | |||
| GrPEDE / Remorazz | #073 | 320 | 73-146 / 73 | 24 | 2,244 | 1,000 | |||
| Saber T / Sabertooth | #077 | 200 | 24-48 / 24 | 8 | 843 | 500 | |||
| WYRM / Wyrm | #079 | 260 | 40-80 / 40 | 22 | 1,218 | 502 | |||
| SAURIA / Basilisk | #082 | 196 | 30-60 / 30 | 20 | 1,977 | 658 | Gold Needle | Gaze may Stone | |
| CATMAN / Weretiger | #084 | 160 | 30-60 / 30 | 16 | 780 | 780 | Sleeping Bag | 8 HP Regen per turn (not on NES), attack may Poison | |
Saber T / Sabertooth - Will appear with CATMAN / Weretiger, it is weaker and thus can be left for last after CATMAN / Weretigers are defeated.
WYRM / Wyrm - A bit strong, but shouldn't be too hard to handle.
SAURIA / Basilisk - Is not too terribly strong, but has Gaze attack that can petrify the member if it hits.
CATMAN / Weretiger - May appear in groups with Saber T / Sabertooth and is the higher priority between the two.
Inside
| Name | Bestiary | HP | Attack | Defense (NES / GBA+) | EXP | Gil | Weak | Drop | Notes |
|---|---|---|---|---|---|---|---|---|---|
| MUMMY / Mummy | #034 | 80 | 30-60 / 30 | 20 | 300 | 300 | Attack may Sleep | ||
| R.GOYLE / Horned Devil | #058 | 94 | 10-20 / 10 | 32 | 387 | 387 | Attack may Stun / Paralyze | ||
| SORCERER / Mindflayer | #070 | 112 | 1-2 / 1 | 12 | 822 | 999 | Phoenix Down | Attack may instantly kill | |
| ZomBULL / Minotaur Zombie | #086 | 224 | 40-80 / 40 | 14 | 1,050 | 1,050 | Great Axe | ||
| WzMUMMY / King Mummy | #087 | 188 | 43-86 / 43 | 24 | 984 | 1,000 | Attack may Sleep | ||
| MEDUSA / Medusa | #088 | 68 | 20-40 / 20 | 12 / 10 | 699 | 699 | Attack may Poison, Gaze may Stone | ||
| MANCAT / Rakshasa | #089 | 110 | 20-40 / 20 | 30 | 603 | 800 | |||
| ZombieD / Dragon Zombie | #092 | 268 | 56-112 / 56 | 30 | 2,331 | 999 | Megalixir | Attack may Stun / Paralyze | |
ZomBULL / Minotaur Zombie - A slightly tougher BULL / Minotaur with Undead characteristics, those who fought these at the Peninsula of Power should have no trouble with them, it is flagged as unrunable.
WzMUMMY / King Mummy - Can hit pretty hard, though it is often grouped with weaker MUMMY / Mummies making it prime choice for physical attacks while mages take care of the weaker ones.
MEDUSA / Medusa - Not too physically strong, the danger with her besides appearing in large groups is her Gaze attack may petrify a member, though the hit rate for her tends to be very low, she also has a chance to Poison with her physical attack.
MANCAT / Rakshasa - Might not seem too powerful, but it has access to the spells FIRE / Fire, FIR2 / Fira, DARK / Dark, SLEP / Sleep, SLOW / Slow & CURE / Cure. They tend to appear in as little as 3 which can be troublesome if a couple decide to do FIR2 / Fira on your entire party.
ZombieD / Dragon Zombie - Has a strong physical attack that may Stun / Paralyze, unlike other Dragons it doesn't posses a breath attack to hit your party lowering how threatening it could be, however it is unrunable.
Floor Encounters
| Enemy | Floor Number |
|---|---|
| ZomBULL / Minotaur Zombie | B2 |
| R.GOYLE / Horned Devil | B2 & B3 |
| MEDUSA / Medusa | B2 & B3 |
| MANCAT / Rakshasa | B2 & B3 |
| MUMMY / Mummy | B2 & B3 |
| WzMUMMY / King Mummy | B2 & B3 |
| SORCERER / Mindflayer | B2 & B3 |
| ZombieD / Dragon Zombie | B2 & B3 |
1F
Not really much to this floor, walk up to the old man and speak with him. This allows you to go to 2F from the throne in the Northwest room since you have the Crown which is needed even though you have no way of getting here without it. Interestingly NES players do not need to speak with this man which would mean you could go through the area without the CROWN.
Map 2F
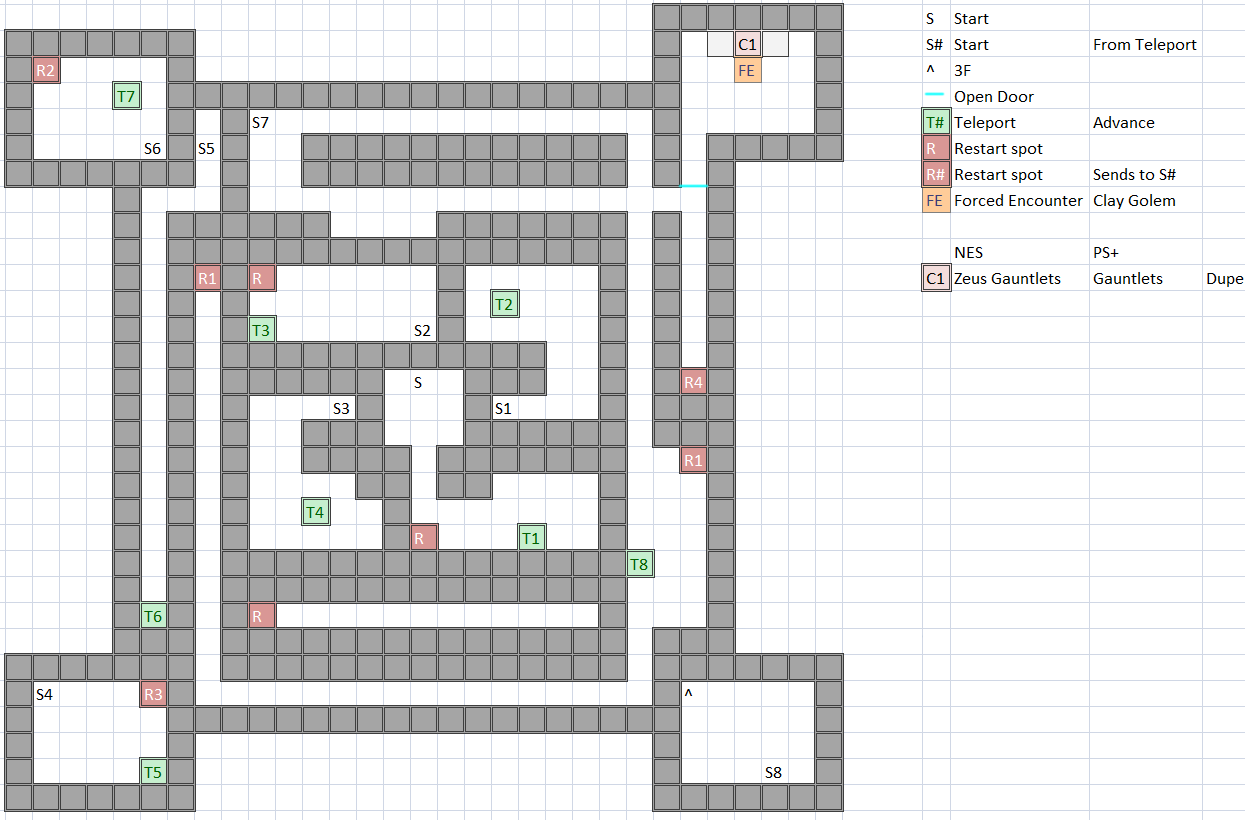
This is basically a teleporter maze a rather simple one though, the room in the upper right has a chest that if you get here empties another chest later, those going for bestiary completion can choose to fight the enemy in a later dungeon, for those who choose to fight it now...
| Name | Bestiary | HP | Attack | Defense | EXP | Gil | Weak | Drop | Notes |
|---|---|---|---|---|---|---|---|---|---|
| MudGOL / Clay Golem | #090 | 176 | 64-128 / 64 | 7 | 1,257 | 800 | Potion | Attack may Poison | |
MudGOL / Clay Golem - You don't want to let this guy live specially if you get unlucky to fight a group of 3 because he has access to FAST / Haste which will leave a nasty dent on whoever he hits the following turn, he resist all elements so magic won't be of much help.
The chest he was guarding has the Zeus Gauntlet / Gauntlets which has the same stats as a Silver Gauntlet / Mythril Gloves, but can only be equipped by Knight, Ninja & Red Wizard all of which are class changes we currently don't have yet. However you won't be using it as equipment because this is the first instance of us getting an item that casts a spell when we use it during battle, this one in particular casts LIT2 / Thundara for free. If using a White Mage they no longer have a need for their physical attack as you should have them use this in battle from now on. After getting it continue on to 3F.
Map 3F
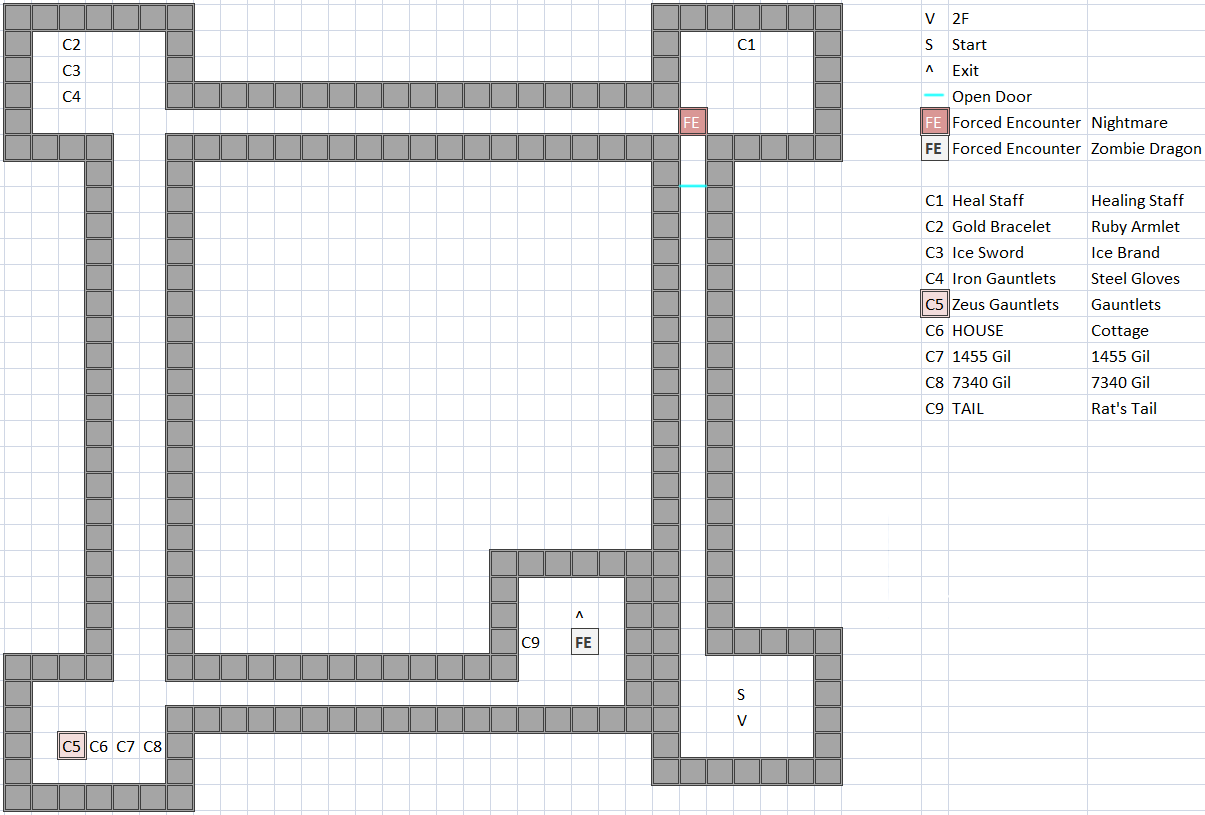
A fairly linear path, the room in the top right corner is guarded by...
| Name | Bestiary | HP | Attack | Defense | EXP | Gil | Weak | Drop | Notes |
|---|---|---|---|---|---|---|---|---|---|
| NITEMARE / Nightmare | #091 | 200 | 30-60 / 30 | 24 | 1,272 | 700 | Snort can cause Darkness | ||
NITEMARE / Nightmare - Has a pretty strong physical attack, it will often use SNORTING / Snort which causes Darkness though it will often miss. Even if you get afflicted by the ailment it doesn't work.
The chest it was guarding the room to has the Heal Staff / Healing Staff which can be equipped by Ninja and White Mage, it has the same stats as the Wooden Staff / Staff, but when this weapon is used as an item in battle will cast HEAL / Heal. Definitely a weapon you want around for some small healing. Those on NES can avoid the second fight against the encounter since the corner can be used to walk around it. Another noteworthy new equipment here is the Gold Bracelet / Ruby Armlet equipable by everyone with a Defense of 24, 9 points better than a Silver Bracelet / Silver Armlet. The treasure we came for to prepare for class change is the Rat's Tail, after taking the chest step in front of the throne to fight ZombieD / Dragon Zombie guarding the exit then step on the throne to warp back to 1F and leave. Make your way back to where you ship is then sail back to where the Airship was when it was unearthed, where we are headed to is the Cardia Islands which is a small chain of islands near the Castle of Ordeals / Citadel of Trials. Fly back the way you sailed to get to the Castle of Ordeals / Citadel of Trials, West and slightly South of it are the small chain of islands, the one you want to look for is the one with 2 holes and a forest patch on it, enter the right hole.
Afterward follow the long hallways and speak with Bahamut who upon seeing your Rat's Tail will now bestow you with upgraded classes. Note while Knight & Ninja on NES and Origins Normal don't have spell charges immediately they will get it every odd level after the change, but they will only go up to a max of 4. In the chance you got here before level 15 on all versions Knight and Ninja will not be able to learn magic yet even though on Origins Easy & DoS+ they will still gain MP. Those on DoS+ will notice the island below where Bahamut is also had 2 holes, the bottom hole is the location of the last bonus dungeon which you will have access to after defeating the Fiend of Fire. The other hole (pre-DoS players see only one) has a treasure trove which include 10 gil (NES / PS) / Elixir (DoS+), a HOUSE / Cottage & 500 gil. The island left of it has a CABIN / Tent in the upper room and 575 gil (NES / PS) / Dry Ether (DoS+) & a SOFT Potion / Gold Needle in the lower room. A lone island to the very right surrounded by forests has 2 treasure troves the closest to the entrance having 2750 gil, 2000 gil & 1455 gil, while the other one on the left side of the room having 160 gil (NES / PS) / X-Potion (DoS+), 9500 gil, 2750 gil & 1520 gil.
Worldwide Shopping Trip
After all of that you should be somewhere around Level 18 (NES / PS) or 33 (DoS+). With class change upon us and an Airship to use we can go around the world buying spells for our characters which is what we'll start with
Coneria / Cornelia
Knight
Spell Charge: RUSE / Blink
MP: Cure
Ninja
SLEP / Sleep
Pravoka
Ninja
Temper (not on NES)
SLOW / Slow
Elfland / Elfheim
Knight
Spell Charge: CUR2 / Cura & AFIR / NulBlaze
MP: NulBlaze
Ninja
FAST / Haste
Melmond
FIR3 / Firaga & CUR3 / Curaga for Red Mage if you didn't already
Crescent Lake
Red / White Wizard
EXIT / Exit!
Protera@
Red / Black Wizard
LIT3 / Thundaga!
!Red Wizard on NES / PS won't have access to spell charges until level 20.
@Only if going for bonus dungeons on remakes.
Those are all towns we've been to so time for a new place. This area is the top right of the map from Crescent Lake head straight South you will eventually see the town on the right side in the Airship only accessible town of Gaia.
Enemies
| Name | Bestiary | HP | Attack | Defense | EXP | Gil | Weak | Drop | Notes |
|---|---|---|---|---|---|---|---|---|---|
| IGUANA / Lizard | #016 | 92 | 18-36 / 18 | 12 | 153 | 50 | |||
| GIANT / Hill Gigas | #040 | 240 | 38-76 / 38 | 12 | 879 | 879 | Tent | ||
| TROLL / Troll | #042 | 184 | 24-48 / 24 | 12 | 621 | 621 | 9 HP Regen per turn (not on NES) | ||
| OCHO / Ochu | #055 | 208 | 20-40 / 20 | 24 | 1,224 | 102 | Attack may Poison | ||
| HYDRA / Hydra | #057 | 212 | 30-60 / 30 | 14 | 915 | 150 | |||
| FrWOLF / Winter Wolf | #069 | 92 | 25-50 / 25 | 0 | 402 | 200 | Ice Shield | ||
| FrGIANT / Ice Gigas | #071 | 336 | 60-120 / 60 | 16 | 1,752 | 1,752 | |||
| GrPEDE / Remorazz | #073 | 320 | 73-146 / 73 | 24 | 2,244 | 1,000 | |||
| WYVERN / Wyvern | #078 | 212 | 30-60 / 30 | 12 | 1,173 | 20 | Attack may Poison | ||
| MANTICOR / Manticore | #080 | 164 | 22-44 / 22 | 8 | 1,317 | 650 | Tent | ||
WYVERN / Wyvern - A weaker version of WYRM / Wyrm their danger mainly comes from them being in groups of up to 3, its attack can potentially Poison a member it hits.
MANTICOR / Manticore - Not terribly strong, the danger comes from its STINGER / Poison Darts attack which can potentially Poison your entire party.
Gaia has a number of shops though they have very few things to buy, however there is a very important glove equipment you definitely want now (specially DoS / Anniversary players going to bonus dungeons). The residence speak of a faerie who was living in the spring, but she hasn't been seen for sometime. The level 7 magic shops are right in front of the entrance, the Inn is to the left of that with the Weapon / Armor shop to the left of that, above the Inn is the level 8 magic shops, the item shop is along the road leading up on the Western side of town.
Inn cost: 500
Weapon Shop
| Item | Cost (NES / PS Normal) | Cost (PS Easy / DoS+) | Attack | Accuracy | User |
|---|---|---|---|---|---|
| Cat Claw | 65,000 | 8 | 22 | 35 | Knight, Ninja, Red Wizard, Black Wizard |
This is simply too expensive to even consider buying when there are much better weapons we can get for free or already have, specially since these are exclusive to class changes.
Armor Shop
| Item | Cost (NES / PS Normal) | Cost (PS Easy / DoS+) | Defense | Evade | Weight | User |
|---|---|---|---|---|---|---|
| Gold Bracelet / Ruby Armlet | 50,000 | 40,000 | 34 | -1 | 1 | Everyone |
| ProRing / Protect Ring | 20,000 | 16,000 | 8 | -1 | 1 | Everyone |
Gold Bracelet / Ruby Armlet - If you have the spare gil go ahead and get them as it will last a pretty long time until it needs to be replaced.
ProRing / Protect Ring - Definitely get this for everyone, this piece of equipment has the ability to resist death attacks (exception being QAKE / Quake & CRACK / Earthquake) which you will really want (specially for those wanting to grind the EYE / Evil Eye later).
White Magic Shop (Level 7)
| Spell (NES / PS+) | Cost (NES / PS Normal) | Cost (PS Easy / DoS+) | NES / PS effect | DoS+ effect | MP Cost | User |
|---|---|---|---|---|---|---|
| CUR4 / Curaja | 45,000 | 30,000 | Restores all HP to an ally. | Fully restores one ally's HP. | 35 | White Wizard |
| HRM4 / Diaja | 45,000 | 30,000 | Deal 80-320 damage to all undead enemies. | Deals damage to all undead foes. | 35 | White Wizard |
CUR4 / Curaja - The ultimate single target healing spell, you will want this incase someone took too large of a hit and you want them back at full HP.
HRM4 / Diaja - The ultimate undead damage spell for White Mage, not really necessary since HRM2 / Diara is the highest you'll really need (even on DoS+ in bonus dungeons).
White Wizard on NES / PS won't have access to spell charges until level 20.
White Magic Shop (Level 8)
| Spell (NES / PS+) | Cost (NES / PS Normal) | Cost (PS Easy / DoS+) | NES / PS effect | DoS+ effect | MP Cost | User |
|---|---|---|---|---|---|---|
| FADE / Holy | 60,000 | 40,000 | Deal 80-320 damage to all enemies. | Damages all foes with holy light. | 50 | White Wizard |
| WALL / NulAll | 60,000 | 40,000 | Protects against status effects and lowers damage. | Reduces damage from spells by half. | 40 | White Wizard |
| XFER / Dispel | 60,000 | 40,000 | Removes elemental resistances from an enemy (Bugged, on NES only works when used on party, not enemy). | Negates one foe's magical defenses. | 35 | White Wizard |
FADE / Holy - Is Non-Elemental in this game and White Wizards shouldn't really be using Lv 8 Spell Charges or MP for damaging spells when equipment used as items suffice enough to kill everything, unless you are on DoS+ and are planning to get a certain Staff that doubles this spells power.
WALL / NulAll - This gives one character resistance to all forms of elemental damage and instant death attacks (except SORCERER / Mindflayer), worthwhile to get if you don't have members without a Ribbon equipped.
Dispel - From Origins onward removes beneficial buffs from the target which you won't find yourself doing often.
White Wizard on NES / PS won't have access to spell charges until level 25. From DoS+ it's level 39 to learn these.
Black Magic Shop (Level 7)
| Spell (NES / PS+) | Cost (NES / PS Normal) | Cost (PS Easy / DoS+) | NES / PS effect | DoS+ effect | MP Cost | User |
|---|---|---|---|---|---|---|
| ICE3 / Blizzaga | 45,000 | 30,000 | Deal 70-280 damage to all enemies, deal more if enemy is weak to Ice. | Deals ice damage to all foes. | 40 | Black Mage, Red Wizard |
| BRAK / Break | 45,000 | 30,000 | Destroys an enemy in one hit. | Petrifies one foe. | 30 | Black Wizard |
ICE3 / Blizzaga - The high tier Ice damaging spell which is good to have another multi target option on a different spell charge / magic level.
BRAK / Break - An instant death spell on enemies, though spells this late are better used as a damage option on multiple rather than just one.
Black Wizard on NES / PS won't have access to spell charges until level 20.
Red Wizard on NES / PS won't have access to spell charges until level 26.
Black Magic Shop (Level 8)
| Spell (NES / PS+) | Cost (NES / PS Normal) | Cost (PS Easy / DoS+) | NES / PS effect | DoS+ effect | MP Cost | User |
|---|---|---|---|---|---|---|
| STOP / Stop | 60,000 | 40,000 | Possibly stuns all enemies. | Stops time and paralyzes all foes. | 30 | Black Wizard |
| ZAP! / Warp | 60,000 | 40,000 | Possibly destroys all enemies. | Banishes foes to another dimension. | 30 | Black Wizard |
| XXXX / Kill | 60,000 | 40,000 | Destroys most enemies with less than 300 HP. | Instantly kill one foe. | 40 | Black Wizard |
STOP / Stop - A party wide STUN / Stun, not really worth getting.
ZAP! / Warp - An instant death spell that is more accurate than BANE / Scourge.
XXXX / Kill - A more accurate RUB / Death.
Black Wizard on NES / PS won't have access to spell charges until level 25. From DoS+ it's level 39 to learn these.
Item Shop
| Item (NES / PS+) | Cost (NES / PS Normal) | Cost (PS Easy / DoS+) | Effect NES / PS | Effect DoS+ |
|---|---|---|---|---|
| HEAL Potion / Potion | 60 | — | Heal one ally for 30 HP outside of battle (16-32 in battle). | Restore 50 HP. |
| Hi-Potion | — | 150 | — | Restore 150 HP. |
| PURE Potion / Antidote | 75 | — | Remove poison from an ally. | Cure poison. |
| Ether | — | 150 | — | Restores 50 MP. |
| Phoenix Down | — | 500 | — | Revives one KO'd ally. |
| CABIN / Tent | 250 | 160 | Restores 60 HP and saves game. | Restores 200 HP and 100 MP. |
| HOUSE / Cottage | 3,000 | 2,000 | Recovers 120 HP and saves game, recovers Spell Charges. | Fully restores party's HP and MP. |
After you have done your shopping (or eyeing the wares for later) enter your Airship and head West you will see a lot of mountains and a river with a waterfall, we'll go there after the next shopping trip. Head South and you should see a town however you won't be able to land near it so head South a bit and find a spot to land near the river, then take the river up to the town and enter.
Enemies
Desert
| Name | Bestiary | HP | Attack | Defense | EXP | Gil | Weak | Drop | Notes |
|---|---|---|---|---|---|---|---|---|---|
| TIGER / Lesser Tiger | #038 | 132 | 22-44 / 22 | 8 | 438 | 108 | X-Potion | ||
| WzOGRE / Ogre Mage | #047 | 144 | 23-46 / 23 | 10 | 723 | 723 | Eye Drops | 7 HP Regen per turn (not on NES) | |
| CEREBUS / Hellhound | #063 | 192 | 30-60 / 30 | 8 | 1,182 | 600 | |||
| GrPEDE / Remorazz | #073 | 320 | 73-146 / 73 | 24 | 2,244 | 1,000 | |||
| ANKYLO / Desert Baretta | #076 | 352 | 98-196 / 98 | 48 | 2,610 | 1 | |||
| Saber T / Sabertooth | #077 | 200 | 24-48 / 24 | 8 | 843 | 500 | |||
| WYRM / Wyrm | #079 | 260 | 40-80 / 40 | 22 | 1,218 | 502 | |||
ANKYLO / Desert Baretta - Can deal a lot of damage if its attack hits, later remakes give him high magic defense making physical the better option.
Near Onrac has the same encounters as Gaia. The town of Onrac doesn't have too many shops available, though what they have something worth looking at. The item shop is North of the entrance, with the magic shops in the center of the town and Inn on the lower left.
Inn cost: 500
White Magic Shop
| Spell (NES / PS+) | Cost (NES / PS Normal) | Cost (PS Easy / DoS+) | NES / PS effect | DoS+ effect | MP Cost | User |
|---|---|---|---|---|---|---|
| ARUB / NulDeath | 45,000 | 30,000 | Protects allies from Rub attacks. | Enhances party's defense against death. | 28 | White Wizard, Red Wizard |
| HEL3 / Healaga | 45,000 | 30,000 | Heal 48-96 HP to all allies. | Restores a lot of HP to entire party. | 38 | White Wizard |
ARUB / NulDeath - Is good to have for enemies with with QAKE / Quake and CRACK / Earthquake that bypass a ProRing / Protect Ring, not told it also grants protection from all status ailments so it acts as a supplementary Ribbon for parties without said equipment.
HEL3 / Healaga - The highest tier party healing spell, this is very much needed on remakes if you plan to do bonus dungeons.
White Wizard on NES / PS won't have access to spell charges until level 20.
Red Wizard on NES / PS won't have access to spell charges until level 26. From DoS+ it's level 37 to learn these.
Black Magic Shop
| Spell (NES / PS+) | Cost (NES / PS Normal) | Cost (PS Easy / DoS+) | NES / PS effect | DoS+ effect | MP Cost | User |
|---|---|---|---|---|---|---|
| SABR / Saber | 45,000 | 30,000 | Increase casters attack and HIT% (Bugged, on NES it does nothing). | Raise casters attack (+16) and accuracy (+10). | 25 | Black Wizard |
| BLND / Blind | 45,000 | 30,000 | Blinds most enemies with less than 300 HP. | Blinds one foe with darkness. | 25 | Black Mage |
SABR / Saber - Would be a good spell...if you could choose the target, there is a piece of equipment that has this spells effect which you should aim to get on remakes since the spell does nothing on the NES version.
BLND / Blind - Is useless cause the Darkness status ailment doesn't work.
Black Mage / Wizard on NES / PS won't have access to spell charges until level 20.
Item Shop
| Item (NES / PS+) | Cost (NES / PS Normal) | Cost (PS Easy / DoS+) | Effect NES / PS | Effect DoS+ |
|---|---|---|---|---|
| HEAL Potion / Potion | 60 | — | Heal one ally for 30 HP outside of battle (16-32 in battle). | Restore 50 HP. |
| Hi-Potion | — | 150 | — | Restore 150 HP. |
| PURE Potion / Antidote | 75 | — | Remove poison from an ally. | Cure poison. |
| SOFT Potion / Gold Needle | 800 | 500 | Remove stone from an ally. | Cures petrify. |
| Ether | — | 150 | — | Restores 50 MP. |
| Remedy | — | 1500 | — | Cures ailments except stone and KO. |
| CABIN / Tent | 250 | — | Restores 60 HP and saves game. | Restores 200 HP and 100 MP. |
| HOUSE / Cottage | 3,000 | 2,000 | Recovers 120 HP and saves game, recovers Spell Charges. | Fully restores party's HP and MP. |
There is a submarine made out of a barrel in the lower right corner of town, however we can't enter because we need an item to breath underwater in order to use it, we don't have access to it now, however we can get some in a short moment.
Under the Waterfall and the Sea
From Onrac head to the river and follow it to the North into the waterfall.
Enemies
| Name | Bestiary | HP | Attack | Defense | EXP | Gil | Weak | Drop | Notes |
|---|---|---|---|---|---|---|---|---|---|
| MUMMY / Mummy | #034 | 80 | 30-60 / 30 | 20 | 300 | 300 | Attack may Sleep | ||
| PERILISK / Pyrolisk | #059 | 44 | 20-40 / 20 | 4 | 432 | 500 | Gold Needle | Gaze can petrify or instantly kill | |
| WzMUMMY / King Mummy | #087 | 188 | 43-86 / 43 | 24 | 984 | 1,000 | Attack may Sleep | ||
| MudGOL / Clay Golem | #090 | 176 | 64-128 / 64 | 7 | 1,257 | 800 | Potion | Attack may Poison | |
| NITEMARE / Nightmare | #091 | 200 | 30-60 / 30 | 24 | 1,272 | 700 | Snort can cause Darkness | ||
| Gas D / Green Dragon | #108 | 352 | 72-144 / 72 | 16 | 4,068 | 5,000 | |||
Gas D / Green Dragon - A very rare encounter here much more common in the endgame dungeon, it has a strong physical attack and can use Poison Gas to damage the party, it is also flagged as unrunable.
Map
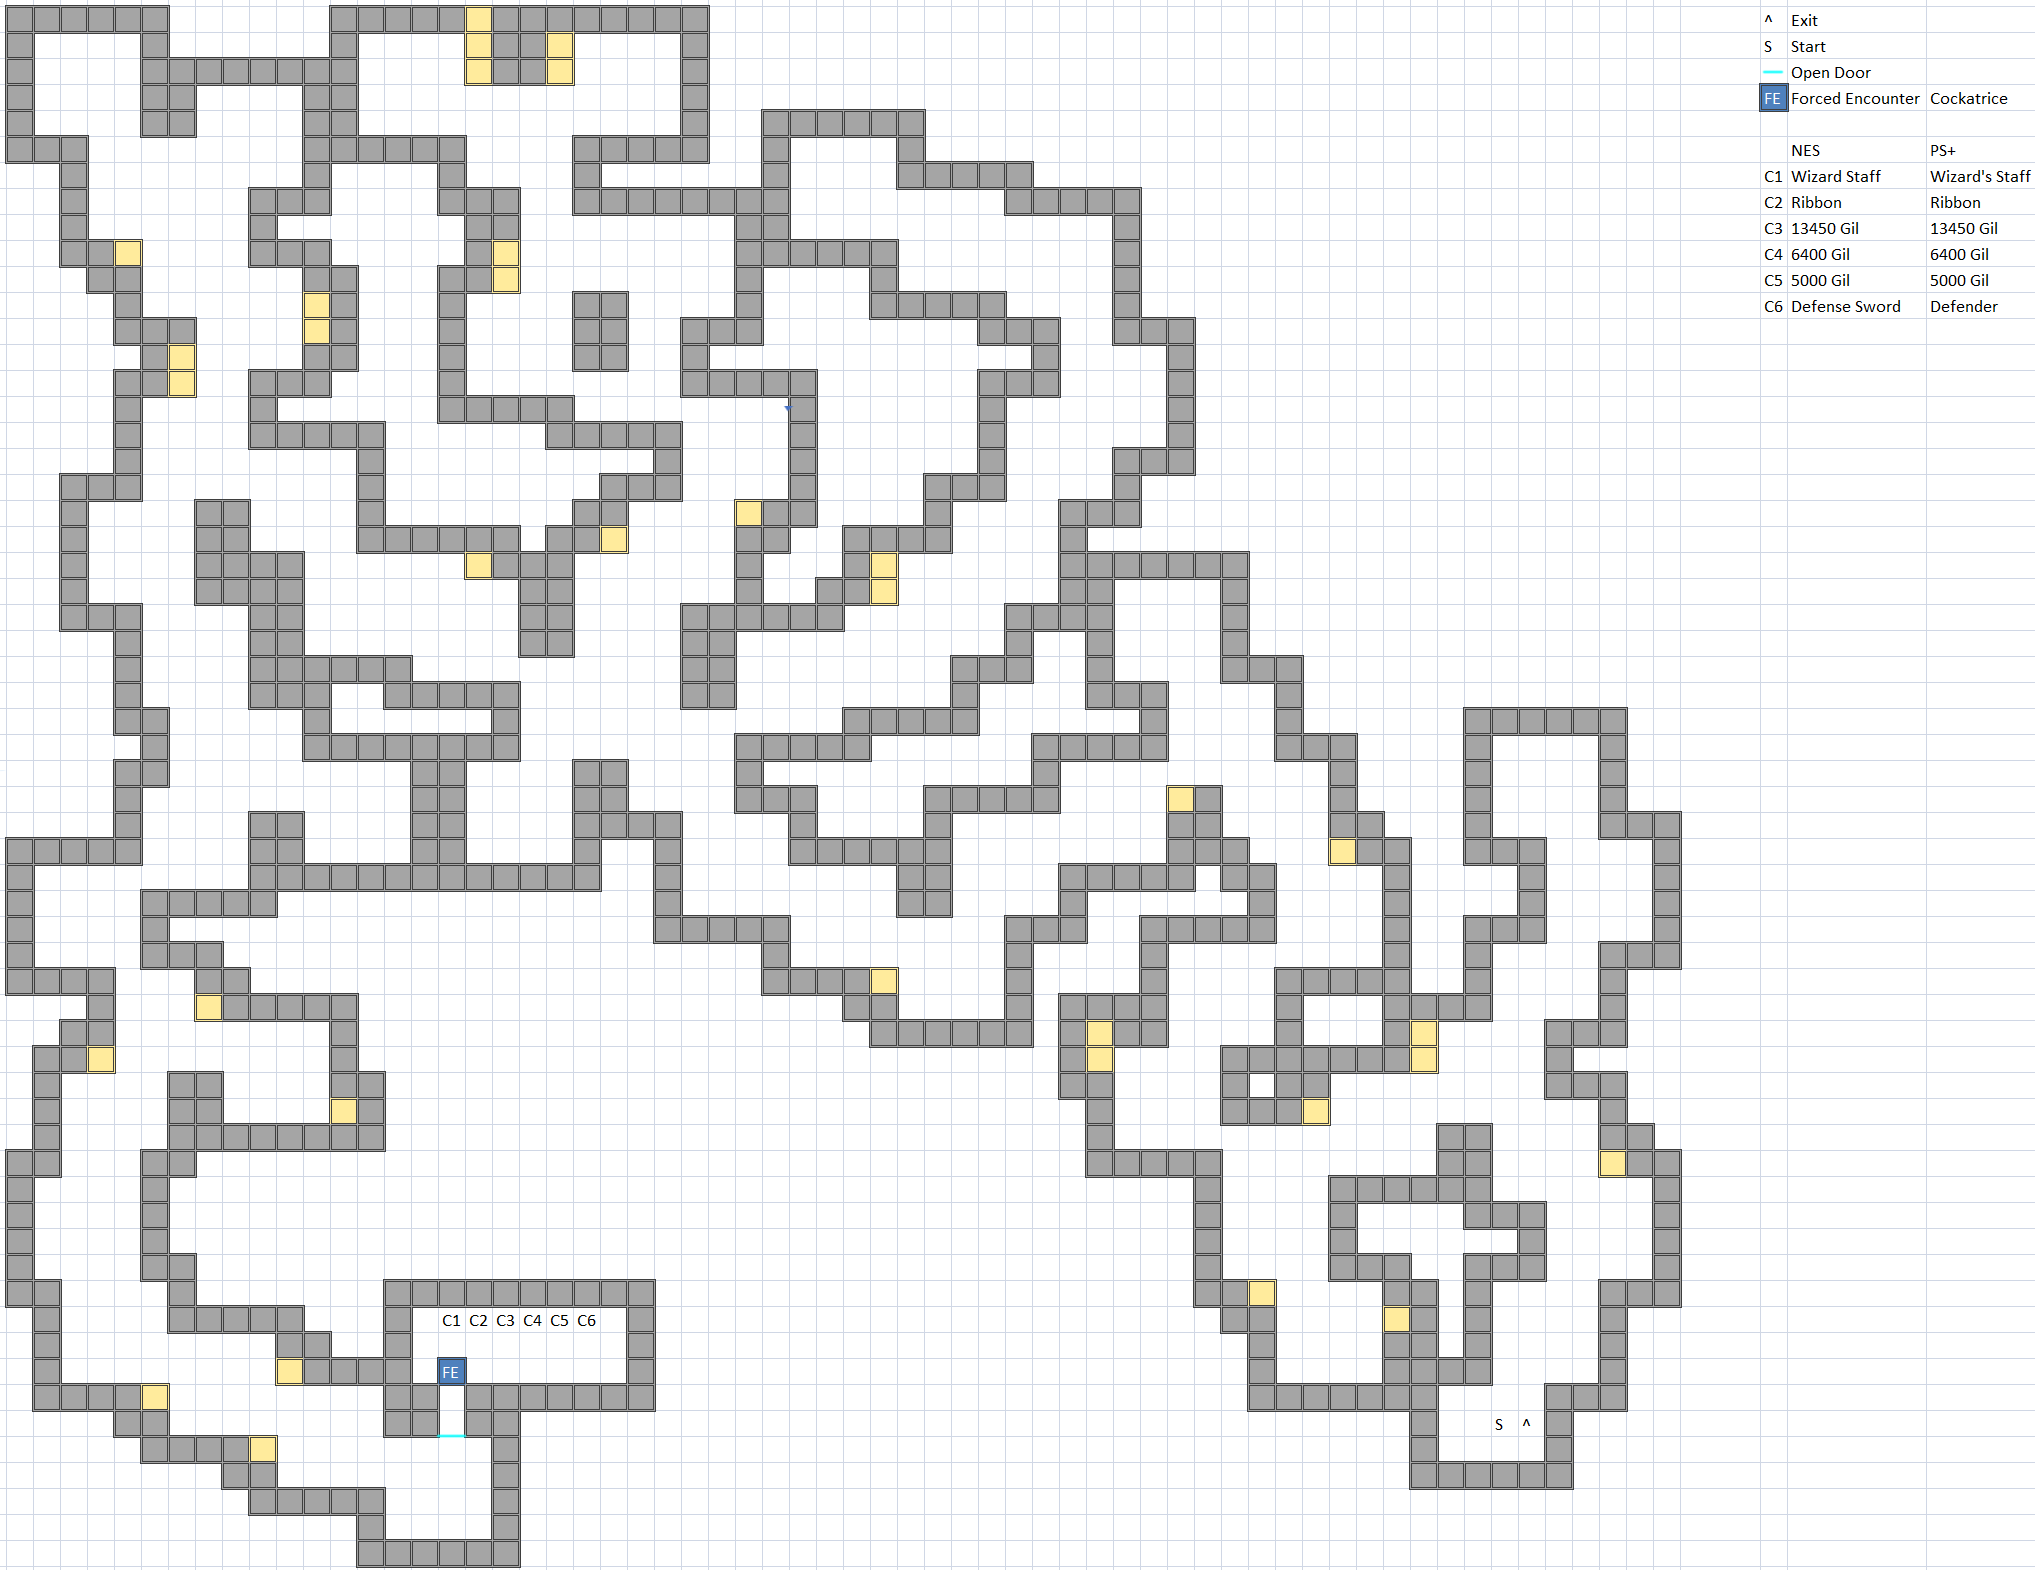
A labyrinth with many dead ends, while here if you aren't already at 50,000 Gil (40,000 on Origins Easy and later remakes) you will want to get as close as you can for what we will buying after leaving. The forced encounter tile can have WzMUMMY / King Mummy, MUMMY / Mummy, COCTRICE / Cockatrice or PERILISK / Pyrolisk (as much as 9 will take) if you have EXIT / Exit you won't have to fight it twice, the robot walking around this room has a Warp Cube which we will need for later. The Wizard Staff can only be equipped by Black Wizard, it has 15 Attack and 15 Accuracy, when used as an item it will cast CONF / Confuse. The Ribbon is a headgear that everyone can equip, it has the same defense and evade as a Cap / Leather Cap, but it gives resistance to all elements including instant death (except for attacks from SORCERER / Mindflayer since its attack is counted as non-elemental with Death added). The Defend Sword / Defender is a weapon that can be equipped by Knight, Ninja & Red Wizard, it has 30 Attack and 35 Accuracy which is 1 Attack and 10 Accuracy more than the Ice Sword / Ice Brand, when used as an item it will cast RUSE / Blink.
After leaving make your way back to your Airship or head into the desert that is West of Onrac, you will notice a small desert patch separated from the rest with a small forest next to it, those on NES can land in the center (due to a bug) where we will find a caravan selling a Bottle for 50,000 Gil (40,000 on Origins Easy and later remakes). After buying that bottle if you go back in, those on NES / PS will see HEAL Potion / Potion, PURE Potion / Antidote & SOFT Potion / Gold Needle being sold. Those on DoS+ however will see
| Item | Cost | Effect |
|---|---|---|
| Giant's Tonic | 1,500 | Temporarily increase HP by 200. |
| Faerie Tonic | 1,500 | Temporarily increase MP by 200. |
| Strength Tonic | 1,000 | Temporarily increase Attack by 10. |
| Protect Drink | 1,000 | Temporarily increase Defense by 10. |
| Speed Drink | 1,000 | Temporarily increase Accuracy by 32. |
These items are stat boosting items that can be used in battle on any ally. These are handy items for those wanting to tackle the bonus dungeons at lower levels before entering the final area of the game.
With the bottle in hand head back to Gaia by heading West and then go North once you see the river in the center of some forest. Upon entering the faerie will free herself and head to the Northeast portion of town (not on NES) so head up there and speak to her (NES players have to use the BOTTLE on the water) and she will reward you with the Oxyale which will allow us to use the barrel submarine to enter the next dungeon, so go back to Onrac and prepare to submerge.
[[[http://capa.wikidot.com/guide:ff1-2 | Continues on page 2]]]
Miscellaneous
Ship Minigame
In nearly every version of Final Fantasy 1 there is a special minigame called 15 Puzzle that can be accessed only when using the Ship. Depending on the version you are playing you will need to hold A / X and press B / O either 55 times (NES & Origins) or 22 times (DoS+) to get access to this. This minigame can be used to gain gil and items (100 gil only on NES) to help your journey.
Level Grinding
Early levels
For the early portion of the game (ie. before Marsh Cave) a good place to grind is the Peninsula of Power which you get there from Pravoka. Head Southeast and follow the path until you reach where you can choose to go down or up, go up and stop before you reach the tip of the Peninsula. The enemies here are near endgame level though you won't always run into the enemies you would want to use for grinding which are ZomBULL / Minotaur Zombie with TROLL / Troll both weak to Fire with ZomBULL / Minotaur Zombie also being weak to Dia, another encounter you would want have FrWOLF / Winter Wolf. These encounters you will need FIR2 / Fira & HRM2 / Diara for ZomBULL / Minotaur Zombie.
Mid to late levels
The EYE / Evil Eye gives a large amount of EXP for minimal effort due to its small amount of HP. All you would need is ProRing / Protect Ring to protect against Death which you can buy immediately after finishing the dungeon when you get the Airship, though NES players may want to wait on it until you have a good amount of Ribbons for your members incase of its Gaze attack that can petrify you. NES max level is 50, Origins onward is 99. Those on PR will not be able to use this due to trap tile encounters being repurposed.
Sea Shrine / Sunken Shrine
Suggested Level: 18 (NES / PS), 33 (DoS+)
Enemies
| Name | Bestiary | HP | Attack | Defense | EXP | Gil | Weak | Drop | Notes |
|---|---|---|---|---|---|---|---|---|---|
| R.SAHAG / Sahagin Chief | #019 | 64 | 15-30 / 15 | 8 | 105 | 105 | |||
| SHARK / Shark | #021 | 120 | 22-44 / 22 | 0 | 267 | 66 | |||
| WzSAHAG / Sahagin Prince | #093 | 204 | 47-94 / 47 | 20 | 882 | 882 | |||
| GrSHARK / White Shark | #094 | 344 | 50-100 / 50 | 8 | 2,361 | 600 | Wyrmkiller | ||
| BigEYE / Deepeyes | #095 | 304 | 30-60 / 30 | 16 | 3,591 | 3,591 | Gaze may Stun / Paralyze, Flash may cause Darkness | ||
| SeaSNAKE / Sea Snake | #096 | 224 | 35-70 / 35 | 12 | 957 | 600 | |||
| LOBSTER / Sea Scorpion | #097 | 148 | 35-70 / 35 | 18 | 639 | 300 | Attack can Poison | ||
| SeaTROLL / Sea Troll | #098 | 216 | 40-80 / 40 | 20 | 852 | 852 | 10 HP Regen per turn (not on NES) | ||
| GHOST / Ghost | #099 | 180 | 93-186 / 93 | 10 | 990 | 990 | |||
| WATER / Water Elemental | #100 | 300 | 69-138 / 69 | 20 | 1,962 | 800 | |||
| NAGA / Water Naga | #101 | 356 | 9-18 / 9 | 8 | 84 | 20 | |||
WzSAHAG / Sahagin Prince - They will always appear with 8 R.SAHAG / Sahagin Chiefs (7 if 2 happen to show), they have more attack than R.SAHAG / Sahagin Chief, but will likely be your main target for physical fighters while your Zeus Gauntlet / Gauntlets will wipe out the others.
GrSHARK / White Shark - Is a stronger SHARK / Shark who they can often appear with, in later remakes they have high magic defense so a Thundara may not kill them, though their physical defense is pretty low.
BigEYE / Deepeyes - Like its cousin from the start of the game OddEYE / Bigeyes it will mainly use Gaze to Stun / Paralyze your members, in addition to that it has Flash to cause Darkness to your party which does not work.
SeaSNAKE / Sea Snake - Will often appear in large groups though they aren't too much of a threat since a LIT2 / Thundara or Zeus Gauntlets / Gauntlets use should decimate them.
LOBSTER / Sea Scorpion - Not too threatening specially due to having low HP of the enemies here coupled with the Lightning weakness, their attack has a chance to Poison.
SeaTROLL / Sea Troll - Basically a slightly stronger TROLL / Troll, it having a weakness to Lightning makes them not as threatening. If they live they will recover 10 HP per turn (not on NES).
GHOST / Ghost - Has a monstrously high physical attack, the strongest of non boss monsters within the main game and they will usually be in groups of 2 to 5. Their HP is very low so a HRM2 / Diara or FIR2 / Fira should be able to take them out before they do major damage to your group, it is flagged as unrunable.
WATER / Water Elemental - It has a very high physical attack stat which can hurt, oddly unlike the other enemies it is weak to Ice instead of Lightning, it is flagged as unrunable.
NAGA / Water Naga - While its attack is low, it has a slew of magic it can use such as LIT2 / Thundara, HOLD / Hold, SLOW / Slow, DARK / Dark, LIT / Thunder, LOCK / Focus & SLEP / Sleep.
Floor Encounters
| Enemy | Floor Number |
|---|---|
| SeaTROLL / Sea Troll | All |
| LOBSTER / Sea Scorpion | All |
| SeaSNAKE / Sea Snake | All |
| NAGA / Water Naga | 3F |
| WATER / Water Elemental | 1F, 3F & 4F |
| GrSHARK / White Shark | All |
| SHARK / Shark | 1F, 3F & 4F |
| WzSAHAG / Sahagin Prince | 2F-4F |
| R.SAHAG / Sahagin Chief | 2F-4F |
| GHOST / Ghost | 2F & 4F |
| BigEYE / Deepeyes | 1F, 2F & 4F |
Map 3F
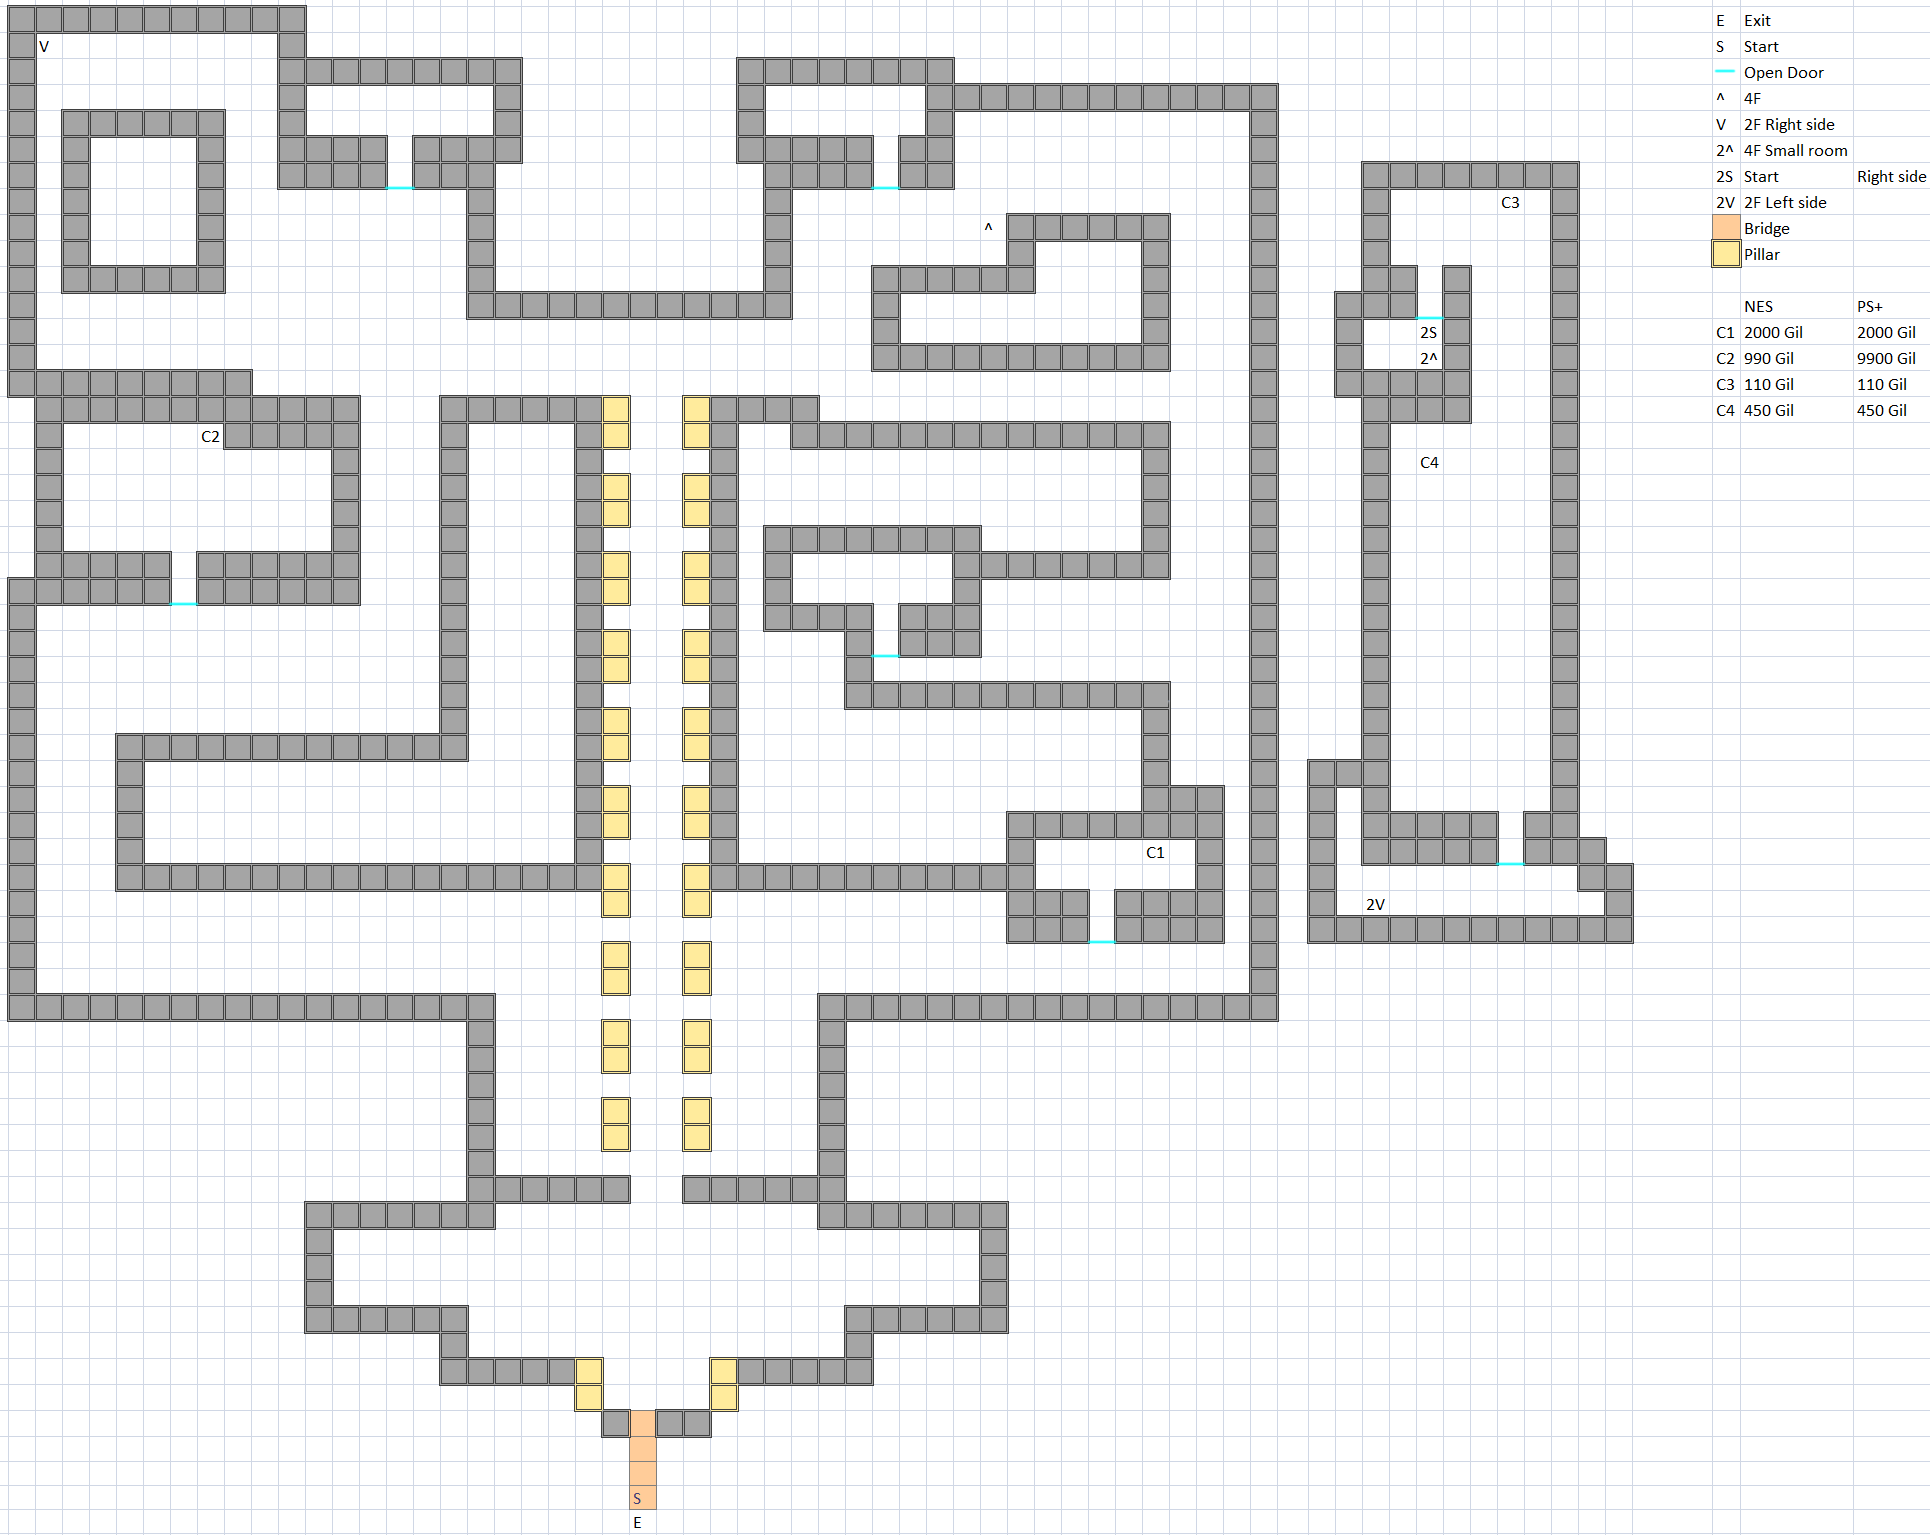
Instead of starting at the top or bottom of the area we actually start in the middle, additionally unlike some previous dungeons there are no duplicate chests so you will get an item more than once, NES players will have to back out to sell stuff (or drop something) if you are going for all treasures. This area has 5 floors and we want to go up first so head to the Northeast section of the room while also getting the treasure along the way.
Map 4F
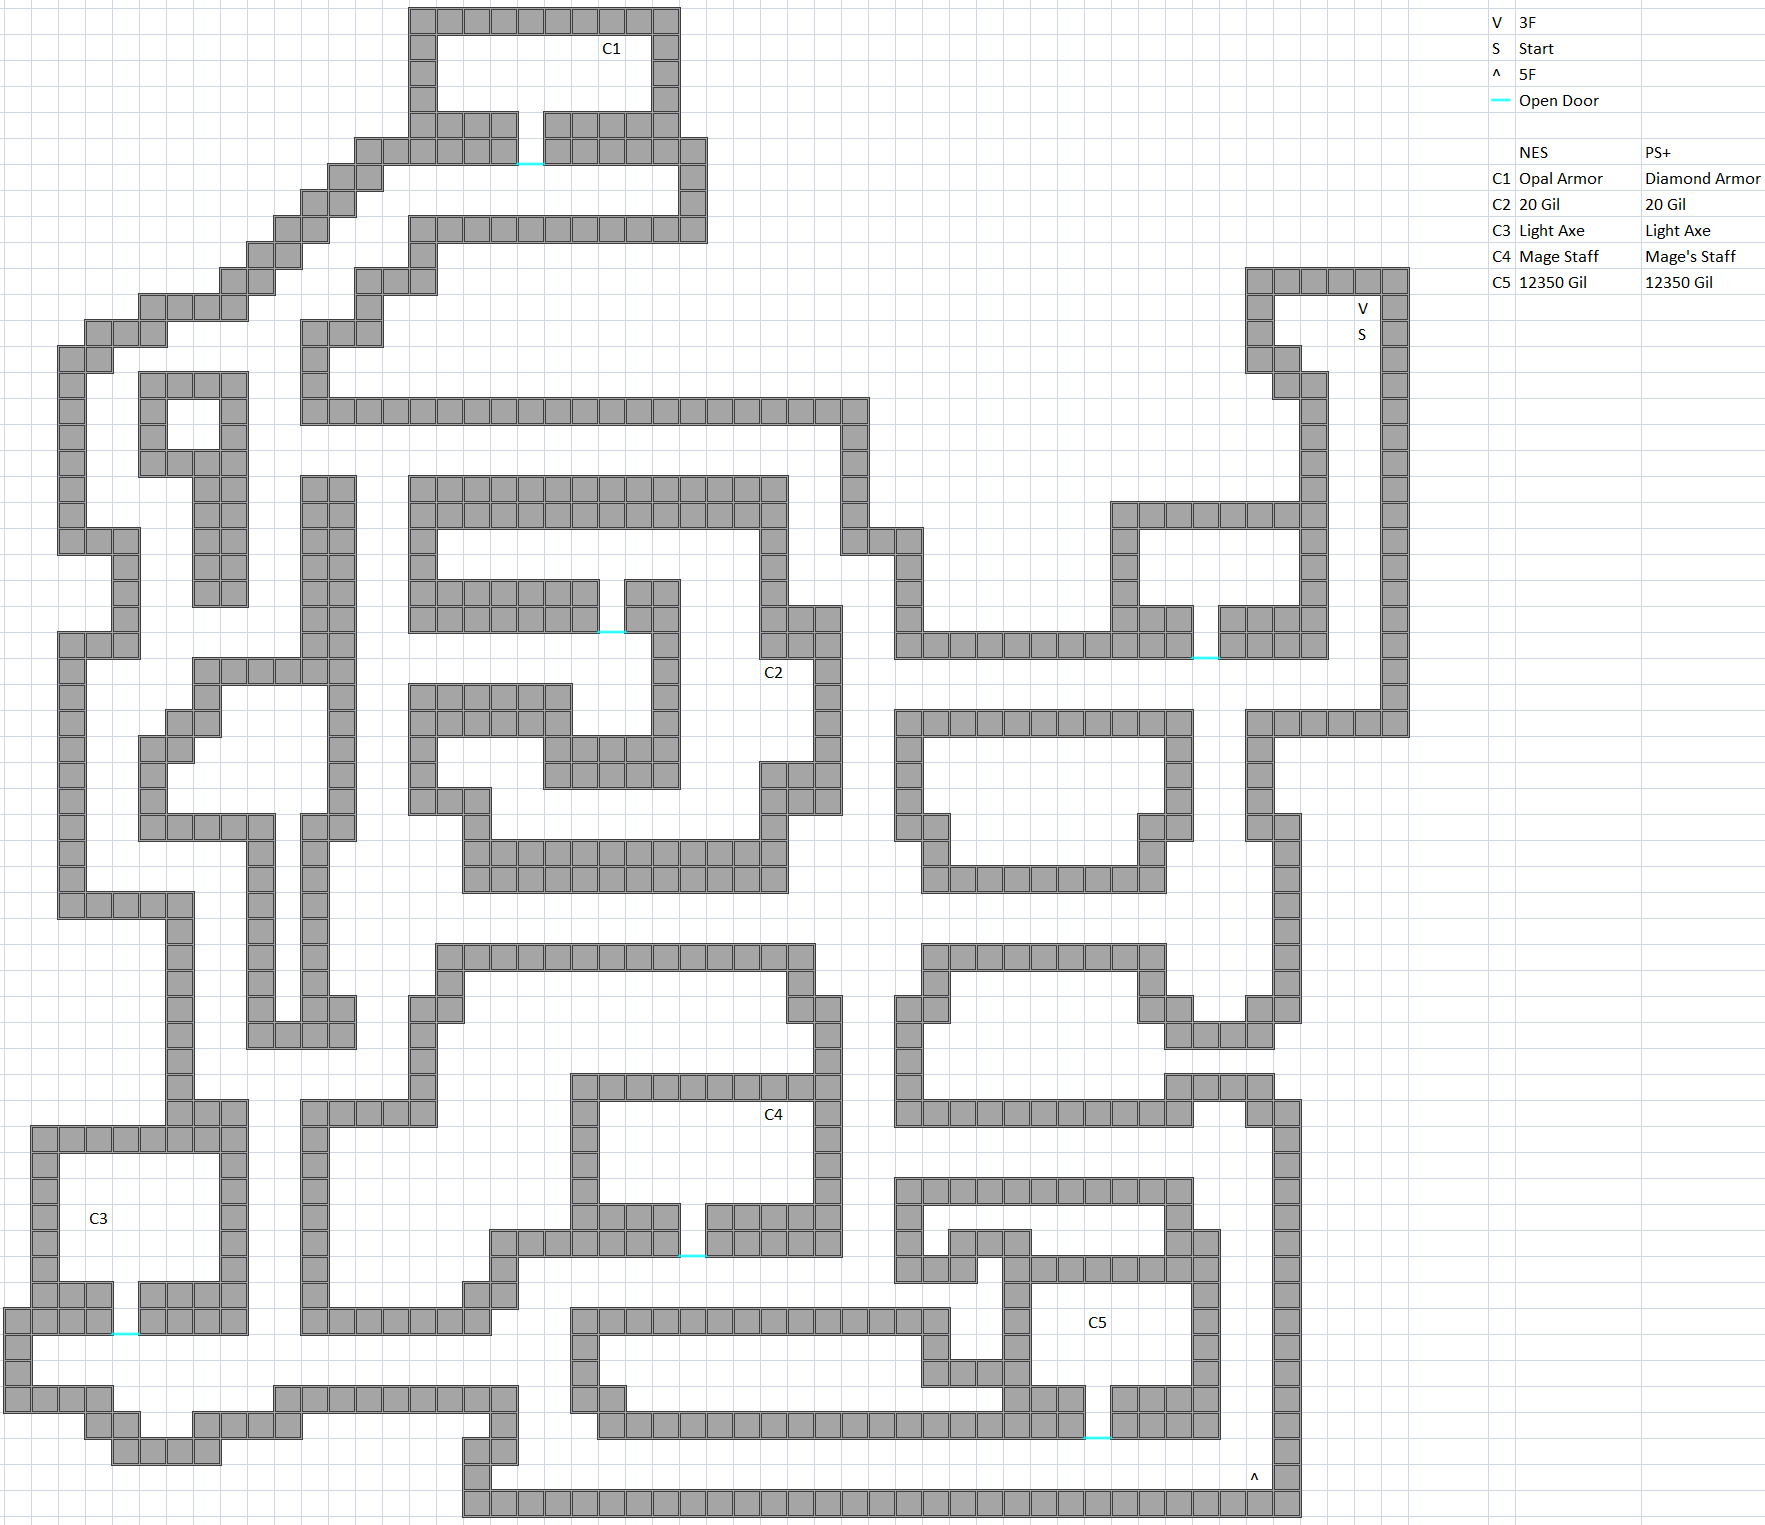
We start at the top right and must make our way to the bottom right, however this floor has some treasure that is of value, namely the Opal Armor / Diamond Armor that can only be equipped by Knight, it provides 42 Defense 8 more than Flame Mail / Ice Armor and has the same weight as the Flame Mail / Ice Armor, this armor gives resistance to Lightning (which does work on NES(!)). This is the second best armor for Knight in the main game (3rd best on DoS in terms of pure defense, 4th on PSP counting the added superboss drops) and like the other elemental armors doesn't stack with ALIT / NulShock. Another item you will find on this floor is the Light Axe which can be equipped by Fighter / Warrior & Ninja it has 28 Attack and 15 Accuracy, when used as an item it will cast HRM2 / Diara. The last item is the Mage Staff / Mage's Staff it can be equipped by Black Mage & Ninja it has 12 Attack and 10 Accuracy, when used as an item it will cast FIR2 / Fira. After collecting the treasure make your way to the lower right to get to the next floor.
Map 5F
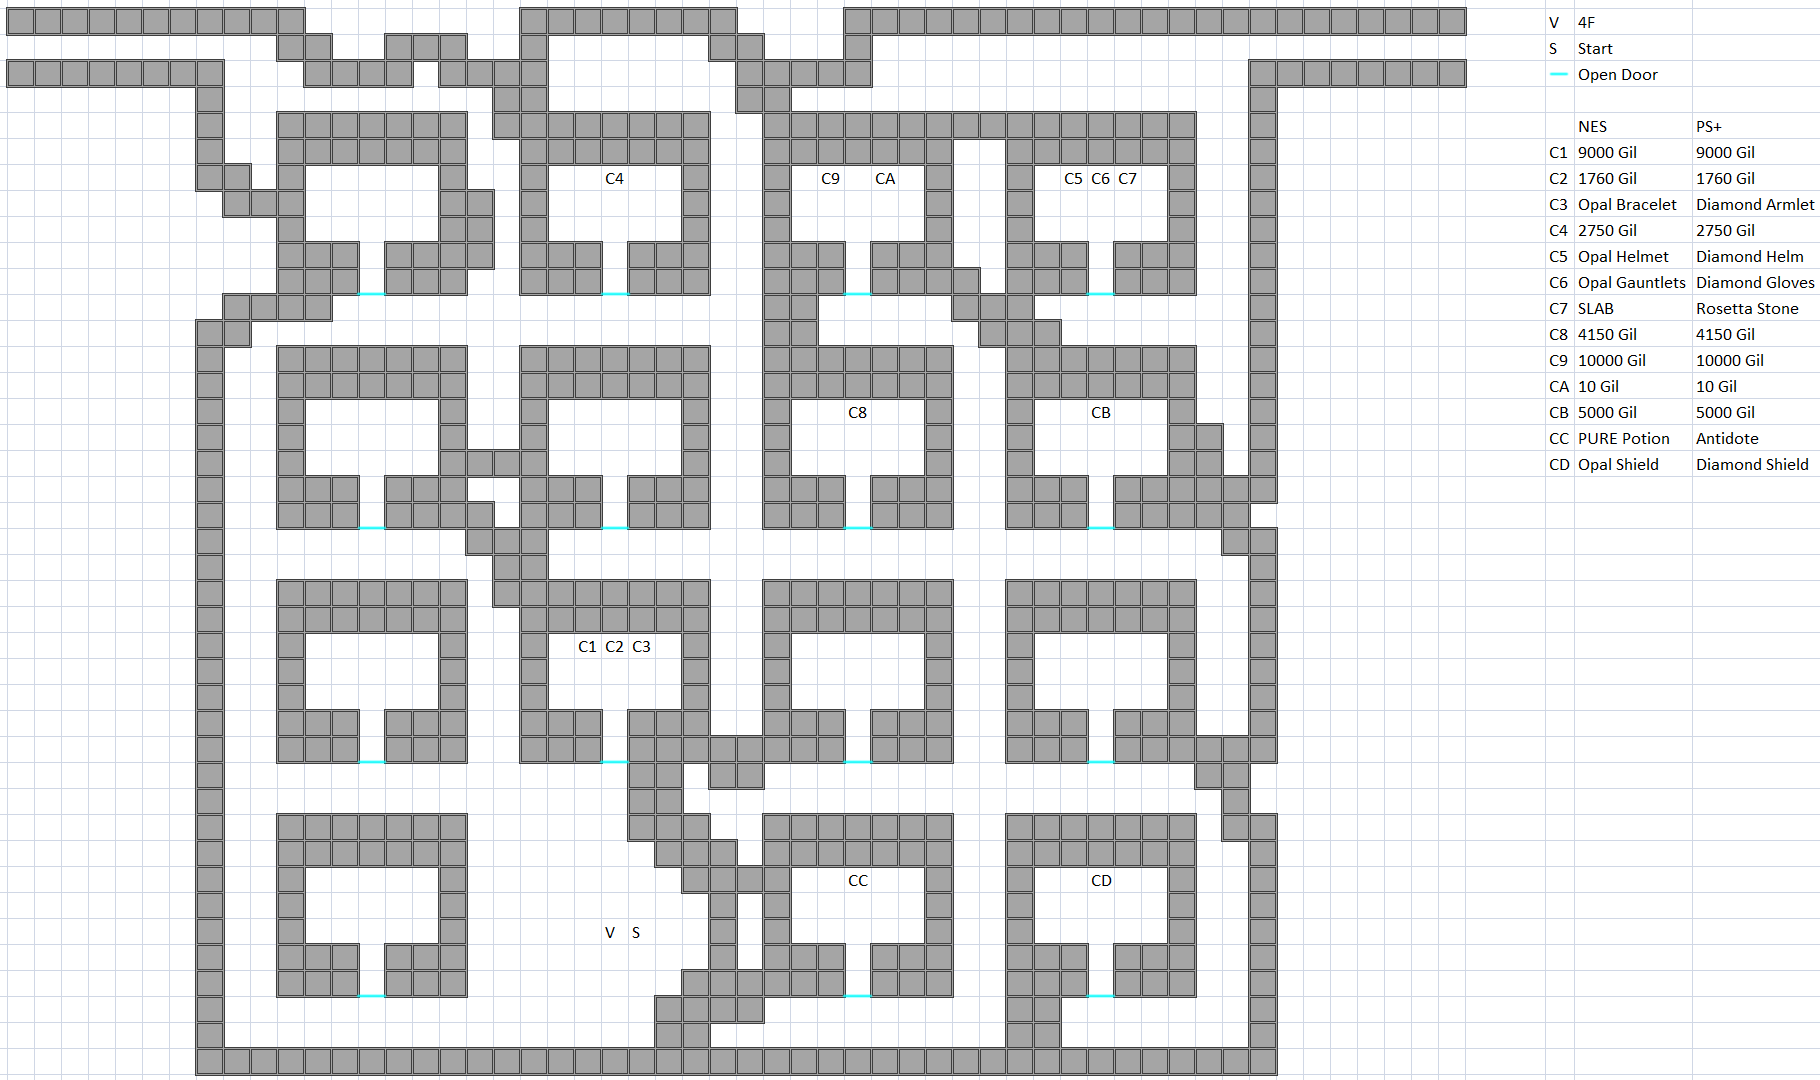
This floor has no random encounters (the encounter table doesn't count this floor). This floor has a lot of rooms some with a mermaid inside and some with treasure, the new equipment we can find are the Opal Bracelet / Diamond Armlet, the Opal Helmet / Diamond Helm, Opal Gauntlets / Diamond Gloves and the Opal Shield / Diamond Shield. The Opal Bracelet / Diamond Armlet can be equipped by everyone, it provides 34 Defense which is 10 more than the Gold Bracelet / Ruby Armlet this should go to the second main tank as it's the only one in the game (remakes included). The Opal Helmet / Diamond Helm can only be equipped by Knight, it provides 8 Defense, 2 more than the Silver / Mythril one you've had for a long while and having the same Evade / Weight thus it is a slight defense upgrade. The Opal Gauntlets / Diamond Gloves can only be equipped by Knight, it provides 8 Defense like the ProRing / Protect Ring, but has 3 Weight hindering evade, it is better sold since it doesn't provide instant death protection. The Opal Shield / Diamond Shield can only be equipped by Knight, it provides 16 Defense 4 more than Flame / Ice Shield, but since the Lightning resistance doesn't stack the Armor is the better choice while this is better sold. There is a key item within these chests the SLAB / Rosetta Stone a certain famous doctor will be wanting to take a look at this, but that can wait until after we finish this dungeon. When you are done cast EXIT / Exit or WARP / Teleport (twice) to start back at 3F or manually go back down. Back at 3F this time we want to take the upper left set of stairs while getting the treasure along the way.
Map 2F
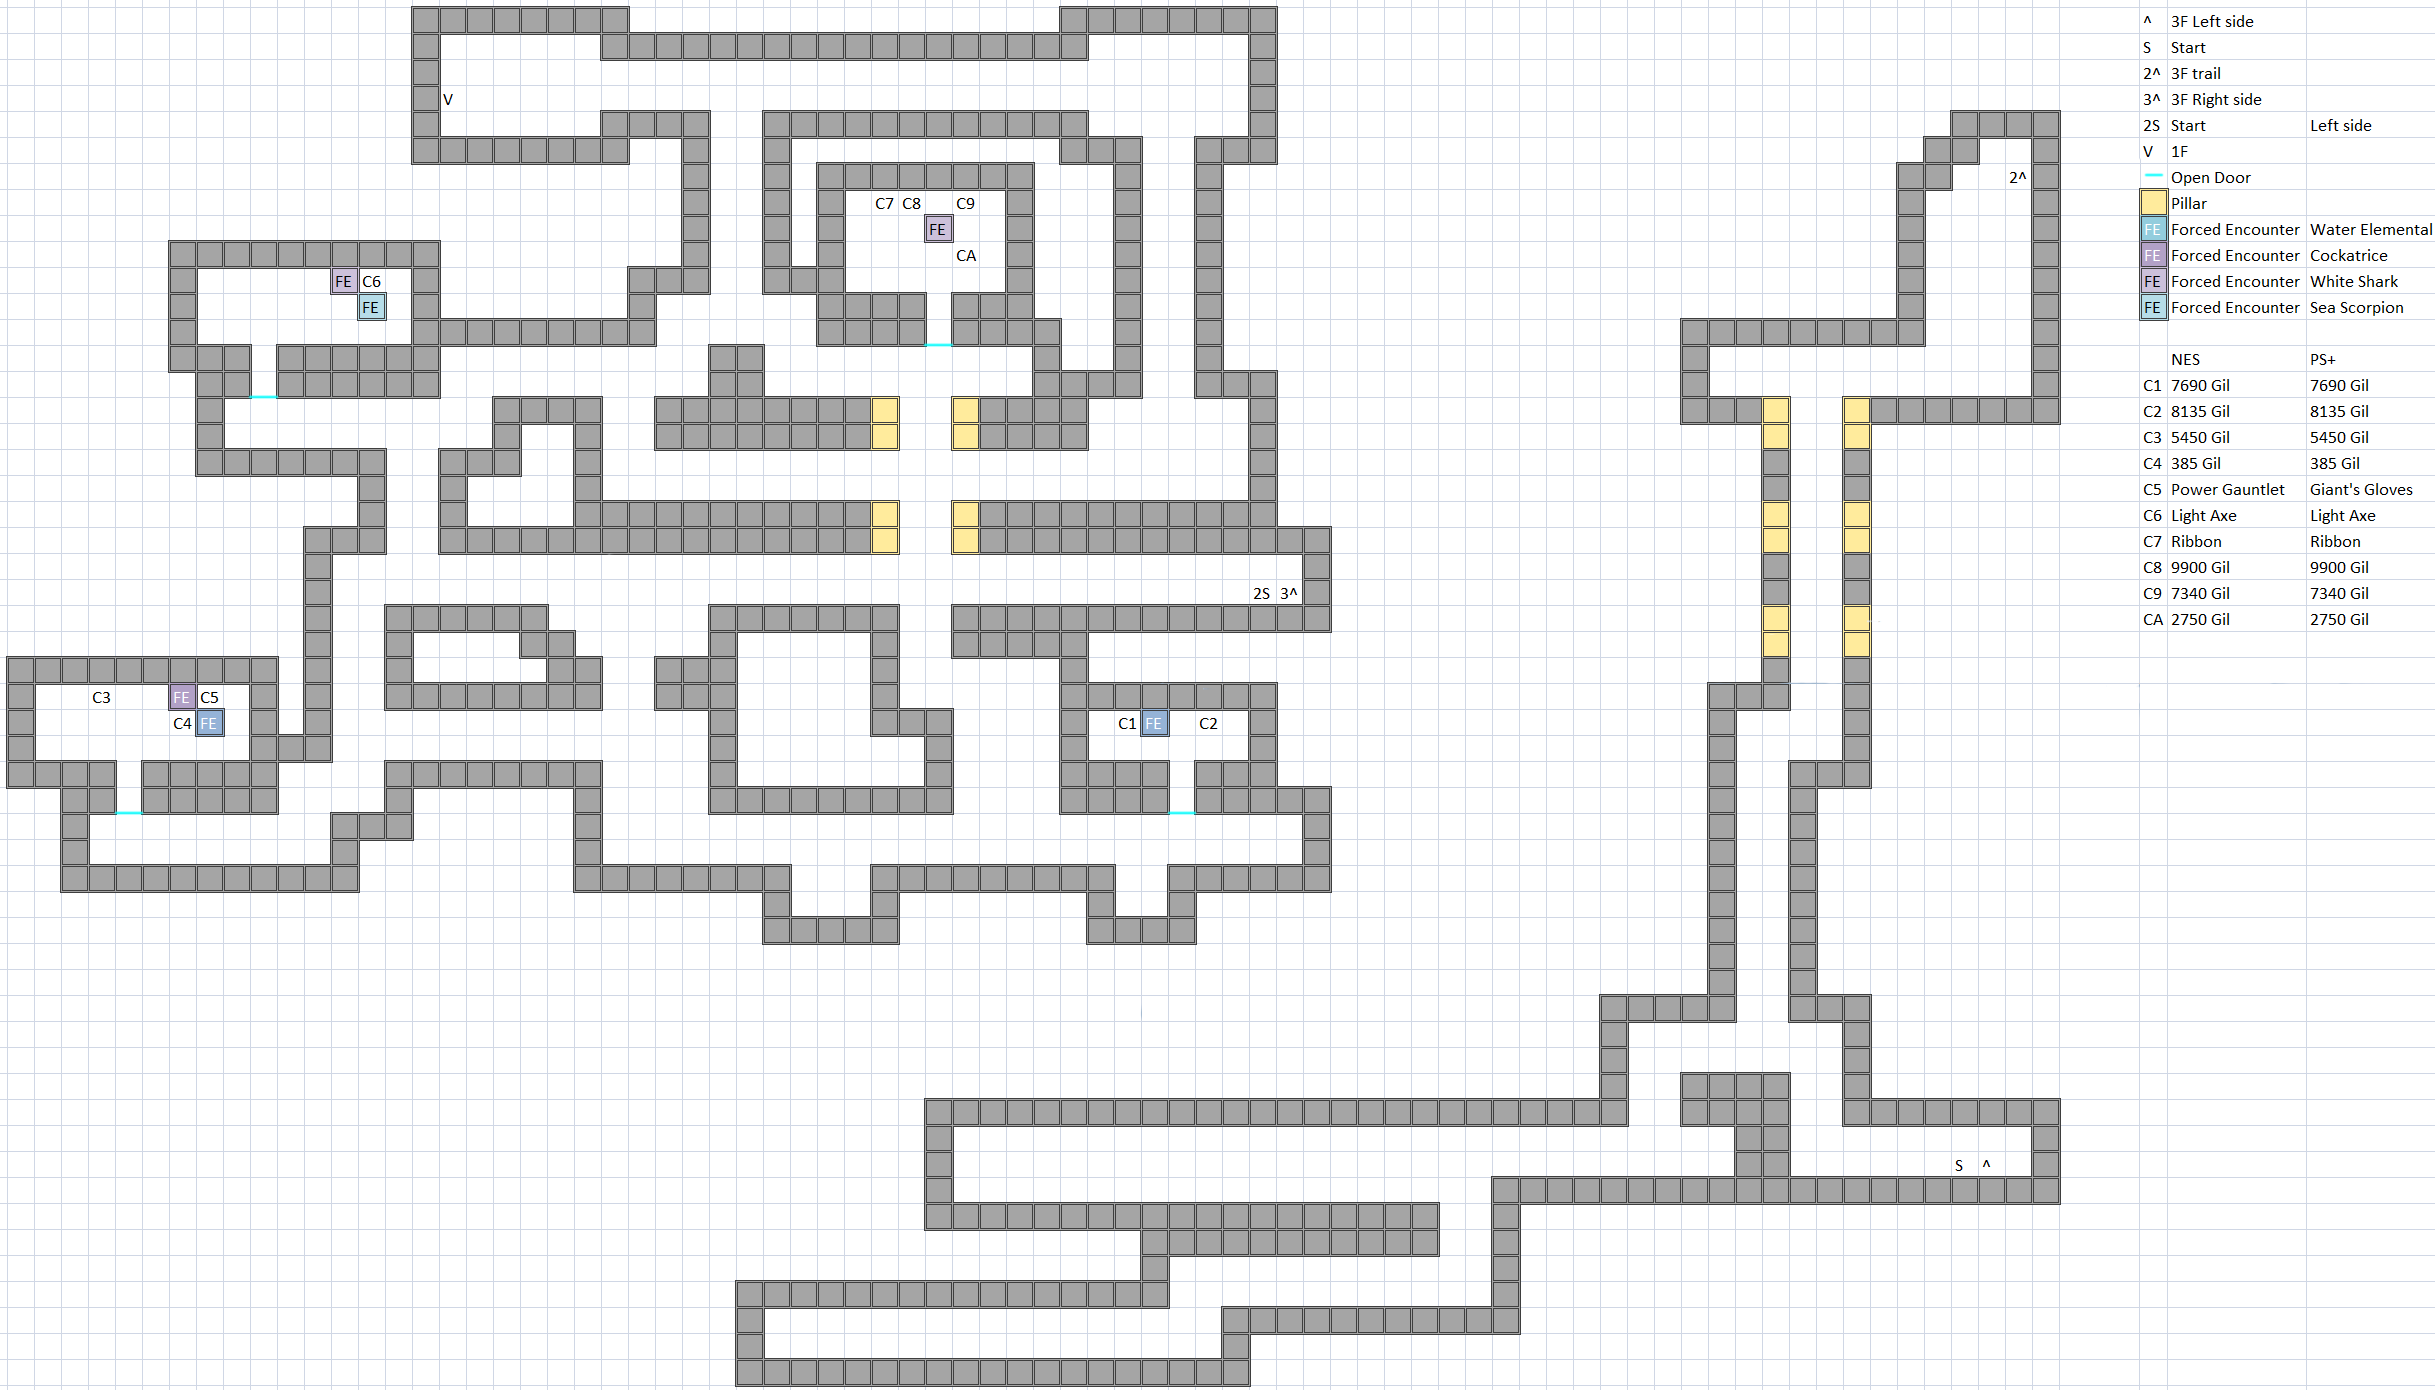
We start on the lower right section and need to head to the stairs at the top, going up those stairs leads to a very small pathway (not mapped) which leads to another pair of stairs up into a room in the upper left of 4F (also not mapped), the room there has no treasure inside so head to the lower right portion of the room which leads to the right room mapped on 3F. In that room take the stairs on the lower section of the map which leads to the upper left section of this map. This floor has the second Ribbon (if you went to Waterfall Cavern), another Light Axe (not a dupe chest so there's your second one) and a new equipment piece. The Power Gauntlet / Giant's Gloves which can be equipped by Knight, Ninja & Red Mage it has the same stats as the Zeus Gauntlets / Gauntlets except that it casts the SABR / Saber on the user, those on NES may as well sell this as it is useless due to SABR doing nothing and ProRing being better, those on remakes will want to keep this for boss fights for their main physical damage dealer. The chests labeled C4 & C5 you will want to open from below C5 as it has the safer enemies guarding it. After finishing head to the Northwest portion of the floor to reach the stairs.
Map 1F
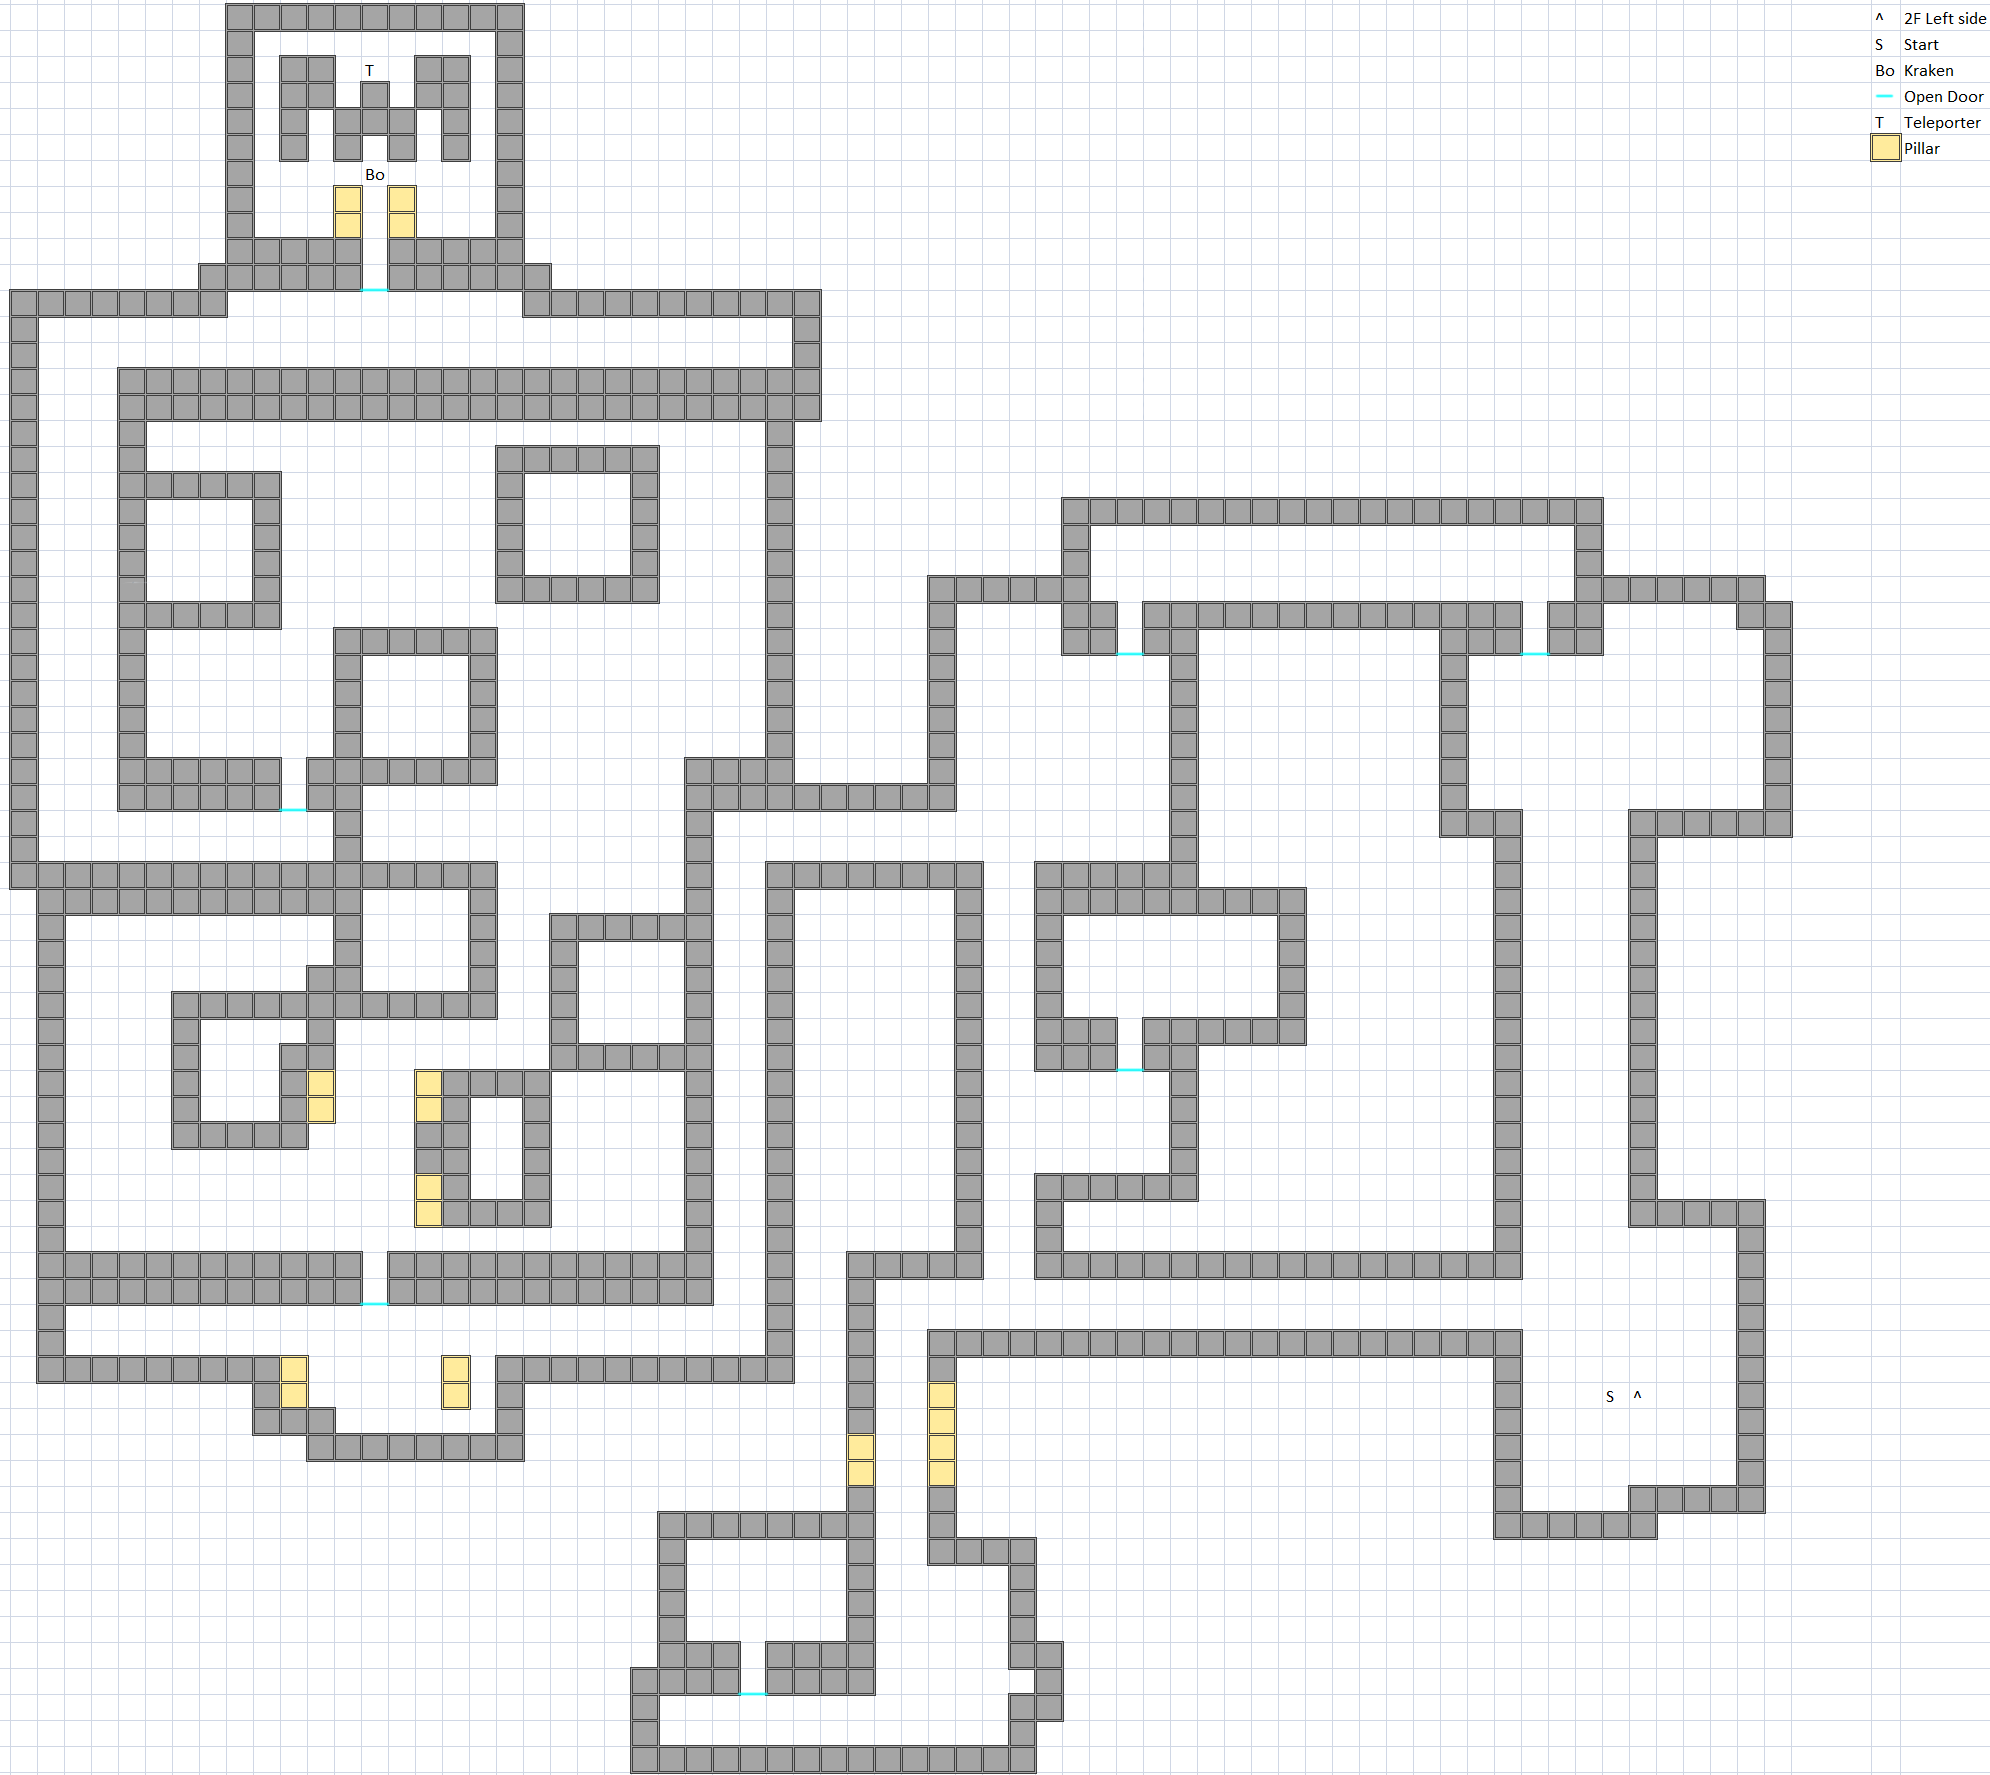
A large floor with paths that lead mainly to the same area follow the path and head to the boos room where the Fiend of Water waits for your challenge.
Fiend of Water
KRAKEN / Kraken (#102)
HP: 800 (NES) / 1,600 (PS) / 1,800 (DoS+)
Attack: 50-100 (NES) / 50 (PS+)
Defense: 10 (NES) / 60 (PS+)
EXP: 4,245
Gil: 5,000
Weak:
Resist:
Drop: Kikuichimonji (Rare)
He has a pretty nasty physical attack as he can hit up to 8 times (having 8 tentacles and all), he has a special attack called Ink that he can use occasionally which can cause Darkness to your party, but since Darkness doesn't work this is a free turn for you. He has pretty high magic defense so Thundaga would be your best bet to exploit his elemental weakness.
After Kraken has been defeated the Water Crystal will be restored to its shining glory, those on DoS+ will notice a statue of Kraken gets removed from a certain area, that is the entrance of the Lifespring Grotto. It is located in the whirlpool West of Mount Duergar and East of Melmond you can only get in via the Ship which should be back near Crescent Lake.
Fortress in the Sky
While inside the Sea Shrine / Sunken Shrine there was an item called SLAB / Rosetta Stone in one of the chests on Floor 5, this item is needed to progress with the story as we need 2 items to be able to access the next dungeon one of them you need to be able to understand the residences in order to be given it. With the SLAB / Rosetta Stone head back to Melmond and speak to Dr. Unne who teaches us how to speak the language of Lufenian (despite that we never talk) so we are now able to understand them. Head back to Gaia and head South and park in the one tile that isn't a forest tile near the mountain.
Enemies
Lufien / Lufenia area
| Name | Bestiary | HP | Attack | Defense | EXP | Gil | Weak | Drop | Notes |
|---|---|---|---|---|---|---|---|---|---|
| GIANT / Hill Gigas | #040 | 240 | 38-76 / 38 | 12 | 879 | 879 | Tent | ||
| TROLL / Troll | #042 | 184 | 24-48 / 24 | 12 | 621 | 621 | 9 HP Regen per turn (not on NES) | ||
| FrWOLF / Winter Wolf | #069 | 92 | 25-50 / 25 | 0 | 402 | 200 | Ice Shield | ||
| WYVERN / Wyvern | #078 | 212 | 30-60 / 30 | 12 | 1,173 | 20 | Attack may Poison | ||
| TYRO / Allosaurus | #083 | 480 | 65-130 / 65 | 10 | 3,387 | 502 | Strength Tonic | ||
| ZomBULL / Minotaur Zombie | #086 | 224 | 40-80 / 40 | 14 | 1,050 | 1,050 | Great Axe | ||
TYRO / Allosaurus - A pretty strong enemy with a lot of HP, in later remakes it has a lot of magic defense making physical the better option.
These enemies you would face on the Peninsula of Power near the start of the game so they should be no problem by now, follow the path East and South to eventually reach the town of Lufien / Lufenia.
Lufien / Lufenia
If you didn't not learn the language of the Lufeninan from Dr. Unne you will not be able to understand anyone, those on remakes get the obligatory Cid mention from the person at the entrance. The item we need to open the next area is given to us by the Lufenian to the right of us from the entrance, make your way to him to get the Chime which is needed to access the Mirage Tower. You may be wondering where the magic shops are since we've had only 3 choice for level 8 spells, from the top right corner of the town you will notice a small space you are able to enter, go through it and head right until you see the White and Black magic shops.
White Magic Shop
| Spell (NES / PS+) | Cost (NES / PS Normal) | Cost (PS Easy / DoS+) | NES / PS effect | DoS+ effect | MP Cost | User |
|---|---|---|---|---|---|---|
| LIF2 / Full-Life | 60,000 | 40,000 | Restores a fallen ally to full HP (Does not work in battle on NES). | Revives one ally and fully restores HP. | 40 | White Wizard |
LIF2 / Full-Life - A good spell to fully revive someone to get them back up with no extra healing.
Black Magic Shop
| Spell (NES / PS+) | Cost (NES / PS Normal) | Cost (PS Easy / DoS+) | NES / PS effect | DoS+ effect | MP Cost | User |
|---|---|---|---|---|---|---|
| NUKE / Flare | 60,000 | 40,000 | Hits all enemies for 100-400 damage. | Blast all foes with light and heat. | 50 | Black Wizard |
NUKE / Flare - The only worthwhile level 8 spell for Black Wizard which you may as well get, unless on DoS+ where you can get an item that casts this for free (which you can get for your entire party).
After you are done head out of Lufien / Lufenia and head back to your Airship and fly to the desert South of where the Airship was parked and land on the single non desert tile then head West and slightly North to enter the Mirage Tower, make sure that you went to the Waterfall Cavern to get the Warp Cube because if you don't have it you will be forced to get it.
Mirage Tower
Suggested Level: 21 (NES / PS), 37 (DoS+)
Enemies
Outside
| Name | Bestiary | HP | Attack | Defense | EXP | Gil | Weak | Drop | Notes |
|---|---|---|---|---|---|---|---|---|---|
| ANKYLO / Desert Baretta | #076 | 352 | 98-196 / 98 | 48 | 2,610 | 1 | |||
| WYVERN / Wyvern | #078 | 212 | 30-60 / 30 | 12 | 1,173 | 20 | Attack may Poison | ||
| R.ANKYLO / Baretta | #081 | 256 | 60-120 / 60 | 38 | 1,428 | 300 | |||
| TYRO / Allosaurus | #083 | 480 | 65-130 / 65 | 10 | 3,387 | 502 | Strength Tonic | ||
| Sand W / Sand Worm | #085 | 200 | 46-92 / 46 | 14 | 2,683 | 900 | Attack may Poison | ||
| T REX / Tyrannosaur | #103 | 600 | 115-230 / 115 | 10 | 7,200 | 600 | |||
R.ANKYLO / Baretta - Weaker version of its cousin who you can also run into, like ANKYLO / Desert Baretta it has high magic defense so physical attacks are a better option.
Sand W / Sand Worm - Not too terribly strong though it has access to CRACK / Earthquake which can possible kill party members that don't have a Ribbon equipped to protect from Quake elemental.
T REX / Tyrannosaur - One of the two rarest monsters within the main game with an incredibly powerful physical attack, it has high magic defense so physical attacks are a better option.
Inside
| Name | Bestiary | HP (NES / PS+) | Attack | Defense (NES / PS+) | EXP | Gil | Weak | Drop | Notes |
|---|---|---|---|---|---|---|---|---|---|
| MUMMY / Mummy | #034 | 80 | 30-60 / 30 | 20 | 300 | 300 | Attack may Sleep | ||
| COCTRICE / Cockatrice | #045 | 50 | 1-2 / 1 | 4 | 186 | 200 | Gold Needle | Attack may Petrify | |
| VAMPIRE / Vampire | #046 | 156 / 280 | 76-152 / 76 | 10 / 26 | 1,200 | 2,000 | Gaze may Stun / Paralyze | ||
| PERILISK / Pyrolisk | #059 | 44 | 20-40 / 20 | 4 | 432 | 500 | Gold Needle | Gaze can petrify or instantly kill | |
| CEREBUS / Hellhound | #063 | 192 | 30-60 / 30 | 8 | 1,182 | 600 | |||
| Saber T / Sabertooth | #077 | 200 | 24-48 / 24 | 8 | 843 | 500 | |||
| WYVERN / Wyvern | #078 | 212 | 30-60 / 30 | 12 | 1,173 | 20 | Attack may Poison | ||
| WYRM / Wyrm | #079 | 260 | 40-80 / 40 | 22 | 1,218 | 502 | |||
| CATMAN / Weretiger | #084 | 160 | 30-60 / 30 | 16 | 780 | 780 | Sleeping Bag | 8 HP Regen per turn (not on NES), attack may Poison | |
| WzMUMMY / King Mummy | #087 | 188 | 43-86 / 43 | 24 | 984 | 1,000 | Attack may Sleep | ||
| MEDUSA / Medusa | #088 | 68 | 20-40 / 20 | 12 / 10 | 699 | 699 | Attack may Poison, Gaze may Stone | ||
| NITEMARE / Nightmare | #091 | 200 | 30-60 / 30 | 24 | 1,272 | 700 | Snort can cause Darkness | ||
| BADMAN / Black Knight | #104 | 260 | 44-88 / 44 | 38 | 1,263 | 1,800 | Deathbringer | ||
| CHIMERA / Chimera | #105 | 300 | 30-60 / 30 | 20 | 2,064 | 2,500 | |||
| GUARD / Guardian | #106 | 200 | 25-50 / 25 | 40 | 1,224 | 400 | Attack has a chance to Stun / Paralyze. | ||
| Blue D / Blue Dragon | #107 | 454 | 92-184 / 92 | 20 | 3,274 | 2,000 | |||
BADMAN / Black Knight - Not too terribly strong of an enemy so it should be no trouble to dispatch.
CHIMERA / Chimera - It has access to Blaze which would be pretty nasty to party members who don't have fire resistance, specially if a group of 3 show up.
GUARD / Guardian - A relatively weak enemy who should pose no threat.
Blue D / Blue Dragon - A pretty dangerous enemy to find since it has access to THUNDER / Thunderbolt which can deal around 150 to members without Lightning resistance, it is flagged as unrunable.
Floor Encounters
| Enemy | Floor Number |
|---|---|
| NITEMARE / Nightmare | 1F |
| BADMAN / Black Knight | 1F |
| VAMPIRE / Vampire | All |
| CHIMERA / Chimera | 1F & 2F |
| GUARD / Guardian | 1F & 2F |
| MEDUSA / Medusa | 1F & 3F |
| Saber T / Sabertooth | All |
| CATMAN / Weretiger | All |
| CEREBUS / Hellhound | 2F & 3F |
| WzMUMMY / King Mummy | 2F & 3F |
| MUMMY / Mummy | 2F & 3F |
| COCTRICE / Cockatrice | 2F & 3F |
| PERILISK / Pyrolisk | 2F & 3F |
| Blue D / Blue Dragon | 2F & 3F |
| WYVERN / Wyvern | 3F |
| WYRM / Wyrm | 3F |
Map 1F
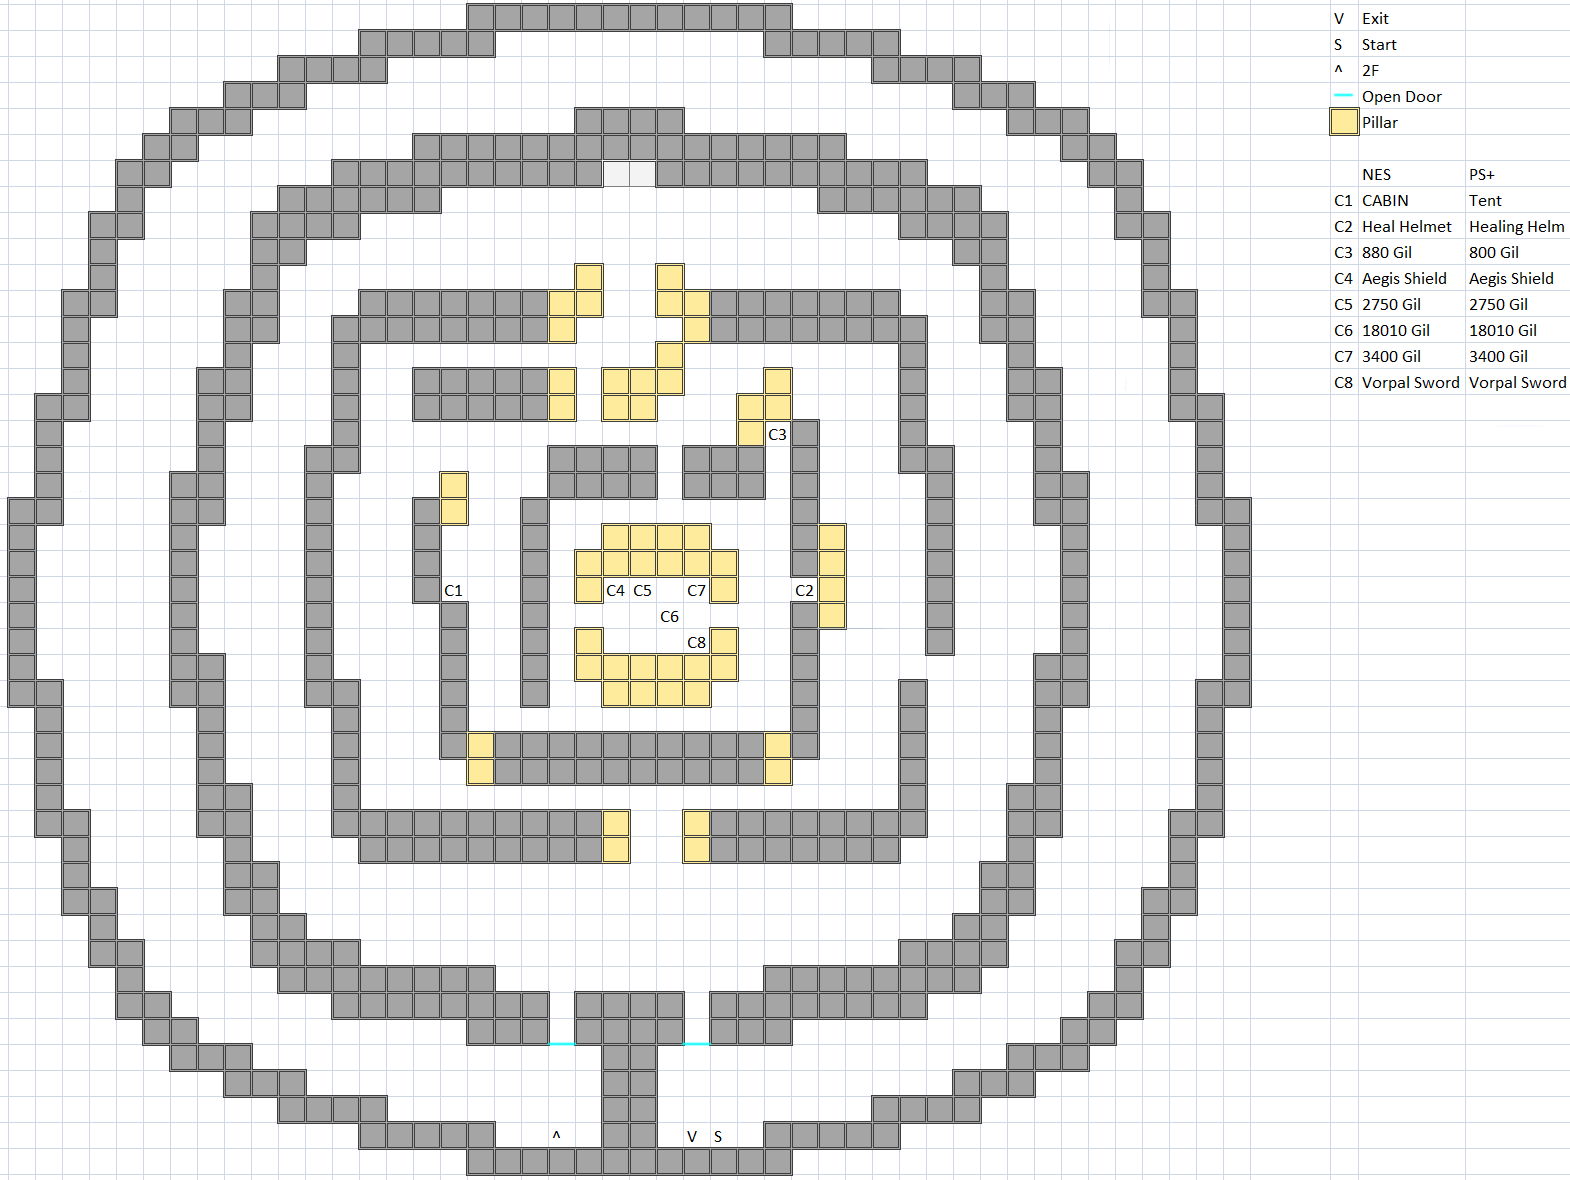
A very short floor given that the stairs up are within view and you are able to take them through a massive shortcut that is the doors above you, however this floor has some nice treasure to get, NES players are likely going to have to drop armor since you are going to run out of space from the limited inventory. The new equipment available here are the Aegis Shield, Heal Helmet / Healing Helm & Vorpal Sword. The Aegis Shield can be equipped only by Knight, it has the same stats as the Opal Shield / Diamond Shield, however the Aegis Shield has the benefit of providing protection from Poison and Stone which is the best shield for the Knight in the main game. The Heal Helmet / Healing Helm can be equipped by Knight & Ninja it has the same stats as the Silver Helmet / Mythril Helm that was replaced by the Opal Helmet / Diamond Helm, however when used as an item it will cast the HEAL / Heal spell. The Vorpal Sword can be equipped by Knight, Ninja & Red Wizard it has 24 Attack with 25 Accuracy it is weaker than the weapons you likely have now (Defense Sword / Defender and Ice Sword / Ice Brand). After taking all the treasure take the stairs up to 2F.
Map 2F
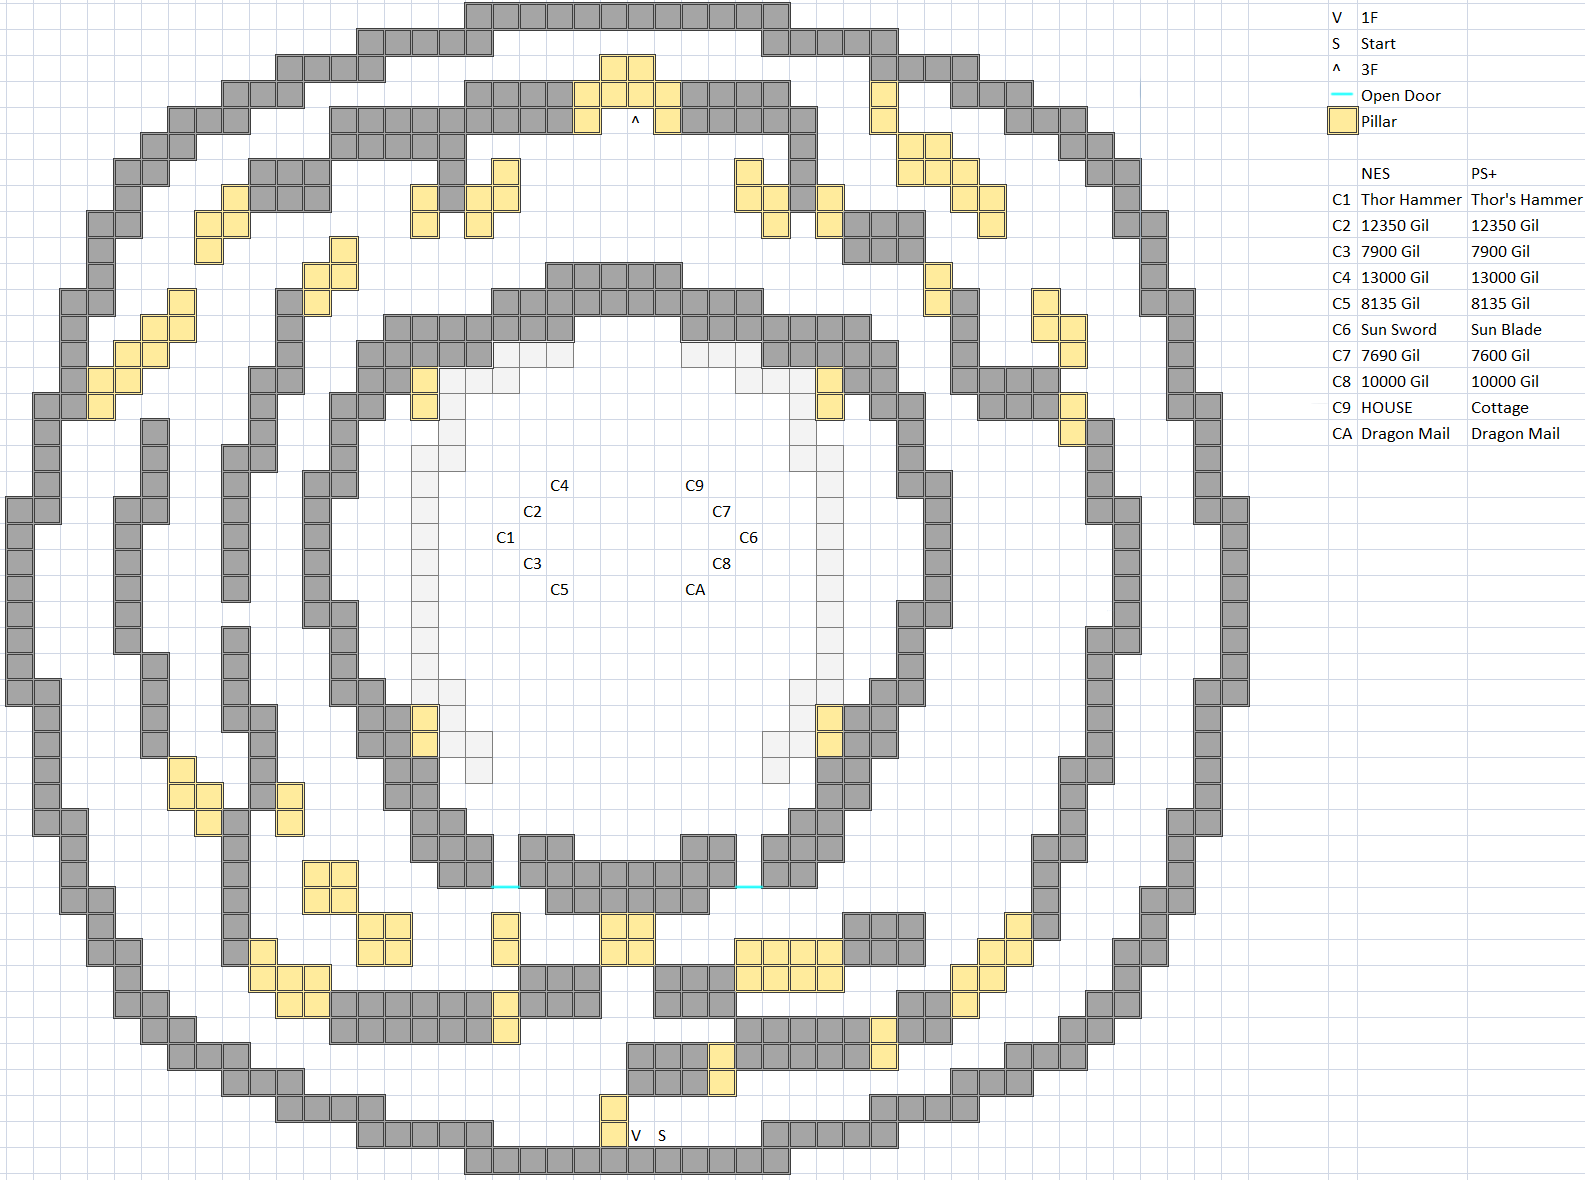
Unlike the previous floor we are forced to walk the perimeter to get to the stairs up and treasure trove. The new equipment available here are Thor's Hammer, Sun Blade and the Dragon Mail. Thor Hammer / Thor's Hammer can be equipped by Knight, Ninja & White Wizard is has 18 Attack with 15 Accuracy this is the strongest hammer in the game the White Wizard can equip (unless on DoS+ where War Hammer is much stronger), when used as an item it will cast LIT2 / Thundara similar to the Zeus Gauntlets / Gauntlets. The Sun Sword can be equipped by Fighter / Warrior, Red Mage & Ninja it has 32 Attack and 30 Accuracy while more powerful than the Defense Sword / Defender (32 vs 30) it has 5 less accuracy and should be given to whoever has the Ice Sword / Ice Brand. The Dragon Mail can only be equipped by Knight and has the same stats as the Opal Armor / Diamond Armor, but the Dragon Mail provides resistance to the primary 3 elements of Fire, Ice and Lightning compared to just Lightning from the Opal Armor / Diamond Armor, this is the best armor for the Knight in the main game. After taking the treasure exit the room and head upward to the stairs to 3F.
Map 3F
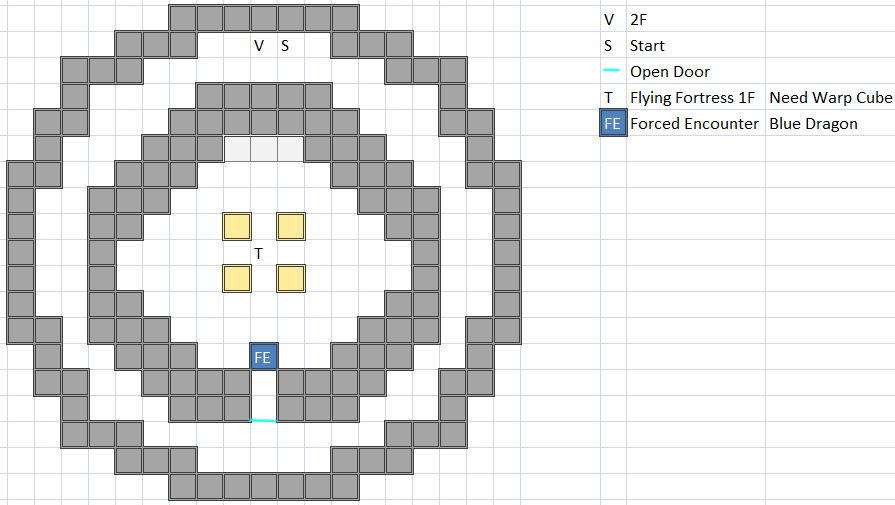
An extremely small room head into the room to fight the forced battle against Blue D / Blue Dragon, then take the teleporter up to the next area. If you did not go to the Waterfall Cavern to get the Warp Cube you will not be able to go and have to leave Mirage Tower and go there then come back to proceed.
Sky Fortress / Flying Fortress
Suggested Level: 21 (NES / PS), 37 (DoS+)
Enemies
| Name | Bestiary | HP | Attack | Defense | EXP | Gil | Weak | Drop | Notes |
|---|---|---|---|---|---|---|---|---|---|
| NAOCHO / Neochu | #056 | 344 | 35-70 35 | 32 | 3,189 | 500 | Attack may Poison | ||
| R.HYDRA / Fire Hydra | #061 | 182 | 20-40 / 20 | 14 | 1,215 | 400 | Red Fang | ||
| SORCERER / Mindflayer | #070 | 112 | 1-2 / 1 | 12 | 822 | 999 | Phoenix Down | Attack may instantly kill | |
| EYE / Evil Eye | #075 | 162 | 30-60 / 30 | 30 | 3,325 | 3,325 | |||
| MANTICOR / Manticore | #080 | 164 | 22-44 / 22 | 8 | 1,317 | 650 | Tent | ||
| MEDUSA / Medusa | #088 | 68 | 20-40 / 20 | 12 / 10 | 699 | 699 | Attack may Poison, Gaze may Stone | ||
| MANCAT / Rakshasa | #089 | 110 | 20-40 / 20 | 30 | 603 | 800 | |||
| MudGOL / Clay Golem | #090 | 176 | 64-128 / 64 | 7 | 1,257 | 800 | Potion | Attack may Poison | |
| NITEMARE / Nightmare | #091 | 200 | 30-60 / 30 | 24 | 1,272 | 700 | Snort can cause Darkness | ||
| BADMAN / Black Knight | #104 | 260 | 44-88 / 44 | 38 | 1,263 | 1,800 | Deathbringer | ||
| CHIMERA / Chimera | #105 | 300 | 30-60 / 30 | 20 | 2,064 | 2,500 | |||
| GUARD / Guardian | #106 | 200 | 25-50 / 25 | 40 | 1,224 | 400 | |||
| RockGOL / Stone Golem | #109 | 200 | 70-140 / 70 | 16 | 2,385 | 1,000 | |||
| AIR / Air Elemental | #110 | 358 | 53-106 / 53 | 4 | 1,614 | 807 | Ether | ||
| GrNAGA / Spirit Naga | #111 | 420 | 7-14 / 7 | 16 | 3,489 | 4,000 | |||
| EVILMAN / Death Knight | #112 | 190 | 55-110 / 55 | 32 | 2,700 | 3,000 | |||
| GrMEDUSA / Earth Medusa | #113 | 96 | 11-22 / 11 | 12 | 1,218 | 1,218 | Glance can Petrify | ||
| SLIME / Black Flan | #114 | 156 | 49-98 / 49 | 255 | 900 | 1,101 | |||
| SENTRY / Soldier | #115 | 400 | 102-204 / 102 | 48 | 4,000 | 2,000 | |||
| WzVAMP / Vampire Lord | #116 | 300 | 90-180 / 90 | 28 | 2,385 | 3,000 | Hermes' Shoes | ||
| FIGHTER / Dark Fighter | #117 | 200 | 40-80 / 40 | 38 | 3,420 | 3,420 | |||
RockGOL / Stone Golem - Not as threatening as MudGOL / Clay Golem since they have SLOW / Slow as their spell instead of FAST / Haste, like its cousin it is resistant to all elements making physical the better choice.
AIR / Air Elemental - Weaker than the WATER / Water Elemental from Sea Shrine / Sunken Shrine so it shouldn't pose too much of a threat.
GrNAGA / Spirit Naga - Is quite a threat to meet up with, it won't use its physical attack often and will generally use Magic such as SLOW / Slow, SLEP / Sleep, FIRE / Fire, LIT / Thunder, HEAL / Heal, RUSE / Blink, DARK / Dark, MUTE / Silence or the attack Poison Gas. This is the second enemy in the game that can use MUTE / Silence, but it's very rare for it to be cast and you likely have a Ribbon on everyone who could use magic anyway not counting battle items that cast spells.
EVILMAN / Death Knight - This enemy can be pretty dangerous as he has access to NUKE / Flare & XXXX / Kill, however he will tend to not use magic in favor of physical attacks. He also has XFER / Dispel & BLND / Blind, but those are nothing to worry about.
GrMEDUSA / Earth Medusa - Pretty weak though they may appear in large groups (up to 4), but otherwise can be threatening depending one how many members don't have Ribbon or Aegis Shield to protect from her petrifying Glance.
SLIME / Black Flan - Like SCUM / Green Slime from Marsh Cave they are a physical wall, however they don't have anything special about them so a FIR2 / Fira or Mage Staff / Mage's Staff use should take it out easily.
SENTRY / Soldier - Much more threatening than GUARD / Guardian having more attack and HP than it, there tend to only be 1 of it so it should be easy to take out with Lightning elemental attacks.
WzVAMP / Vampire Lord - Has low level spells such as ICE / Blizzard, LIT / Thunder, SLEP / Sleep & STUN / Stun all of which aren't very threatening, interestingly on NES there is a bug where if they cast AFIR due to them being weak to Fire it does nothing for them.
FIGHTER / Dark Fighter - Despite its name it has a slew of spells to debuff your party (XFER / Dispel), buffs (WALL / NulAll, FOG2 / Protera & INV2 / Invisira) and even healing (HEL3 / Healaga, CUR3 / Curaga & CUR4 / Curaja), they can make a battle get out of hand if left alive long enough.
Floor Encounters
| Enemy | Floor Number |
|---|---|
| BADMAN / Black Knight | 1F |
| GrNAGA / Spirit Naga | 1F, 2F & 5F |
| AIR / Air Elemental | 1F, 2F, 4F & 5F |
| EYE / Evil Eye | 1F & 2F |
| EVILMAN / Death Knight | 1F & 2F |
| NITEMARE / Nightmare | 1F & 2F |
| MANTICOR / Manticore | 1F-3F |
| GrMEDUSA / Earth Medusa | 1F & 2F |
| SLIME / Black Flan | 1F, 2F & 5F |
| CHIMERA / Chimera | 2F & 3F |
| RockGOL / Stone Golem | 2F & 3F |
| GUARD / Guardian | 3F & 4F |
| SENTRY / Soldier | 3F & 4F |
| MANCAT / Rakshasa | 3F & 4F |
| MEDUSA / Medusa | 3F & 4F |
| R.HYDRA / Fire Hydra | 3F & 5F |
| WzVAMP / Vampire Lord | 3F & 4F |
| FIGHTER / Dark Fighter | 3F & 4F |
| NAOCHO / Neochu | 4F |
| SORCERER / Mindflayer | 4F & 5F |
| MudGOL / Clay Golem | 4F & 5F |
Map 1F
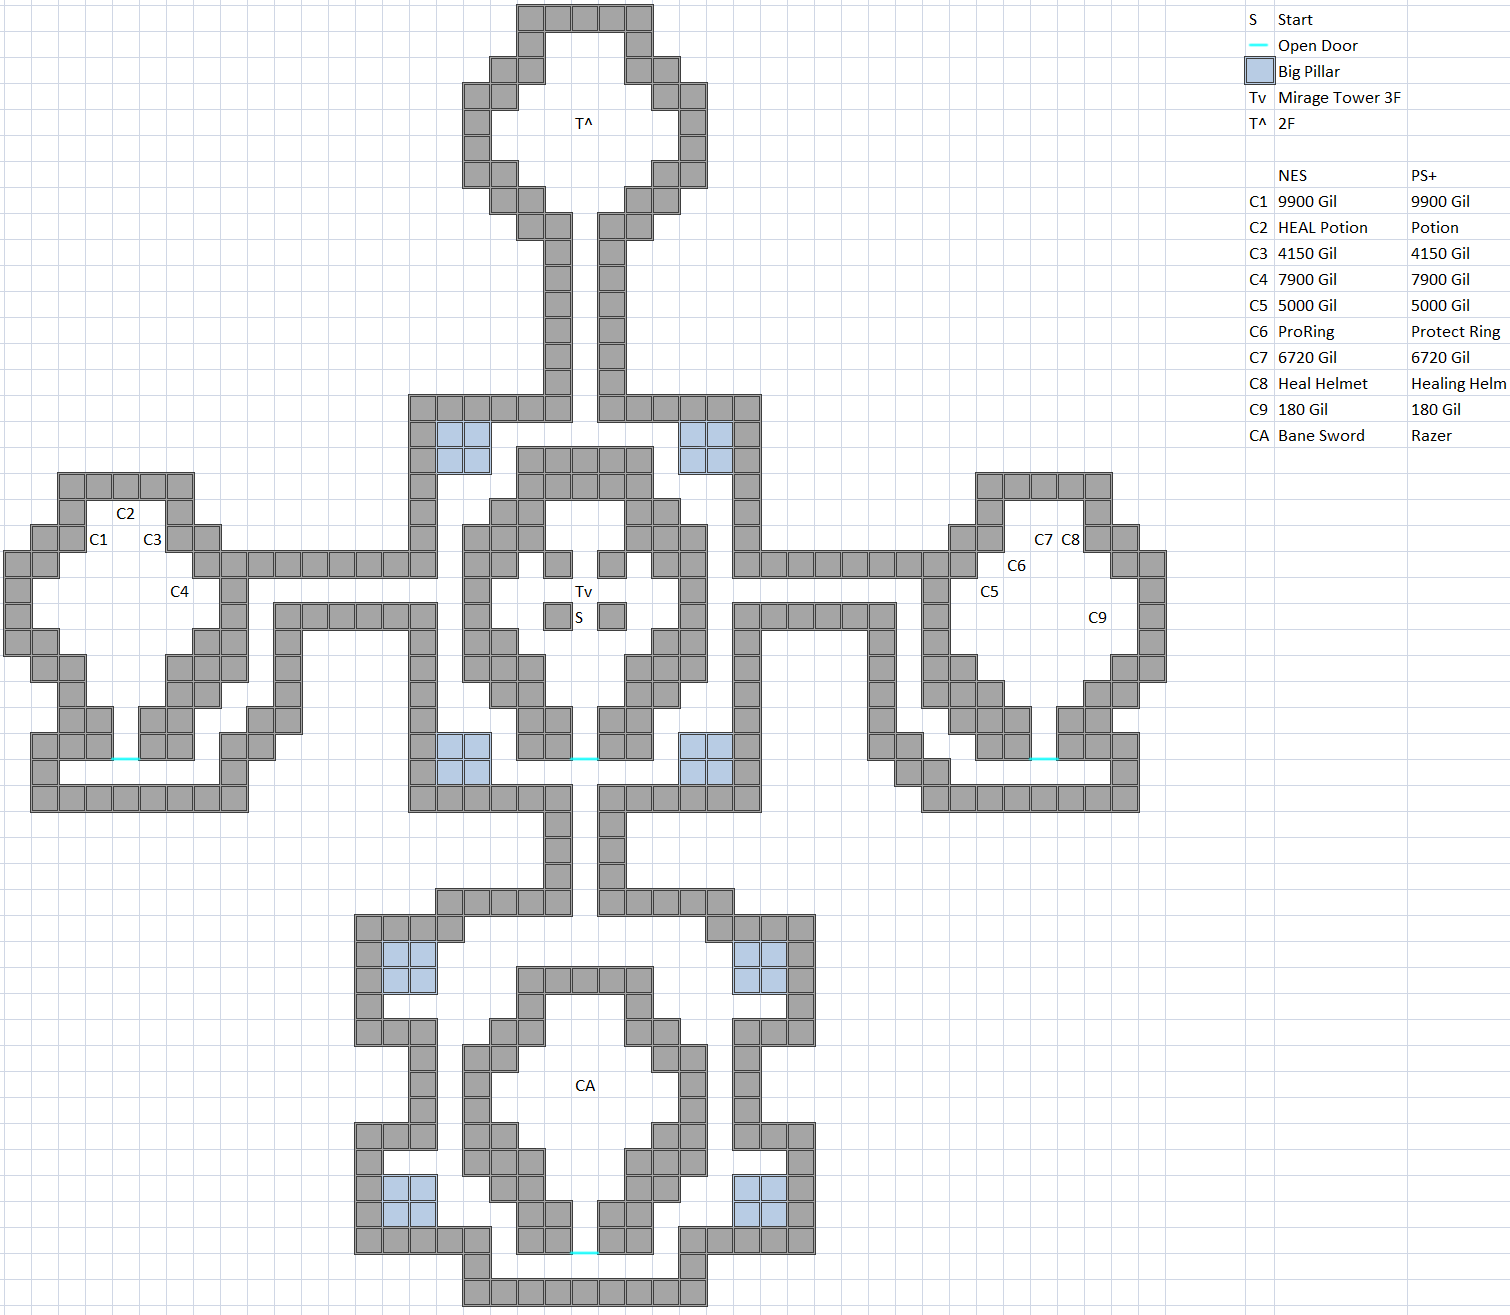
Four paths we can choose to go to the left, right and bottom having treasure while the top leads to the next floor. The only new equipment here is the Bane Sword / Razer, it can be equipped by Knight, Ninja & Red Wizard, it has 22 Attack and 20 Accuracy which is weaker than weapons you already have by now, however when used as an item it will cast BANE / Scourge, if lucky you can use that to kill the Fiend here and even KARY / Marilith and Kraken if you chose to not kill them yet. When you finish getting the treasure head up to the next floor.
Map 2F
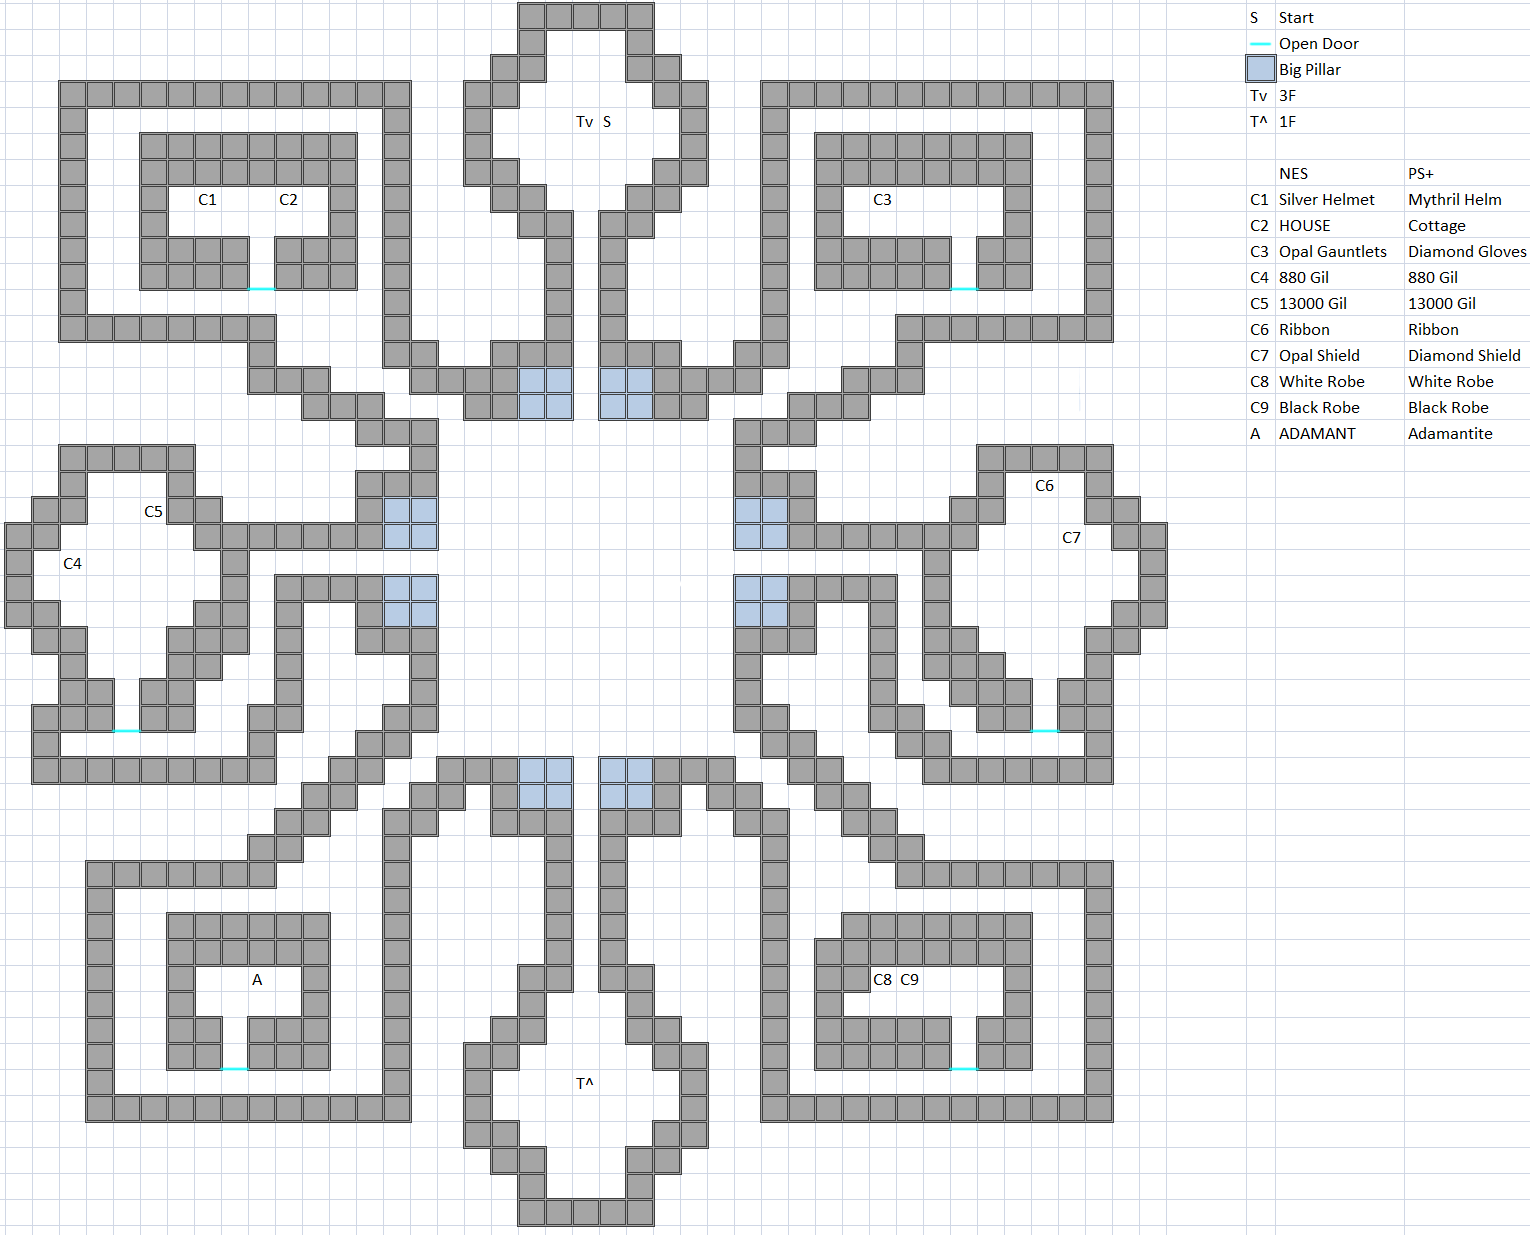
This time we have 7 directions to choose from with the Southern path being the exit, those who are using a Knight will want to get the item in the Southwest path as it will create one of the best weapons a Knight can equip (not counting DoS equipment & the PSP Superboss drop), this floor also has the 3rd and final Ribbon of the main game (4th if DoS+ players did Hellfire Chasm and defeated Rubicante). New equipment here are the White Robe & Black Robe. The White Robe can only be equipped by White Wizard, it provides 24 Defense and -2 Evade with a Weight of 2 if you are still using the Gold Bracelet / Ruby Armlet this has 1 less Evade while providing the same Defense, it also provides protection against Fire & Death, when used as an item it will cast INV2 / Invisira. The Black Robe similarly can only be equipped by Black Wizard, it has the same stats as White Robe, but provides protection against Ice & Time, when used as an item it will cast ICE2 / Blizzara. When you are finished go down the Southern path to go to the next floor.
Map 3F
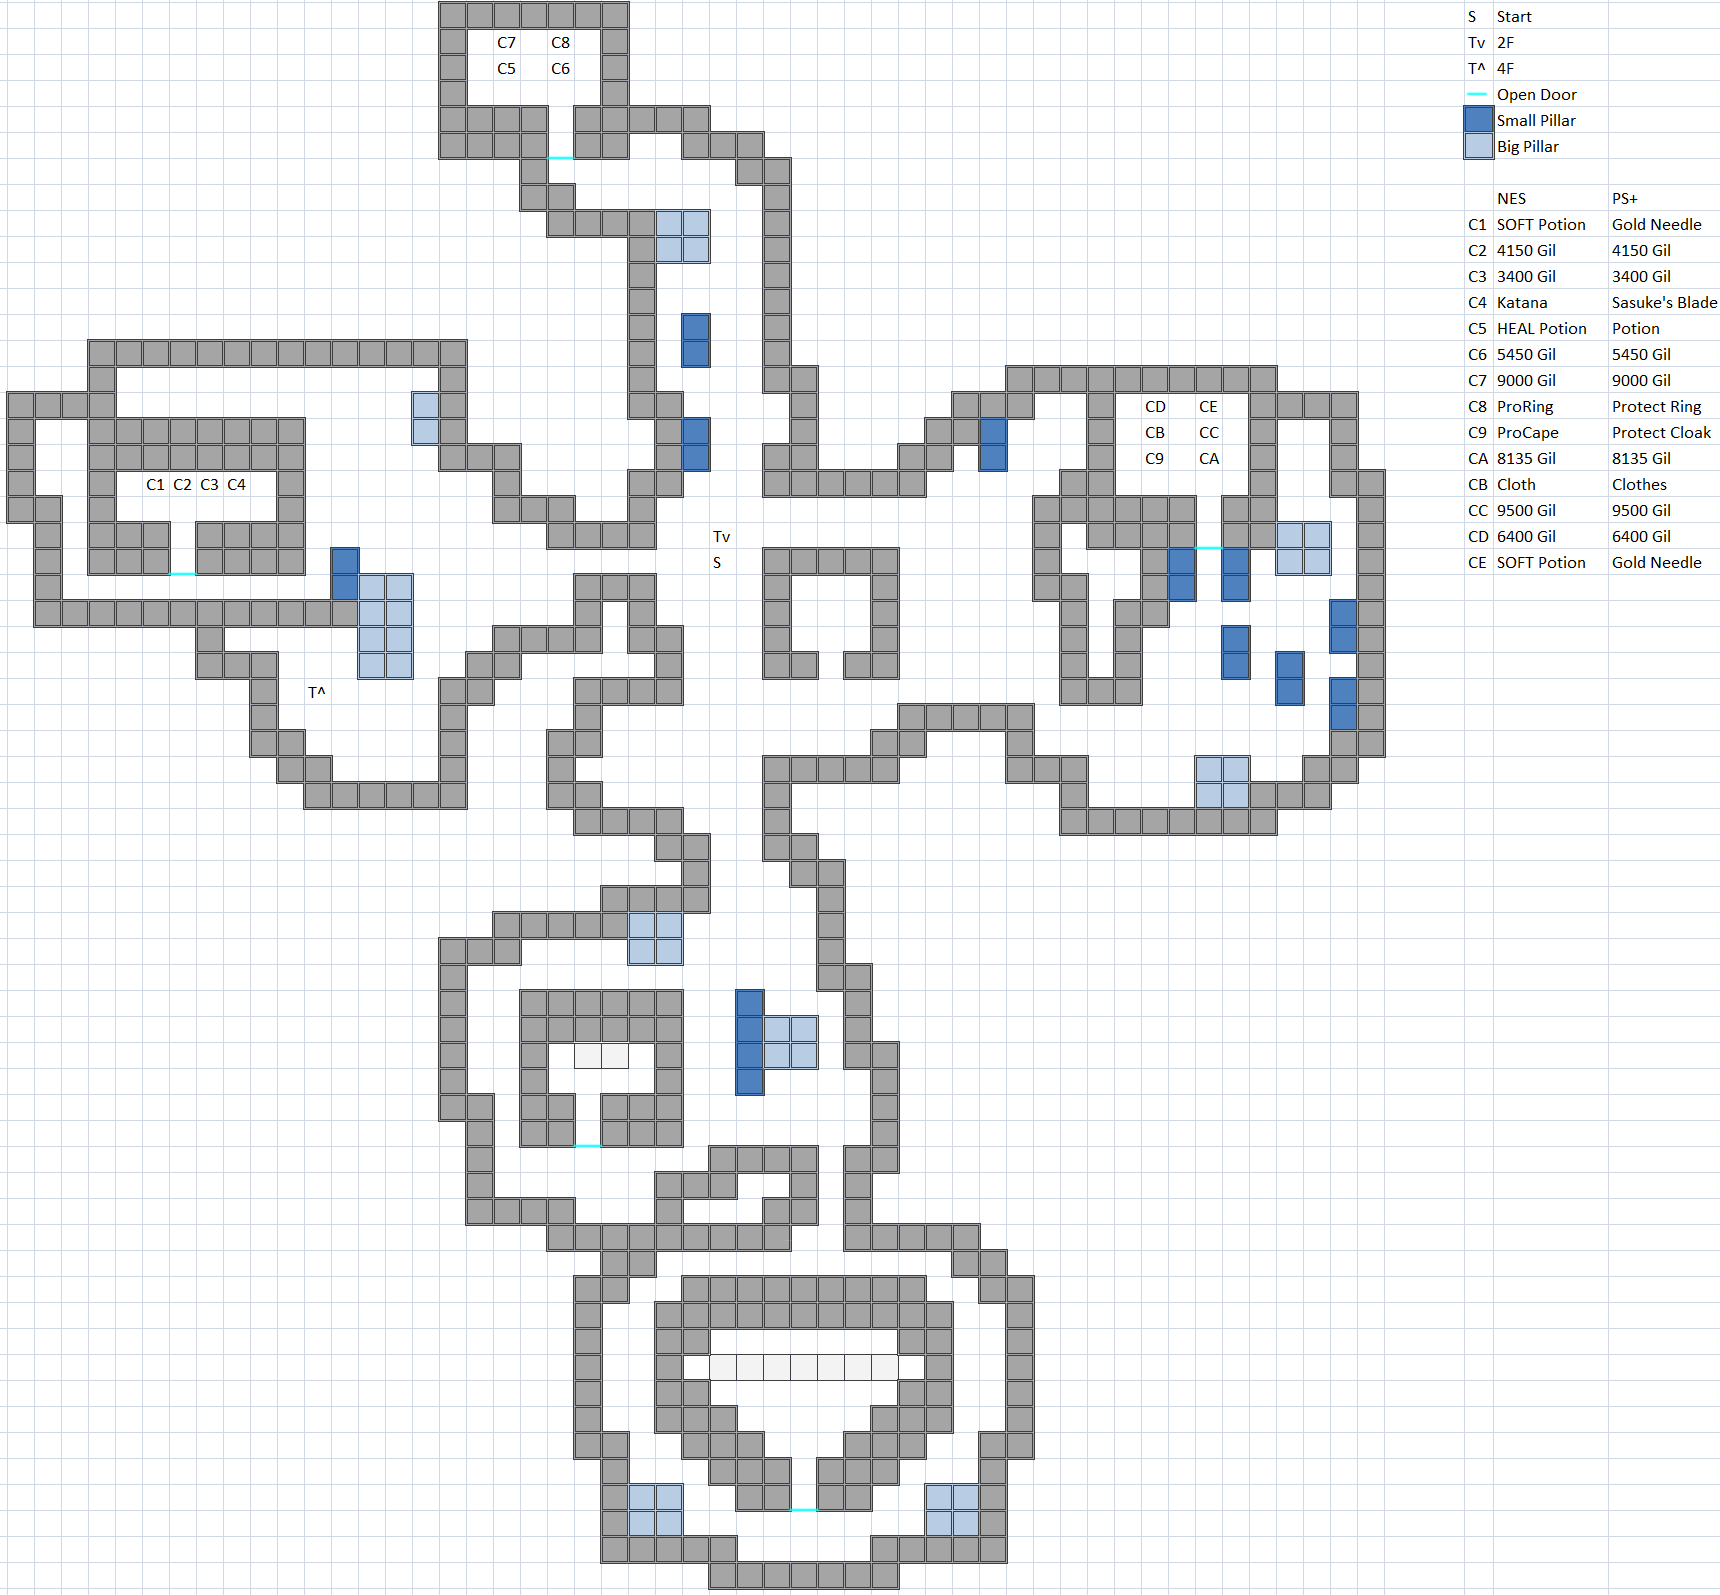
Another floor with 4 paths the exit this time being on a small split to the left and downward rather than being directly in a room, at this point NES players are likely out of space for armor so you will have to decide on if you want all chests open or throw away equipment you aren't using. The new equipment on this floor are Katana / Sasuke's Katana and ProCape / Protect Cloak. Katana / Sasuke's Katana can only be equipped by Ninja, it has 33 Attack and 35 Accuracy which is an upgrade to whatever weapon they have (unless those on DoS+ got Kikuichimonji as a drop from Kraken or Rubicante). The ProCape / Protect Cloak can be equipped by nearly every class (Black Belt / Monk & Master can't) it provides 8 Defense and has -2 Evade with a Weight of 2, it is the only shield the Mages can equip (unless on DoS+ and got Zephyr Cape or Elven Cloak). There is a lookout point you can check near the start of the floor on remakes to see 4 points converging on one location. When you are finished head to the left and go up to the next floor.
Map 4F
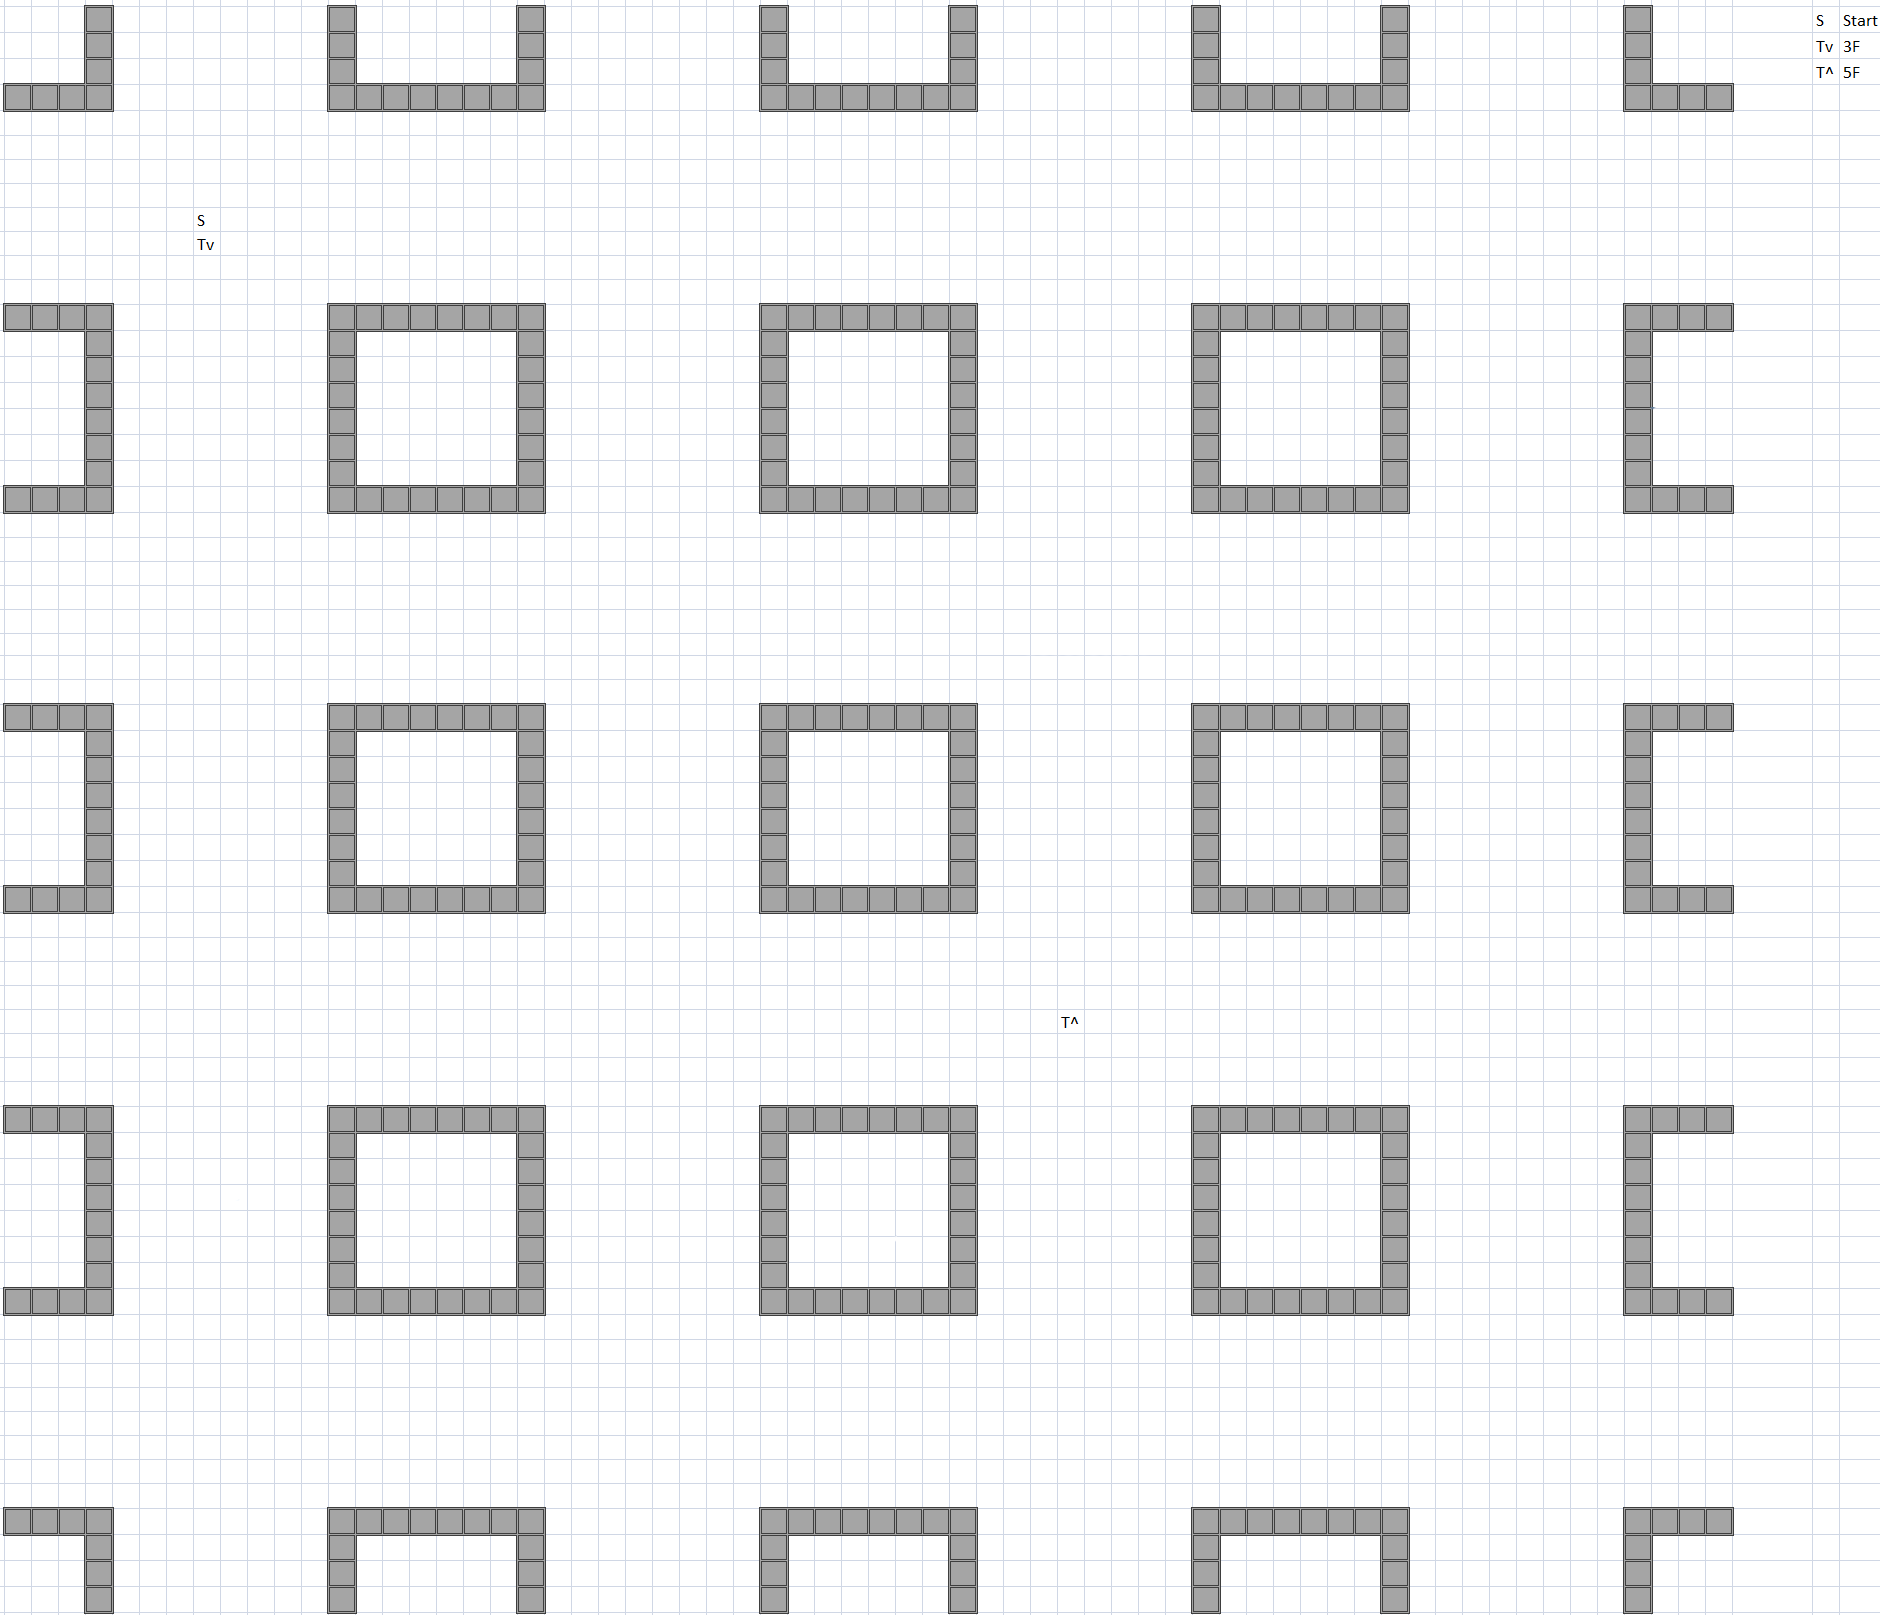
This floor infinitely loops, but as long as you go 2 blocks vertical (up or down) and 2 blocks horizontal (left or right) you will reach the teleporter to the next floor.
Map 5F
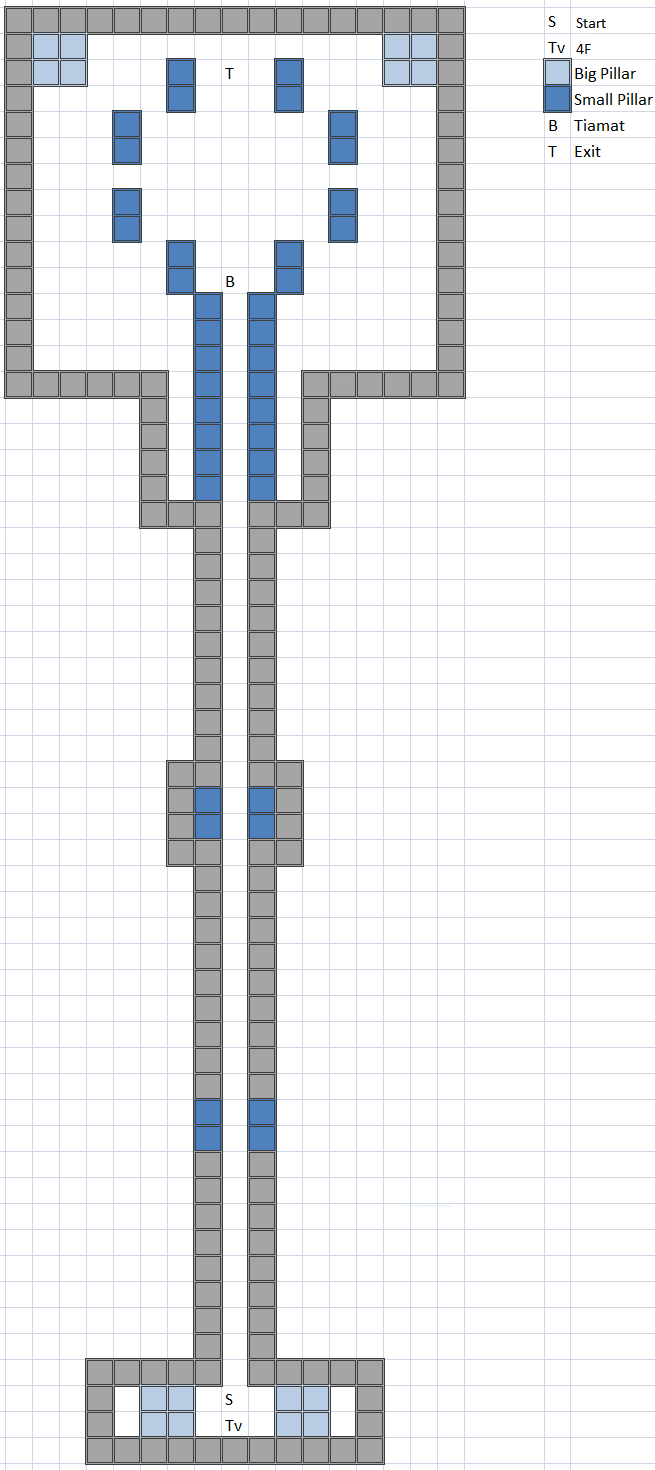
A long straight path that leads to the Fiend of this fortress, however there is a special encounter that you can only get on this bridge only. The Fiend of Wind will otherwise wait for your challenge.
Machine of Death
WarMECH / Death Machine / Warmech (#118)
HP: 1,000 (NES) / 2,000 (PS+)
Attack: 128-256 (NES) / 128 (PS+)
Defense: 80
EXP: 32,000
Gil: 32,000
Weak: —
Resist:
Drop: Genji Armor (Rare)
This can be a tough battle, moreso if it ambushes you and uses NUCLEAR / Nuke / Atomize which will deal around 300+ damage to your party. Depending on your party and level a White Wizard should stick exclusively to HEL3 / Healaga to keep everyone alive while you FAST / Haste your damage dealers and use White Robe if not on White Wizard for INV2 / Invisira to reduce hits taken. The NES version was meant to recover 2 HP per round, but doesn't due to a bug, from Origins onward it recovers 100 HP per turn it is alive. Most don't know that you can run (since unrunable battles don't tend to have a chance of preemptive or ambush) if you feel your party can't handle it. The encounter rate on NES is higher (3 / 64) compared to remakes (1 / 64).
Fiend of Wind
TIAMAT / Tiamat (#119)
HP: 1,000 (NES) / 2,000 (PS) / 2,400 (DoS+)
Attack: 49-98 (NES) / 49 (PS+)
Defense: 10 (NES) / 80 (PS+)
EXP: 5,496
Gil: 6,000
Weak:
Resist:
Drop: None
She will usually choose between her physical attack or her skill cycle which is THUNDER / Thunderbolt > POISON / Poison Gas > BLIZZARD / Icestorm > BLAZE / Blaze. Despite being a boss she is vulnerable to instant death attacks like BANE / Scourge from the Bane Sword / Razer and BRAK / Break, she is otherwise not too tough.
After Tiamat has been defeated the Wind Crystal will be restored to its shining glory, those on DoS+ will notice a statue of Tiamat gets removed from a certain area, that is the entrance of the Whisperwind Cove. It is located near Cavern of Ice on the path South near the route to get to it. We are now ready for endgame, it is recommended that your weakest party member has around 375 max HP at least because of the nasty surprise the first boss will very likely use, also if you are using a Knight and picked up the ADAMANT / Adamantite a certain Dwarf at the Dwarf Cave / Mount Duergar will make the Xcalber / Excalibur for you, only a Knight can equip it, it has 45 Attack and 35 Accuracy and is the Knights best weapon (unless on DoS where Ragnarok & Ultima Weapon are better or the Barbarian Sword on Anniversary Edition), one neat thing about Excalibur is that it targets all enemy types and weaknesses which help it deal more damage than the strongest weapon Masamune attack power wise, though this effect is not present on the NES version, however Xcalber should still be in a Knights hand regardless. Those on remakes should take the time to fill any bestiary entries you may have missed, though if one of them was Green Dragon (108) don't worry about finding it at Waterfall Cavern as the final dungeon has a floor where they appear very often. For those on remakes beating the final boss will cause the game to start all over keeping your kill counts on enemies and having you create a new party, while no enemy is missable you will want to make sure you have every enemy defeated if you want a full bestiary (including all forms of the added superboss for Anniversary Edition players).
Time Warp - A Journeys End
Suggested Level: 23 (NES / PS), 44 (DoS+)
Our journey is coming to a close and it starts where our journey began, those on NES if you don't have the LUTE make sure to get it from Princess Sarah at Coneria Castle. We take our final visit into the Temple of Fiends / Chaos Shrine, those on the Anniversary Edition will notice a hooded figure appear who you may have seen in Cornelia make their way to the back of the temple, this opens an exclusive area for this version know as the Temple of Time which houses the new Superboss of this version. Make your way straight North and "talk" to the Purple orb which will leave behind a portal for us to walk into.
Temple of Fiends / Chaos Shrine (Past)
Enemies
| Name | Bestiary | HP | Attack | Defense | EXP | Gil | Weak | Drop | Notes |
|---|---|---|---|---|---|---|---|---|---|
| SHARK / Shark | #021 | 120 | 22-44 / 22 | 0 | 267 | 66 | |||
| EARTH / Earth Elemental | #041 | 288 | 66-132 / 66 | 20 | 1,536 | 768 | Remedy | ||
| FIRE / Fire Elemental | #060 | 276 | 50-100 / 50 | 20 | 1,620 | 800 | |||
| GREY W / Lava Worm | #062 | 280 | 50-100 / 50 | 31 | 1,671 | 400 | |||
| AGAMA / Fire Lizard | #064 | 296 | 31-62 / 31 | 18 | 2,472 | 1,200 | |||
| R.GIANT / Fire Gigas | #065 | 300 | 73-146 / 73 | 20 | 1,506 | 1,506 | |||
| Red D / Red Dragon | #066 | 248 | 75-150 / 75 | 30 | 2,904 | 4,000 | |||
| FROST D / White Dragon | #068 | 200 | 53-106 / 53 | 8 | 1,701 | 2,000 | |||
| FrWOLF / Winter Wolf | #069 | 92 | 25-50 / 25 | 0 | 402 | 200 | Ice Shield | ||
| SORCERER / Mindflayer | #070 | 112 | 1-2 / 1 | 12 | 822 | 999 | Phoenix Down | Attack may instantly kill | |
| FrGIANT / Ice Gigas | #071 | 336 | 60-120 / 60 | 16 | 1,752 | 1,752 | |||
| MAGE / Dark Wizard | #074 | 105 | 26-52 / 26 | 40 | 1,095 | 1,095 | Red Curtain | ||
| SAURIA / Basilisk | #082 | 196 | 30-60 / 30 | 20 | 1,977 | 658 | Gold Needle | Gaze may Stone | |
| MudGOL / Clay Golem | #090 | 176 | 64-128 / 64 | 7 | 1,257 | 800 | Potion | Attack may Poison | |
| NITEMARE / Nightmare | #091 | 200 | 30-60 / 30 | 24 | 1,272 | 700 | Snort can cause Darkness | ||
| ZombieD / Dragon Zombie | #092 | 268 | 56-112 / 56 | 30 | 2,331 | 999 | Megalixir | Attack may Stun / Paralyze | |
| WzSAHAG / Sahagin Prince | #093 | 204 | 47-94 / 47 | 20 | 882 | 882 | |||
| GrSHARK / White Shark | #094 | 344 | 50-100 / 50 | 8 | 2,361 | 600 | Wyrmkiller | ||
| BigEYE / Deepeyes | #095 | 304 | 30-60 / 30 | 16 | 3,591 | 3,591 | Gaze may Stun / Paralyze, Flash may cause Darkness | ||
| SeaSNAKE / Sea Snake | #096 | 224 | 35-70 / 35 | 12 | 957 | 600 | |||
| LOBSTER / Sea Scorpion | #097 | 148 | 35-70 / 35 | 18 | 639 | 300 | Attack can Poison | ||
| SeaTROLL / Sea Troll | #098 | 216 | 40-80 / 40 | 20 | 852 | 852 | 10 HP Regen per turn (not on NES) | ||
| WATER / Water Elemental | #100 | 300 | 69-138 / 69 | 20 | 1,962 | 800 | |||
| NAGA / Water Naga | #101 | 356 | 9-18 / 9 | 8 | 84 | 20 | |||
| BADMAN / Black Knight | #104 | 260 | 44-88 / 44 | 38 | 1,263 | 1,800 | Deathbringer | ||
| CHIMERA / Chimera | #105 | 300 | 30-60 / 30 | 20 | 2,064 | 2,500 | |||
| Gas D / Green Dragon | #108 | 352 | 72-144 / 72 | 16 | 4,068 | 5,000 | |||
| RockGOL / Stone Golem | #109 | 200 | 70-140 / 70 | 16 | 2,385 | 1,000 | |||
| EVILMAN / Death Knight | #112 | 190 | 55-110 / 55 | 32 | 2,700 | 3,000 | |||
| GrMEDUSA / Earth Medusa | #113 | 96 | 11-22 / 11 | 12 | 1,218 | 1,218 | Glance can Petrify | ||
| SLIME / Black Flan | #114 | 156 | 49-98 / 49 | 255 | 900 | 1,101 | |||
| WzVAMP / Vampire Lord | #116 | 300 | 90-180 / 90 | 28 | 2,385 | 3,000 | Hermes' Shoes | ||
| FIGHTER / Dark Fighter | #117 | 200 | 40-80 / 40 | 38 | 3,420 | 3,420 | |||
| JIMERA / Rhyos | #120 | 350 | 40-80 / 40 | 18 | 4,584 | 5,000 | Power Staff | Stone Gas can petrify | |
| WORM / Purple Worm | #122 | 488 | 65-130 / 65 | 10 | 4,344 | 1,000 | Emergency Exit | ||
| IronGOL / Iron Golem | #123 | 304 | 93-186 / 93 | 100 | 6,717 | 3,000 | Toxic can instantly kill | ||
JIMERA / Rhyos - A slightly upgraded CHIMERA / Chimera whom they will often be in a group with them, its POISON / Stone Gas can petrify your party, though by this point everyone should have protection from Stone.
Worm / Purple Worm - Has a pretty nasty physical attack and later remakes give it a lot of Magic Defense making physical a preferred option.
IronGOL / Iron Golem - The rarest encounter in the game which has an instant death attack called Toxic which will hit anyone who doesn't have resistance to Poison, as you should have Ribbons on everyone you should not have to worry outside of him having more defense than other Golems.
Floor Encounters
| Enemy | Floor Number |
|---|---|
| WORM / Purple Worm | 1F & B4 |
| Frost D / White Dragon | 1F |
| CHIMERA / Chimera | 1F & 2F |
| SLIME / Black Flan | 1F & 2F |
| ZombieD / Zombie Dragon | 2F, 3F & B4 |
| FrGIANT / Ice Gigas | 2F |
| FrWOLF / Winter Wolf | 2F |
| JIMERA / Rhyos | 2F |
| WzVAMP / Vampire Lord | 2F, 3F & B4 |
| BADMAN / Black Knight | 3F |
| Gas D / Green Dragon | 3F |
| MAGE / Dark Wizard | 3F |
| Fighter / Dark Fighter | 3F |
| MudGOL / Clay Golem | B1 |
| RockGOL / Stone Golem | B1 & B4 |
| GrMEDUSA / Earth Medusa | B1 |
| EARTH / Earth Elemental | B1 |
| SAURIA / Basilisk | B1 |
| Grey W / Lava Worm | B2 |
| R.GIANT / Fire Gigas | B2 |
| AGAMA / Fire Lizard | B2 |
| FIRE / Fire Elemental | B2 |
| Red D / Red Dragon | B2 |
| WATER / Eater Elemental | B3 |
| LOBSTER / Sea Scorpion | B3 |
| SeaSNAKE / Sea Snake | B3 |
| SeaTROLL / Sea Troll | B3 |
| WzSAHAG / Sahagin Prince | B3 |
| GrSHARK / White Shark | B3 & B4 |
| BigEYE / Deepeyes | B3 |
| NAGA / Water Naga | B3 |
| SHARK / Shark | B4 |
| EVILMAN / Death Knight | B4 |
| NITEMARE / Nightmare | B4 |
| SORCERER / Mindflayer | B4 |
| IronGOL / Iron Golem | B4 |
Map 1F
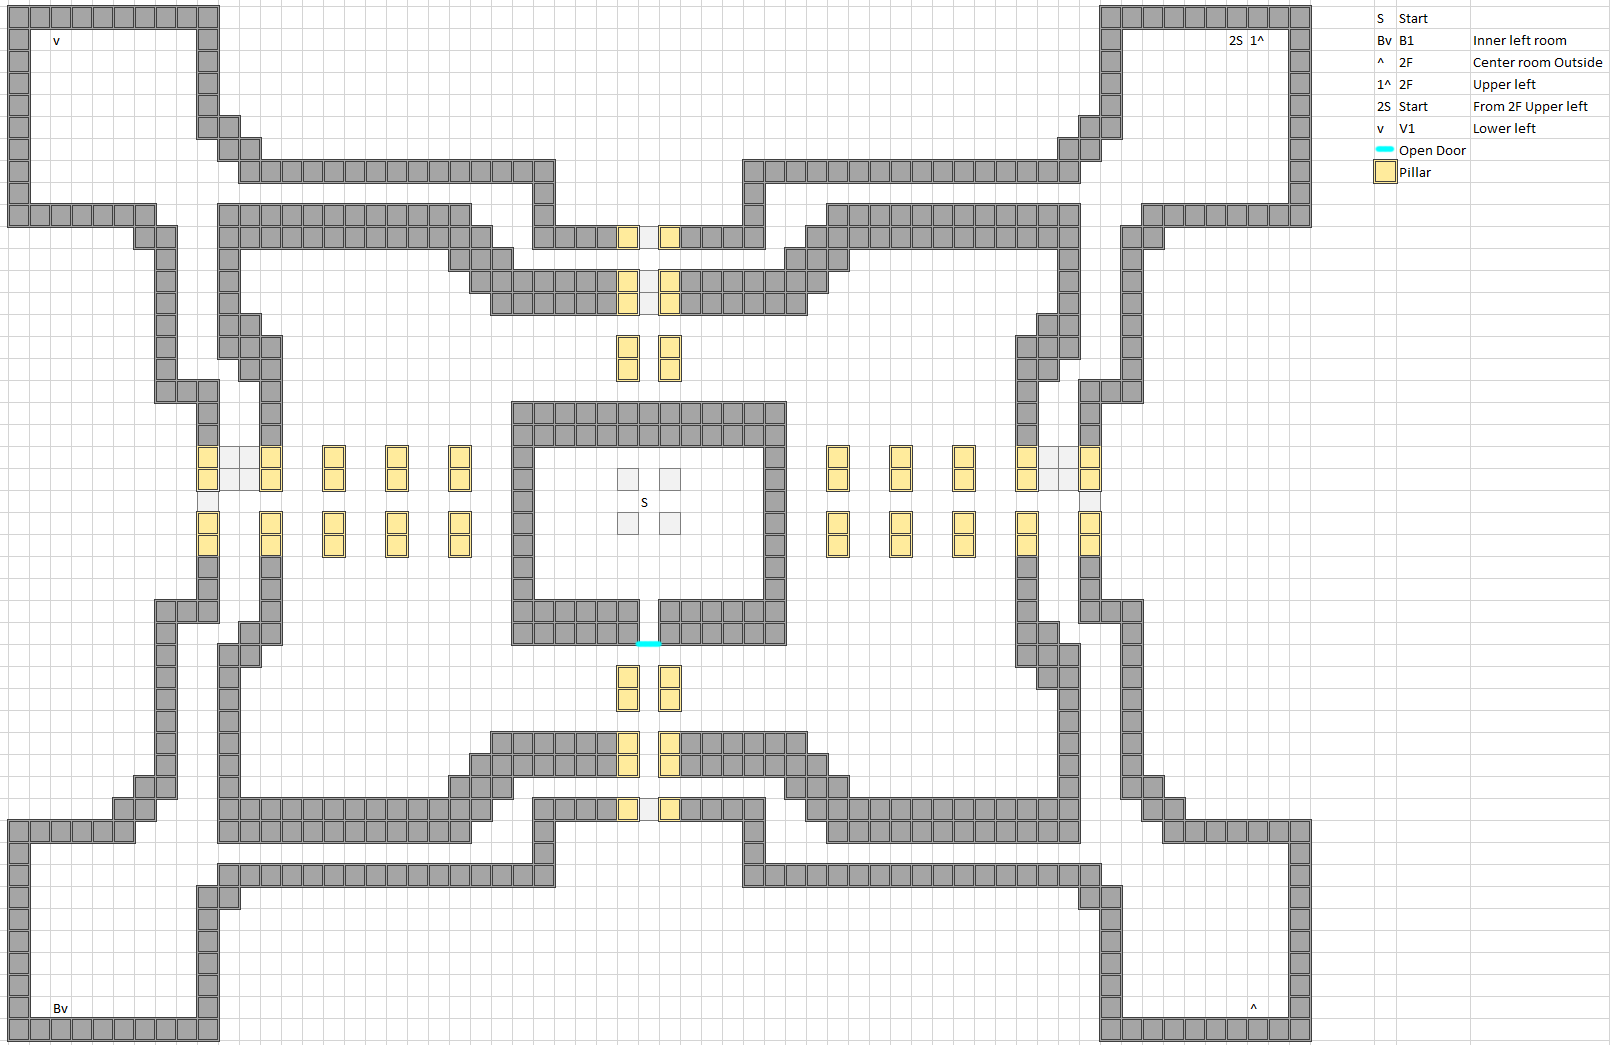
Those on the NES version take note that this is a no turning back point for you, all other versions will have a symbol on the floor where you started which allows them to exit this area, NES players without the EXIT spell will not be able to leave this dungeon. Start by making your way to the Southeast corner as the stairs in the Southwest lead to an empty room that has no means of progressing in this dungeon. This will lead to a small area in Floor 2F in which you must get to the next set of stairs to the East of it which lead to the 3rd floor in the Northwest.
Map 3F
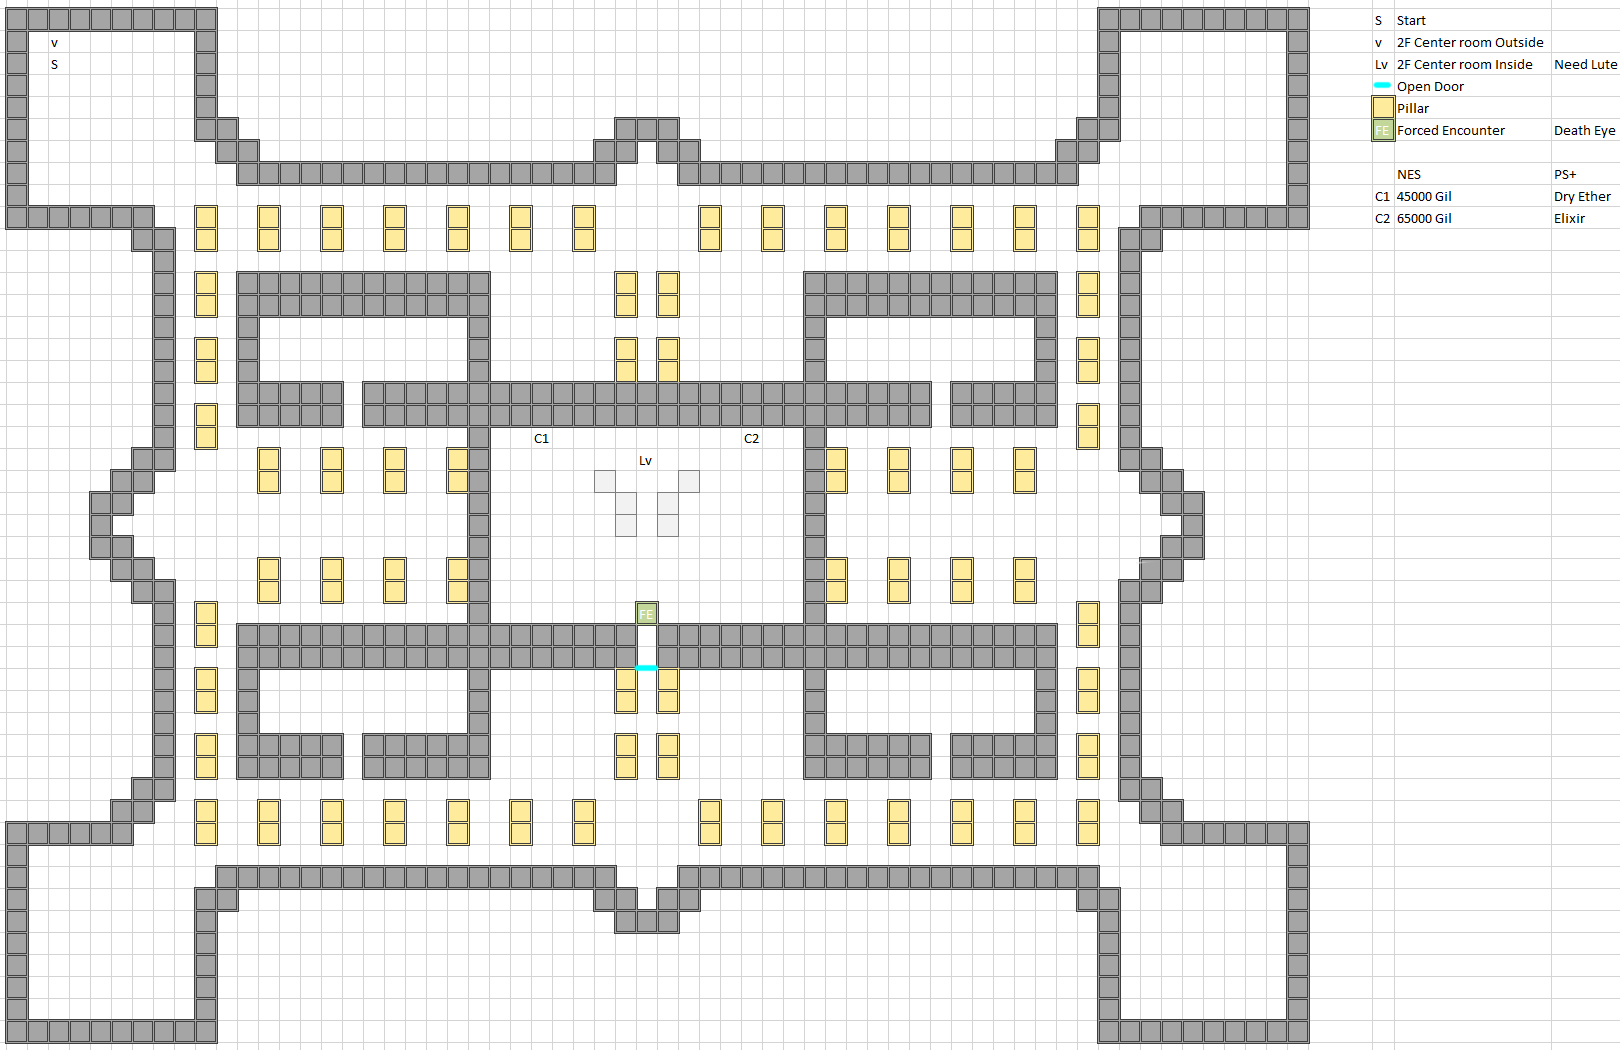
A map was skipped, but it will appear below this one due to how little was explored. Our goal for this floor is to make it to the center room through the South of the area, when you have made you way to the door inside you will face a mini boss.
Mini Boss
PHANTOM / Death Eye (#119)
HP: 360
Attack: 120-240 (NES) / 120 (PS+)
Defense: 60
EXP: 1
Gil: 1
Weak:
Resist:
Drop: Elixir (Rare)
If you remember the EYE / Evil Eye this is basically the same thing, but slightly stronger. Like that enemy it has access to a lot of spells which it will use in order of STOP / Stop > ZAP! / Warp > XFER / Dispell > BRAK / Break > RUB / Death > HOLD / Hold > MUTE / Silence > SLOW / Slow. This is the 3rd and last enemy in the main game that will try to silence you, but it's far down the list to worry about. Its Gaze attack can instant kill, but everyone should be protected from it. In the off chance you don't kill it in one turn it will recover 18 HP (not on NES).
After the PHANTOM / Death Eye has been defeated you can help yourself to the treasure chests the left contains 45,000 Gil (NES) or a Dry Ether (PS+), while the right one contains 65,000 Gil (NES) or an Elixir (PS+). After you have collected the treasure (or decided to ignore it) go to the center slab and use the Lute Princess Sarah gave you (NES players if you didn't get it you will have to go back to Corneia castle to get it, if you don't have EXIT to get out you will have to reset your game.) which will open a path to 2F in the center room.
Map 2F
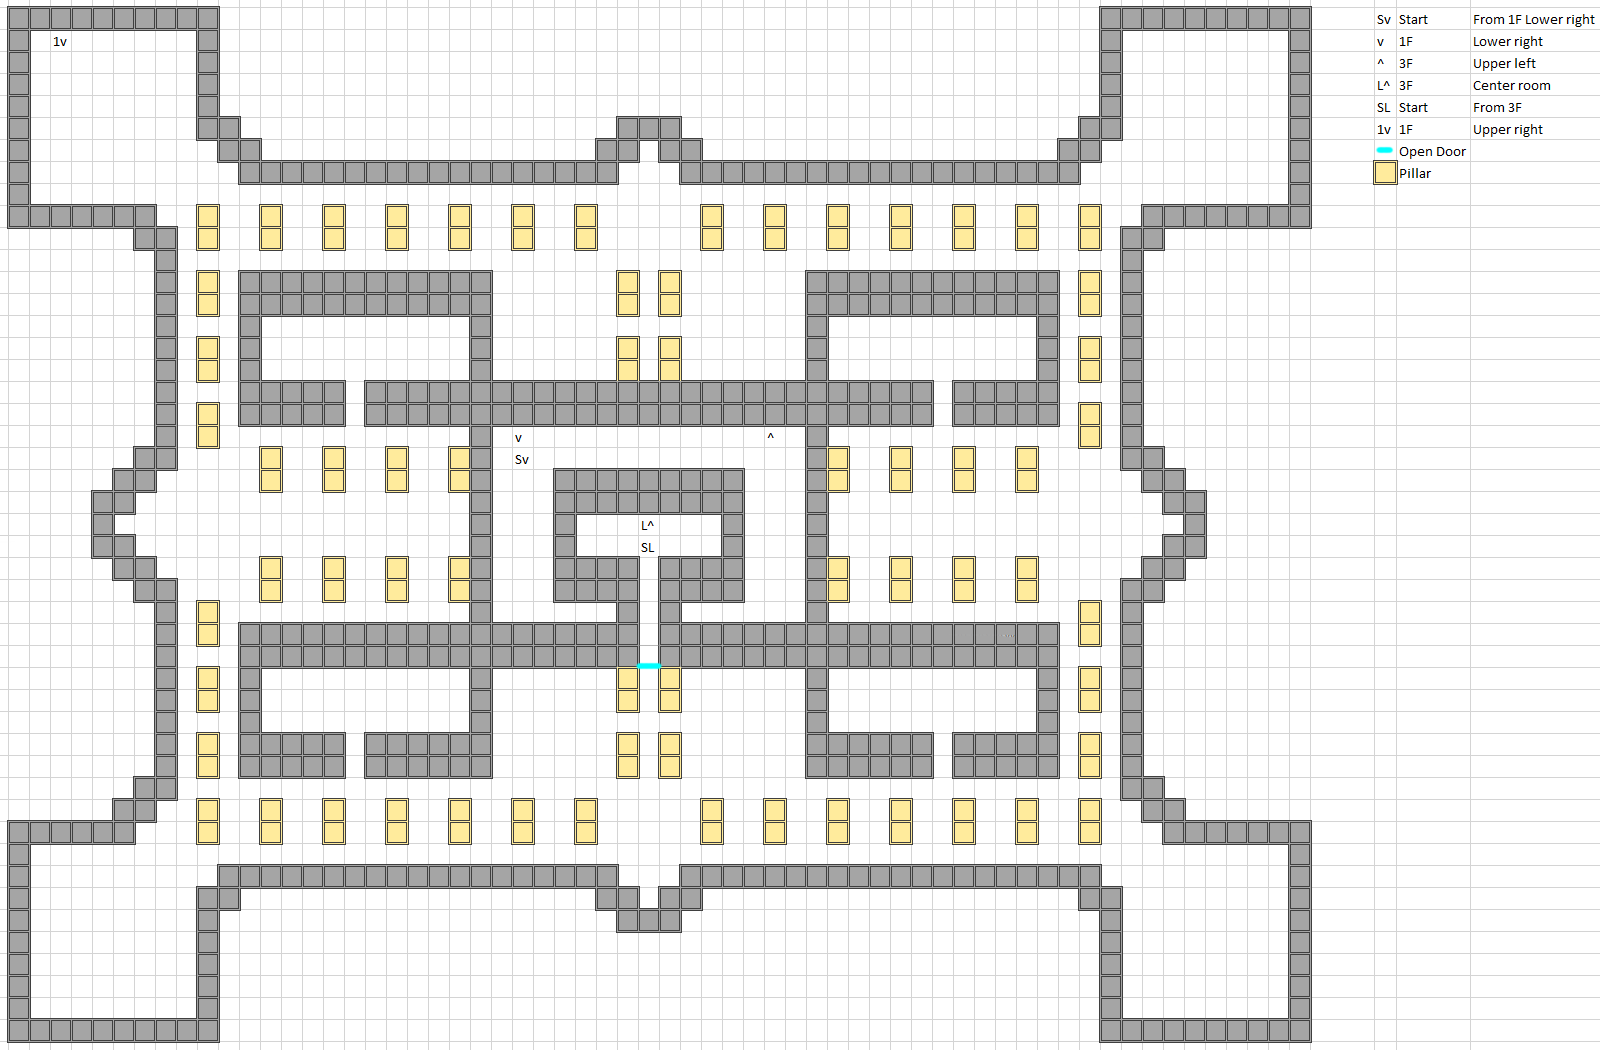
On this floor we have to leave the room and go to the Northwest which leads back to 1F. On 1F we start at the Northeast and must make our way West to the stairs in the Northwest corner.
Map B1
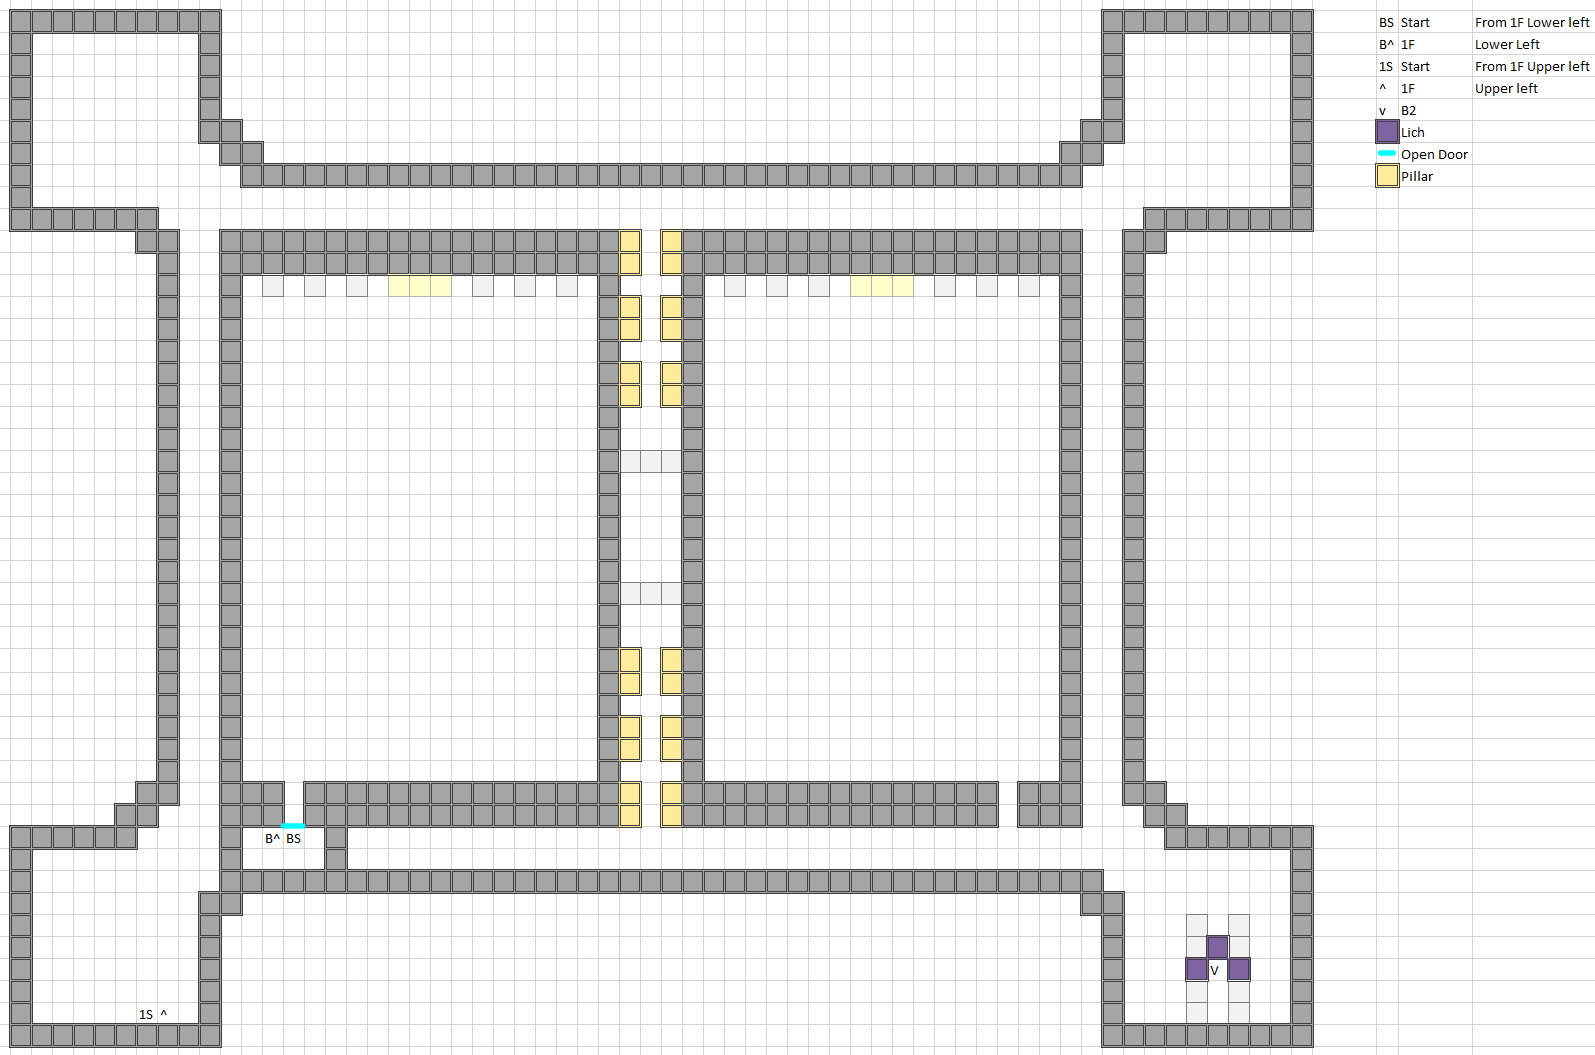
We start in the Southwest corner and must traverse all the way around to the Southeast of the room. Warning before approaching the stairs make sure you are fully healed in order to survive a nasty surprise.
Lich Refight
LICH / Lich (#124)
HP: 500 (NES) / 1,000 (PS) / 2,800 (DoS+)
Attack: 50-100 (NES) / 50 (PS+)
Defense: 80
EXP: 2,000
Gil: 1
Weak:
Resist:
Drop: None
Lich has had a major update to his spell list only using Level 8 spell this time around with the cycle being NUKE / Flare > STOP / Stop > ZAP! / Warp > XXXX / Kill and losing the Fire Weakness he previously had. NUKE / Flare if he uses it on the first turn will deal hefty damage around 375 at the least. Go all out and hopefully kill him before your weaker mages drop.
Map B2
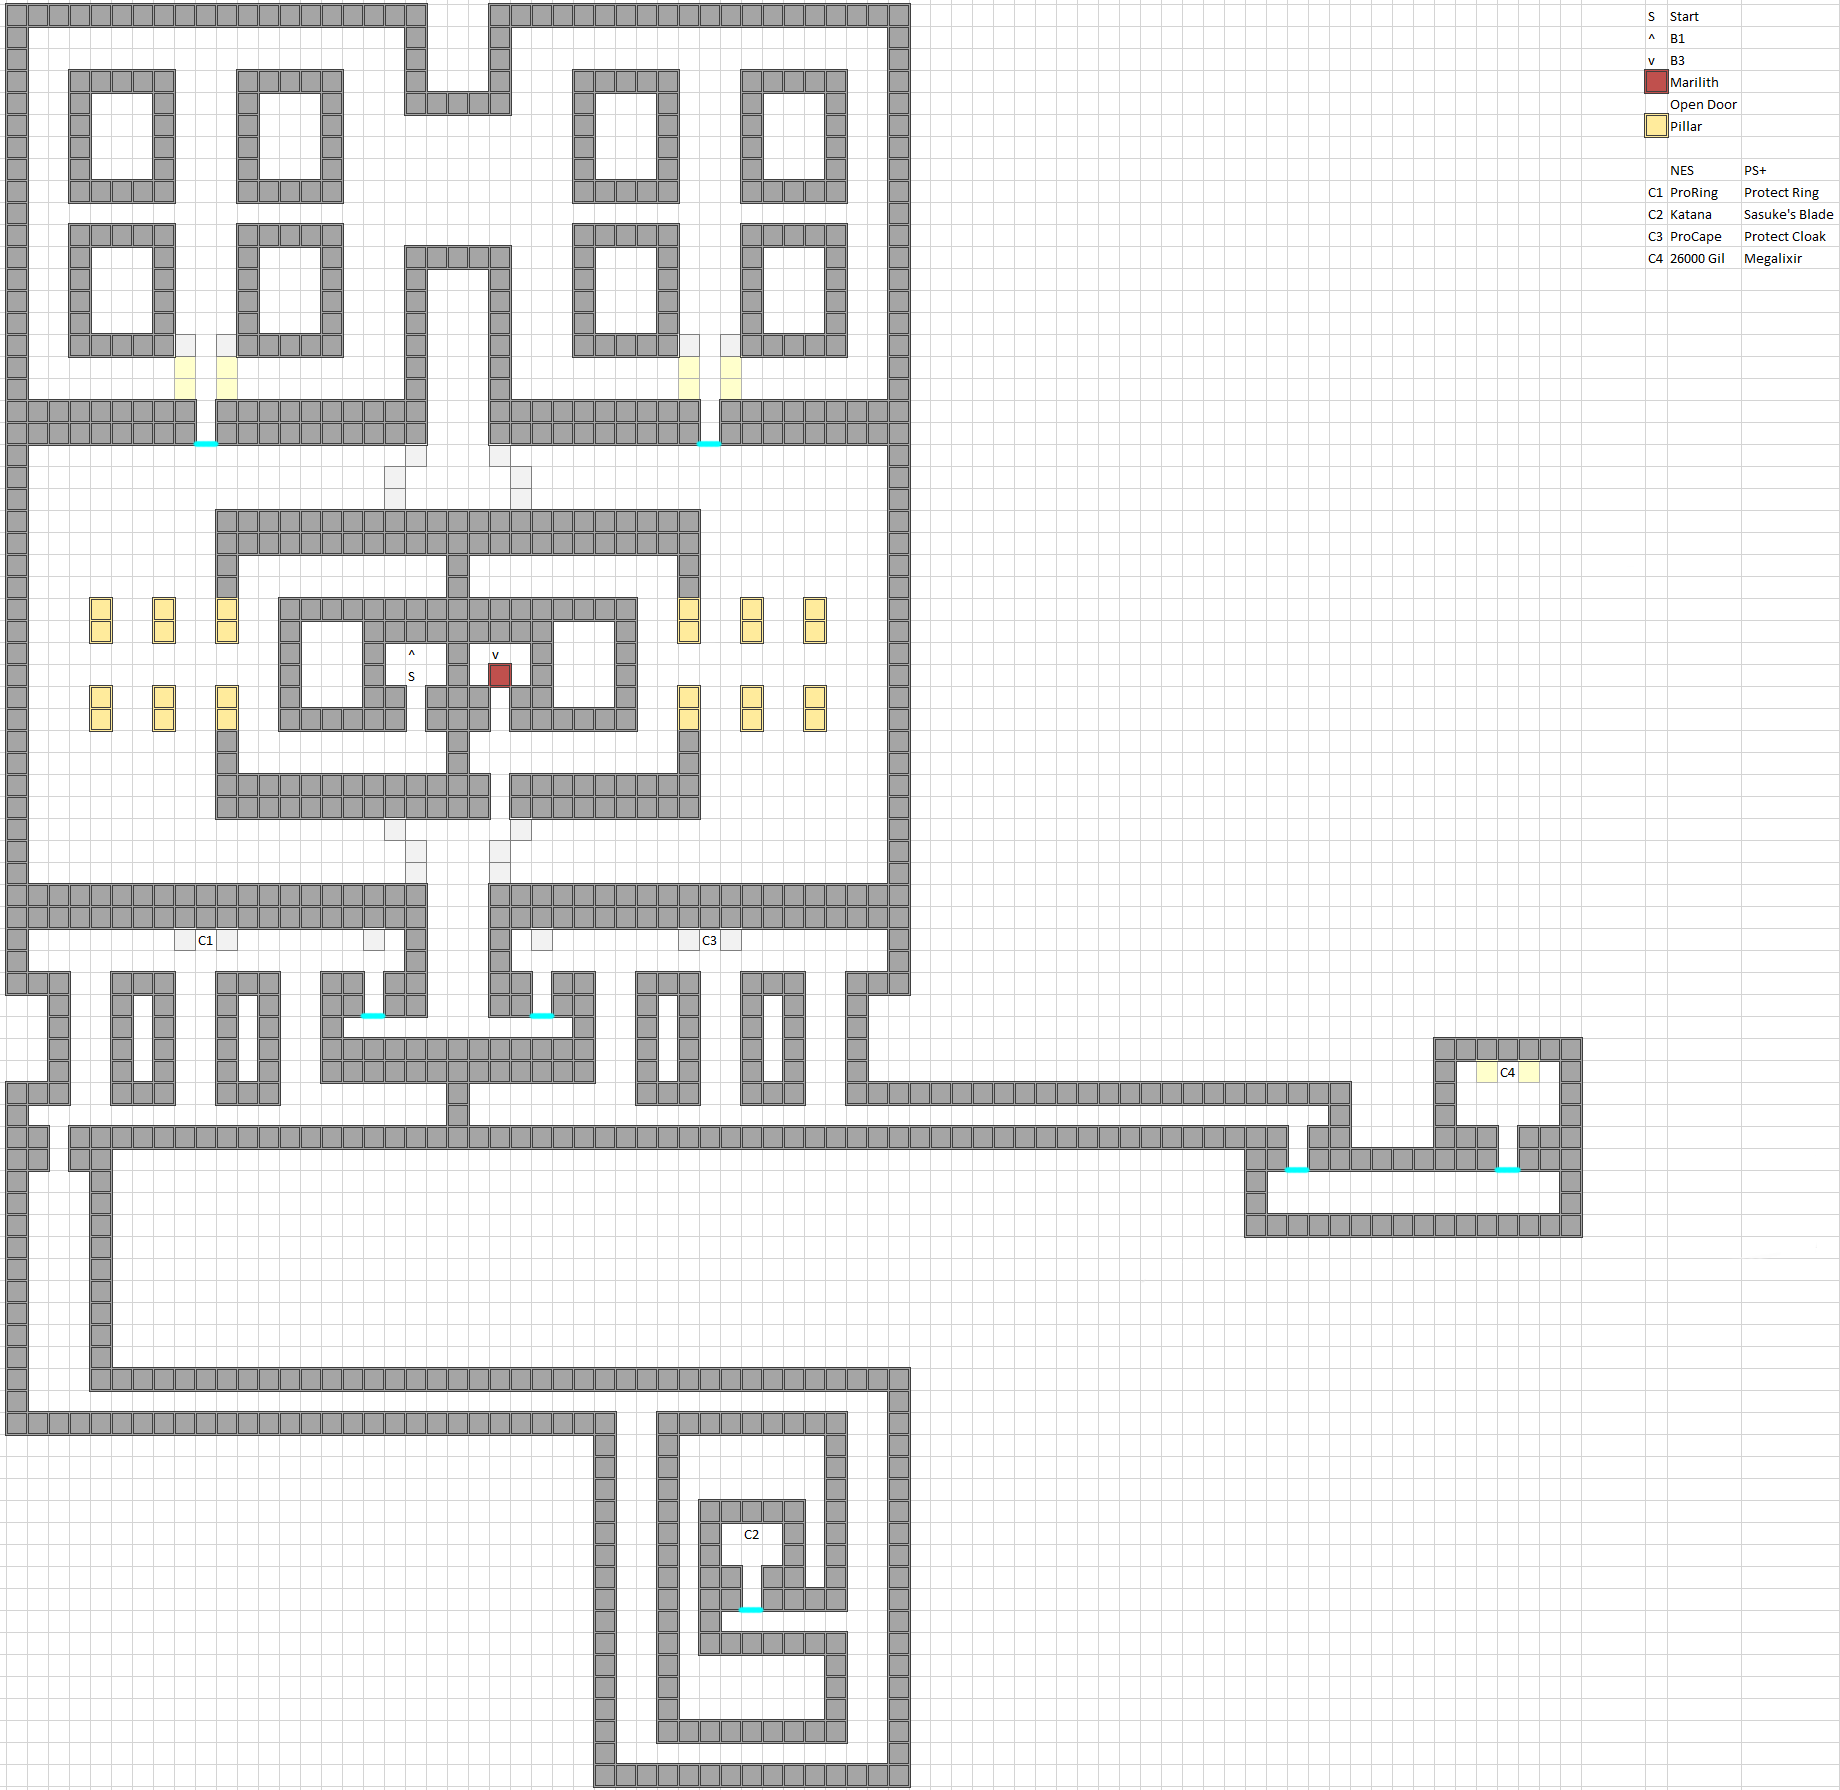
In this area the exit is within view from where we start, however we have to travel all the way around to reach it. There are some extra treasures you can choose to go for before moving to the next floor. The room below to the left has another ProRing / Protect Ring in the chest near the entrance and in the room South and East of that section will have another Katana / Sasuke's Blade which we already got from Sky Fortress / Flying Fortress. The room below on the right has another ProCape / Protect Cloak which you can equip to your other Mage character if you have a second one (and haven't done bonus dungeons on GBA+ which have better cloaks for them) and the other room mostly East of there has 26,000 Gil (NES / PS) or another Megalixir (DoS+), when done collecting the treasure make your way back to the stairs leading the to next floor.
Marilith Refight
KARY / Marilith (#125)
HP: 700 (NES) / 1,400 (PS) / 3,200 (DoS+)
Attack: 60-120 (NES) / 60 (PS+)
Defense: 60
EXP: 2,000
Gil: 1
Weak: —
Resist:
Drop: None
Her spell cycle has been updated to have FIR3 / Firaga replace FIR2 / Fira, BLND / Blind replace DARK / Dark & STUN / Stun replace HOLD / Hold, same strategy as last time will still work.
Map B3
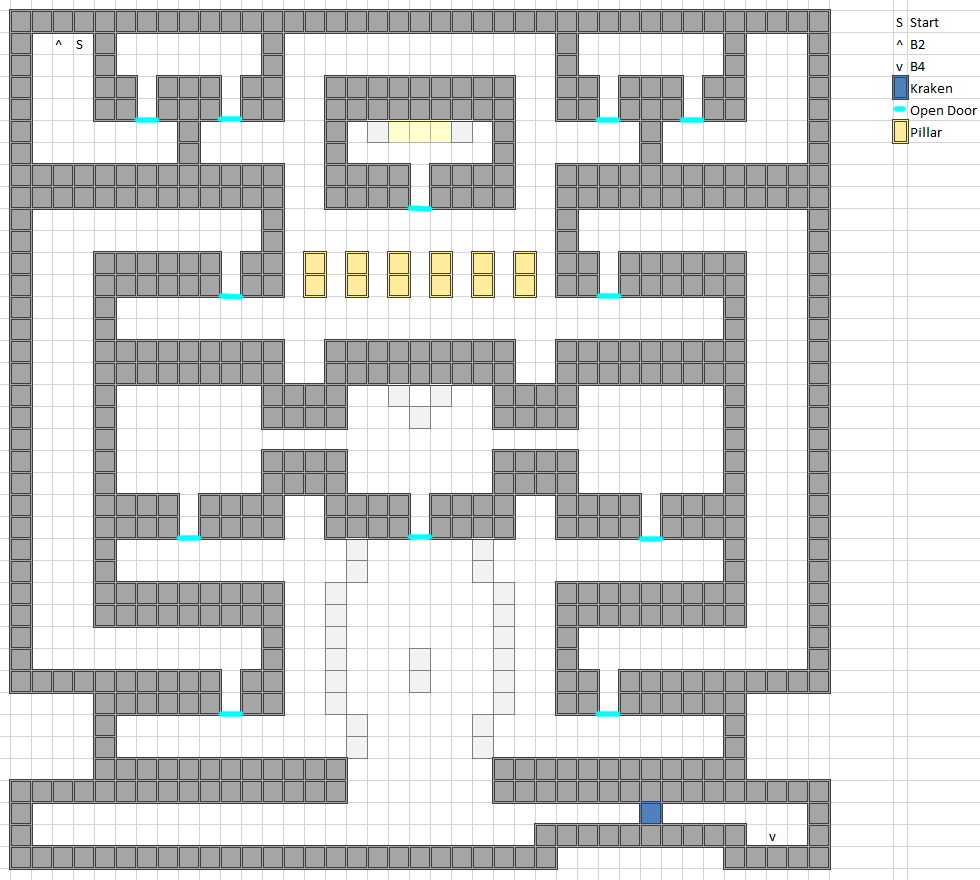
A very simple floor where both paths converge into the same area in the South, there is no treasure here so you can book it to the stairs in the Southeastern room.
Kraken Refight
KRAKEN / Kraken (#126)
HP: 900 (NES) / 1,800 (PS) / 3,600 (DoS+)
Attack: 70-140 (NES) / 70 (PS) / 60 (DoS+)
Defense: 70 (NES / PS) / 80 (DoS+)
EXP: 2,000
Gil: 1
Weak: —
Resist:
Drop: Eye Drops (Rare)
Not much of a change compared to last time though now Kraken has access to LIT2 / Thudara, same strategy as last time still works.
Map B4
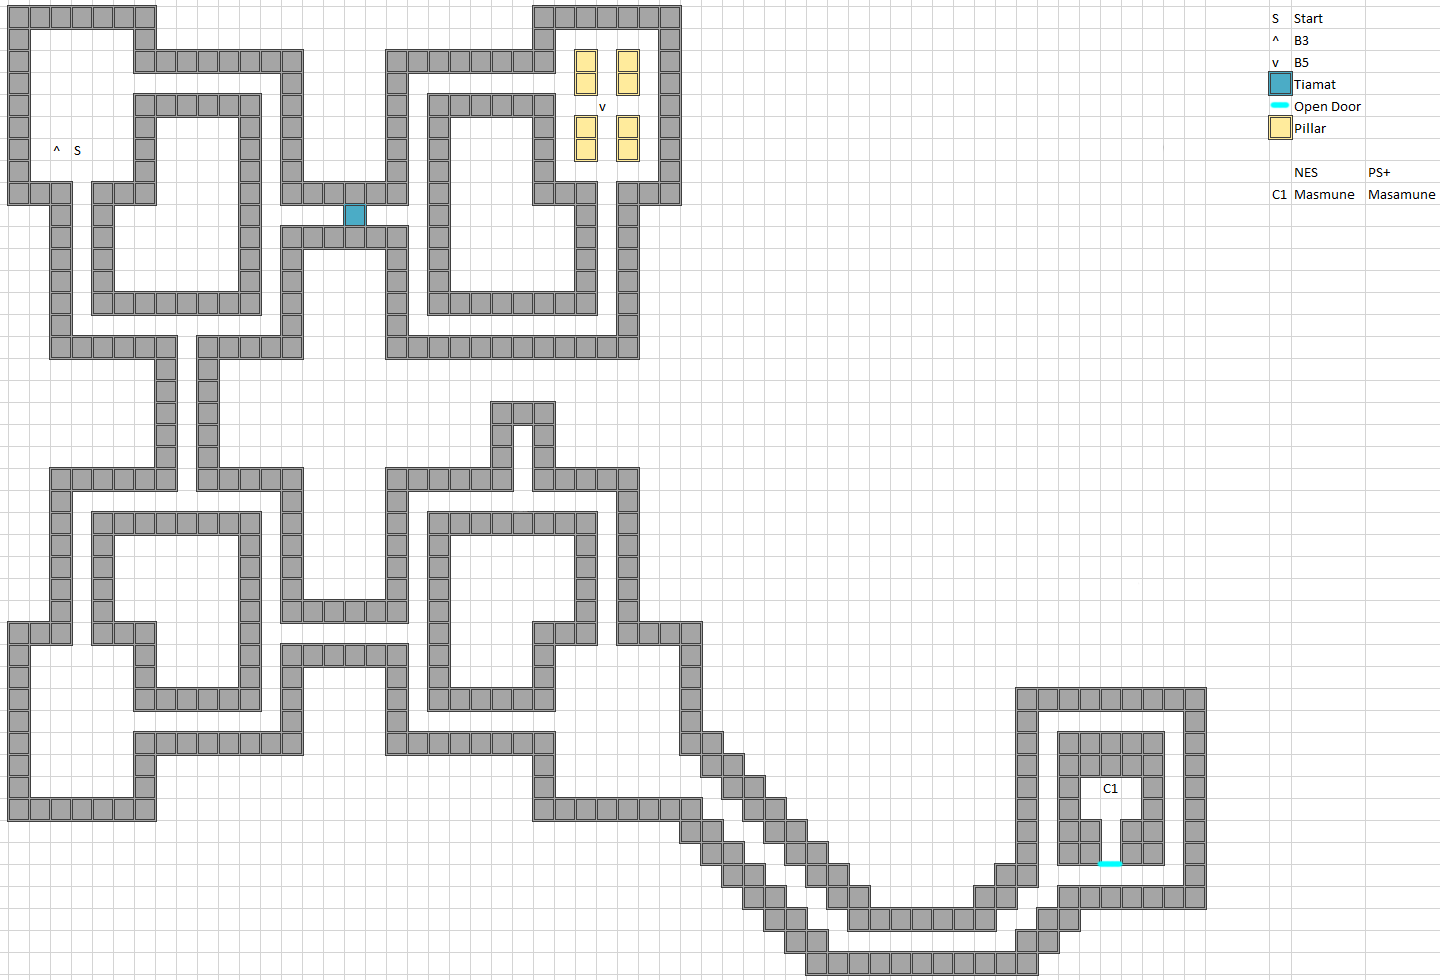
You can choose to go straight for the exit by going to the East to go to the next floor, however this floor has not only a very rare enemy, but there is also a special weapon hidden at the very Southeast. The Masmune / Masamune is the strongest weapon in the game that can be used by every class including with an attack of 56 and accuracy of 40, it is recommended to give it to a weaker character so they can contribute better to normal encounters.
Refight already?
TIAMAT / Tiamat (#119)
HP: 1,100 (NES) / 2,200 (PS) / 5,500 (DoS+)
Attack: 75-150 (NES) / 75 (PS+)
Defense: 90
EXP: 2,000
Gil: 1
Weak: —
Resist:
Drop: Rune Staff (Rare)
It hasn't been too long since we fought Tiamat, this time however she has a spell cycle which she will use more over her skills her spells cycle between BANE / Scourge > ICE2 / Blizzara > LIT2 / Thundara > FIR2 / Fira. Other than her higher defense the old strategy will still work.
Map B5
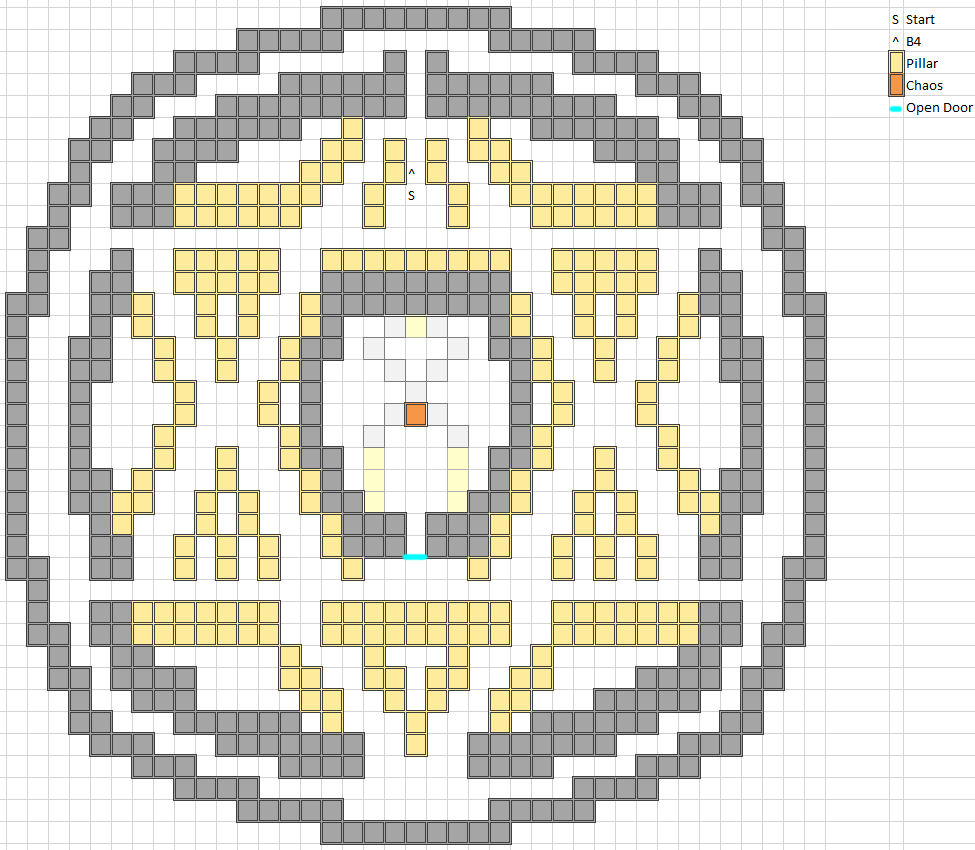
This floor offers much needed breathing room as it has no random encounters so feel free to use your Heal Potions / Megalixir to get back into tip top shape. There is only one room on this floor which houses...Garland? After revealing the plot of the game Garland will transform into.
Final Boss
CHAOS / Chaos (#128)
HP: 2,000 (NES) / 4,000 (PS) / 20,000 (DoS+)
Attack: 100-200 (NES) / 100 (PS+)
Defense: 100
EXP: 0
Gil: 0
Weak: —
Resist:
Drop: None
In all versions this fight is basically a damage race to hopefully defeat him before he uses CUR4 / Curaja in his spell cycle to fully heal himself. His physical attack has a chance to Stun / Paralyze the member he hits.
His spell cycle will go ICE3 / Blizzaga > SLO2 / Slowra > LIT3 / Thundaga > CUR4 / Curaja > FAST / Haste > FIR3 / Firaga > ICE2 / Blizzara > NUKE / Flare
While his skill cycle will go INFERNO / Blaze > SWIRL / Tsunami > TORNADO / Cyclone > CRACK / Earthquake
If you have a member without a Ribbon you will want to cast WALL / NulAll on them as they won't have protection from CRACK / Earthquake since Earth elemental attacks bypasses a ProRing / Protect Ring. Use FAST / Haste on your main fighters (and Giant's Gloves + Temper in later versions) while your White Mage heals every turn to keep the party up. Go all out with your magic after you have buffed up (except your healer who should focus on keeping everyone alive) and he should hopefully go down before before CUR4 / Curaja goes off.
After you have defeated Chaos enjoy the ending to the game, those on remakes can replay the game over again if you choose to save after the credits keeping your bestiary entries.
Additional Content
This is content added in the Dawn of Souls remake that is also in the Anniversary Edition these are 4 areas that get unlocked after you defeat a specific elemental Fiend. The dungeons are randomized between a choice number of floors with a certain amount of treasure that can be found per floor depending on when it shows up. Having your party defeated (all dead or all stoned) will not result in a game over, but instead you will be kicked out of the dungeon to the entrance with 1 HP. The spells Exit & Warp cannot be used once inside, same goes for the Emergency Exit item, none of the bosses give EXP or Gil so plan your strategy accordingly among who you want alive so you can use a Phoenix Down or Life/Full-Life spell on those who fall afterward.
Earthgift Shrine
Unlocked: After defeating Lich
Location: Northwest of Cornelia
# of floors: 5
Home of the original Final Fantasy 3 bosses, Echidna, Cerberus, Ahriman & 2-Headed Dragon from the Dark World will await your challenge on Floor 5, though you can only fight them one at a time so you will have to take at minimum 4 visits.
Enemies
| Name | Bestiary # | HP | Attack | Defense | EXP | Gil | Weak | Drop | Notes |
|---|---|---|---|---|---|---|---|---|---|
| Abyss Worm | #147 | 2,500 | 95 | 30 | 4,000 | 1,000 | Megalixir | ||
| Black Goblin | #164 | 50 | 10 | 4 | 200 | 200 | Potion | Can flee if party level is very high | |
| Desertpede | #166 | 120 | 35 | 15 | 250 | 100 | Antidote | Attack may Poison | |
| Gloom Widow | #167 | 71 | 8 | 20 | 140 | 520 | Antidote | Attack may Poison | |
| Catoblepas | #182 | 200 | 30 | 20 | 1,500 | 800 | Remedy | Gaze may Petrify | |
| Wild Nakk | #186 | 80 | 15 | 20 | 240 | 60 | White Fang | Can flee if party level is very high | |
| Skuldier | #192 | 120 | 25 | 6 | 80 | 133 | |||
Abyss Worm - Is a very deadly enemy to face due to its power and bulk having the highest HP of non boss monsters, if going for the bestiary entry it's better to wait until endgame.
Black Goblin - Is a pathetically weak monster that you should have no problem taking down even though they can appear in large groups (up to 9), if your levels are above 50 they will often flee.
Desertpede - A relatively weak enemy that may appear in large groups, their attack has a chance to Poison.
Gloom Widow - Is a slightly stronger Tarantula who should pose no threat outside of its attack being able to Poison.
Catoblepas - Can be a threat as its Gaze attack can Petrify the member it hits.
Wild Nakk - Like Black Goblin is pathetically weak and can appear in large groups, if your levels are above 50 they will often flee.
Skuldier - Is not too big of a threat by this point.
Enemy Location
| Enemy | Map(s) |
|---|---|
| Abyss Worm | Endless Desert (Rare) |
| Black Goblin | All |
| Desertpede | Dark Forest & Endless Desert |
| Gloom Widow | All |
| Catoblepas | Endless Desert |
| Wild Nakk | Altar Cave |
| Skuldier | Dark Forest |
Possible Chest Items
Floor 1
- Hi-Potion
- Spider's Silk
- White Curtain
- Remedy
Floor 2
- Vampire Fang
- Blue Curtain
- White Fang
- Kenpogi
Floor 3
- Potion
- Speed Drink
- Protect Drink
- Black Cowl
Floor 4
- Red Fang
- Ether
- Silver Apple
- Elven Cloak
Areas
1. Altar Cave 1
2. Altar Cave 2
3. Dark Forest
4. Endless Desert
Maps
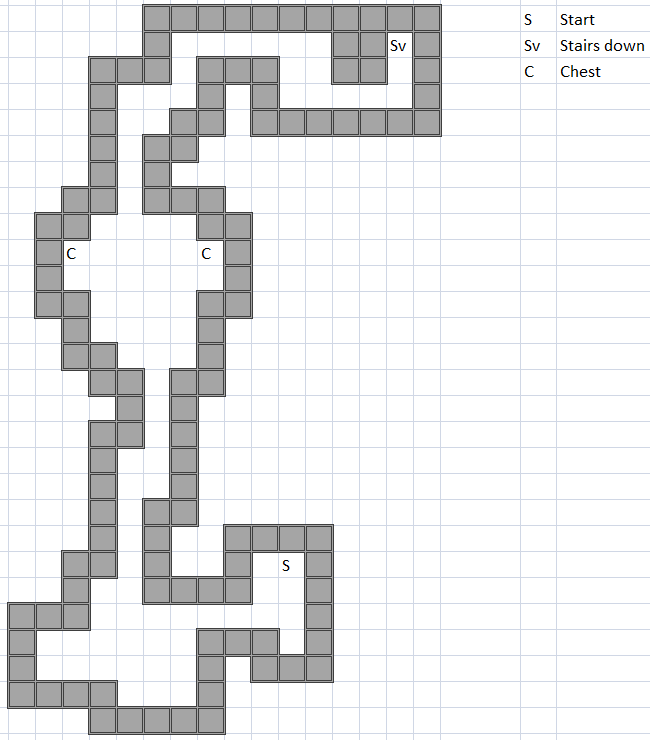
This is the very first area of FF3 which shouldn't be too tough to traverse since you can't really get lost.
Treasure: 2 (Always)
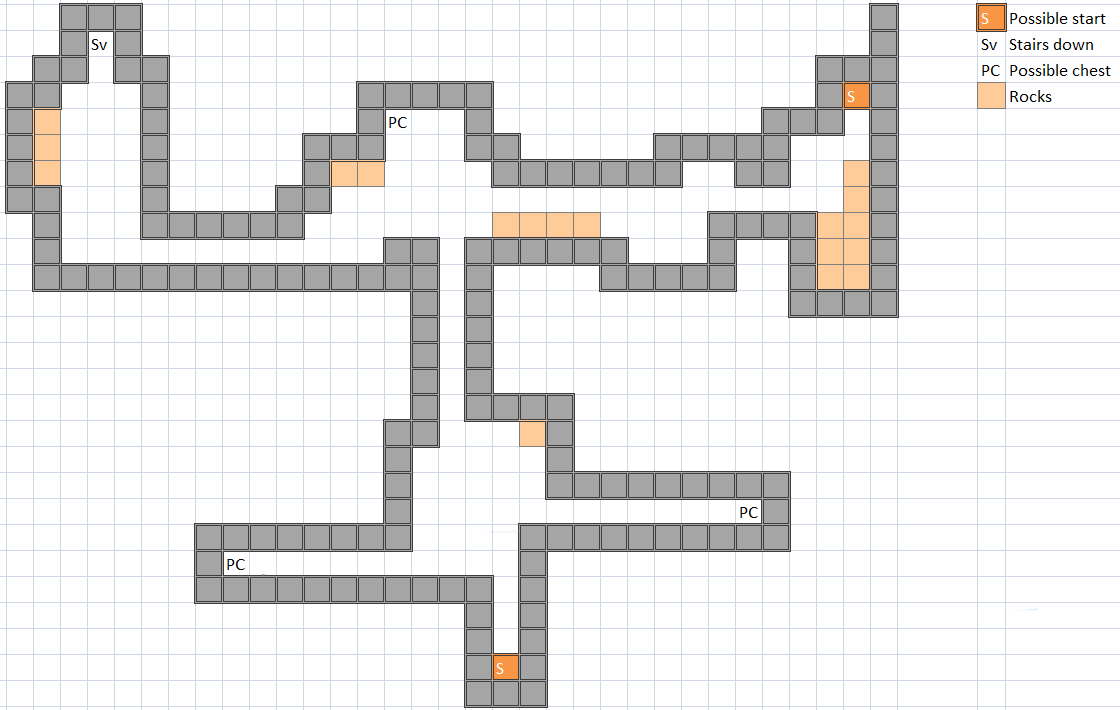
This area has 2 points where you can start at and a chest may not appear depending on what floor you are on.
Treasure: 2 (F1 & 2), 3 (F3 & 4)
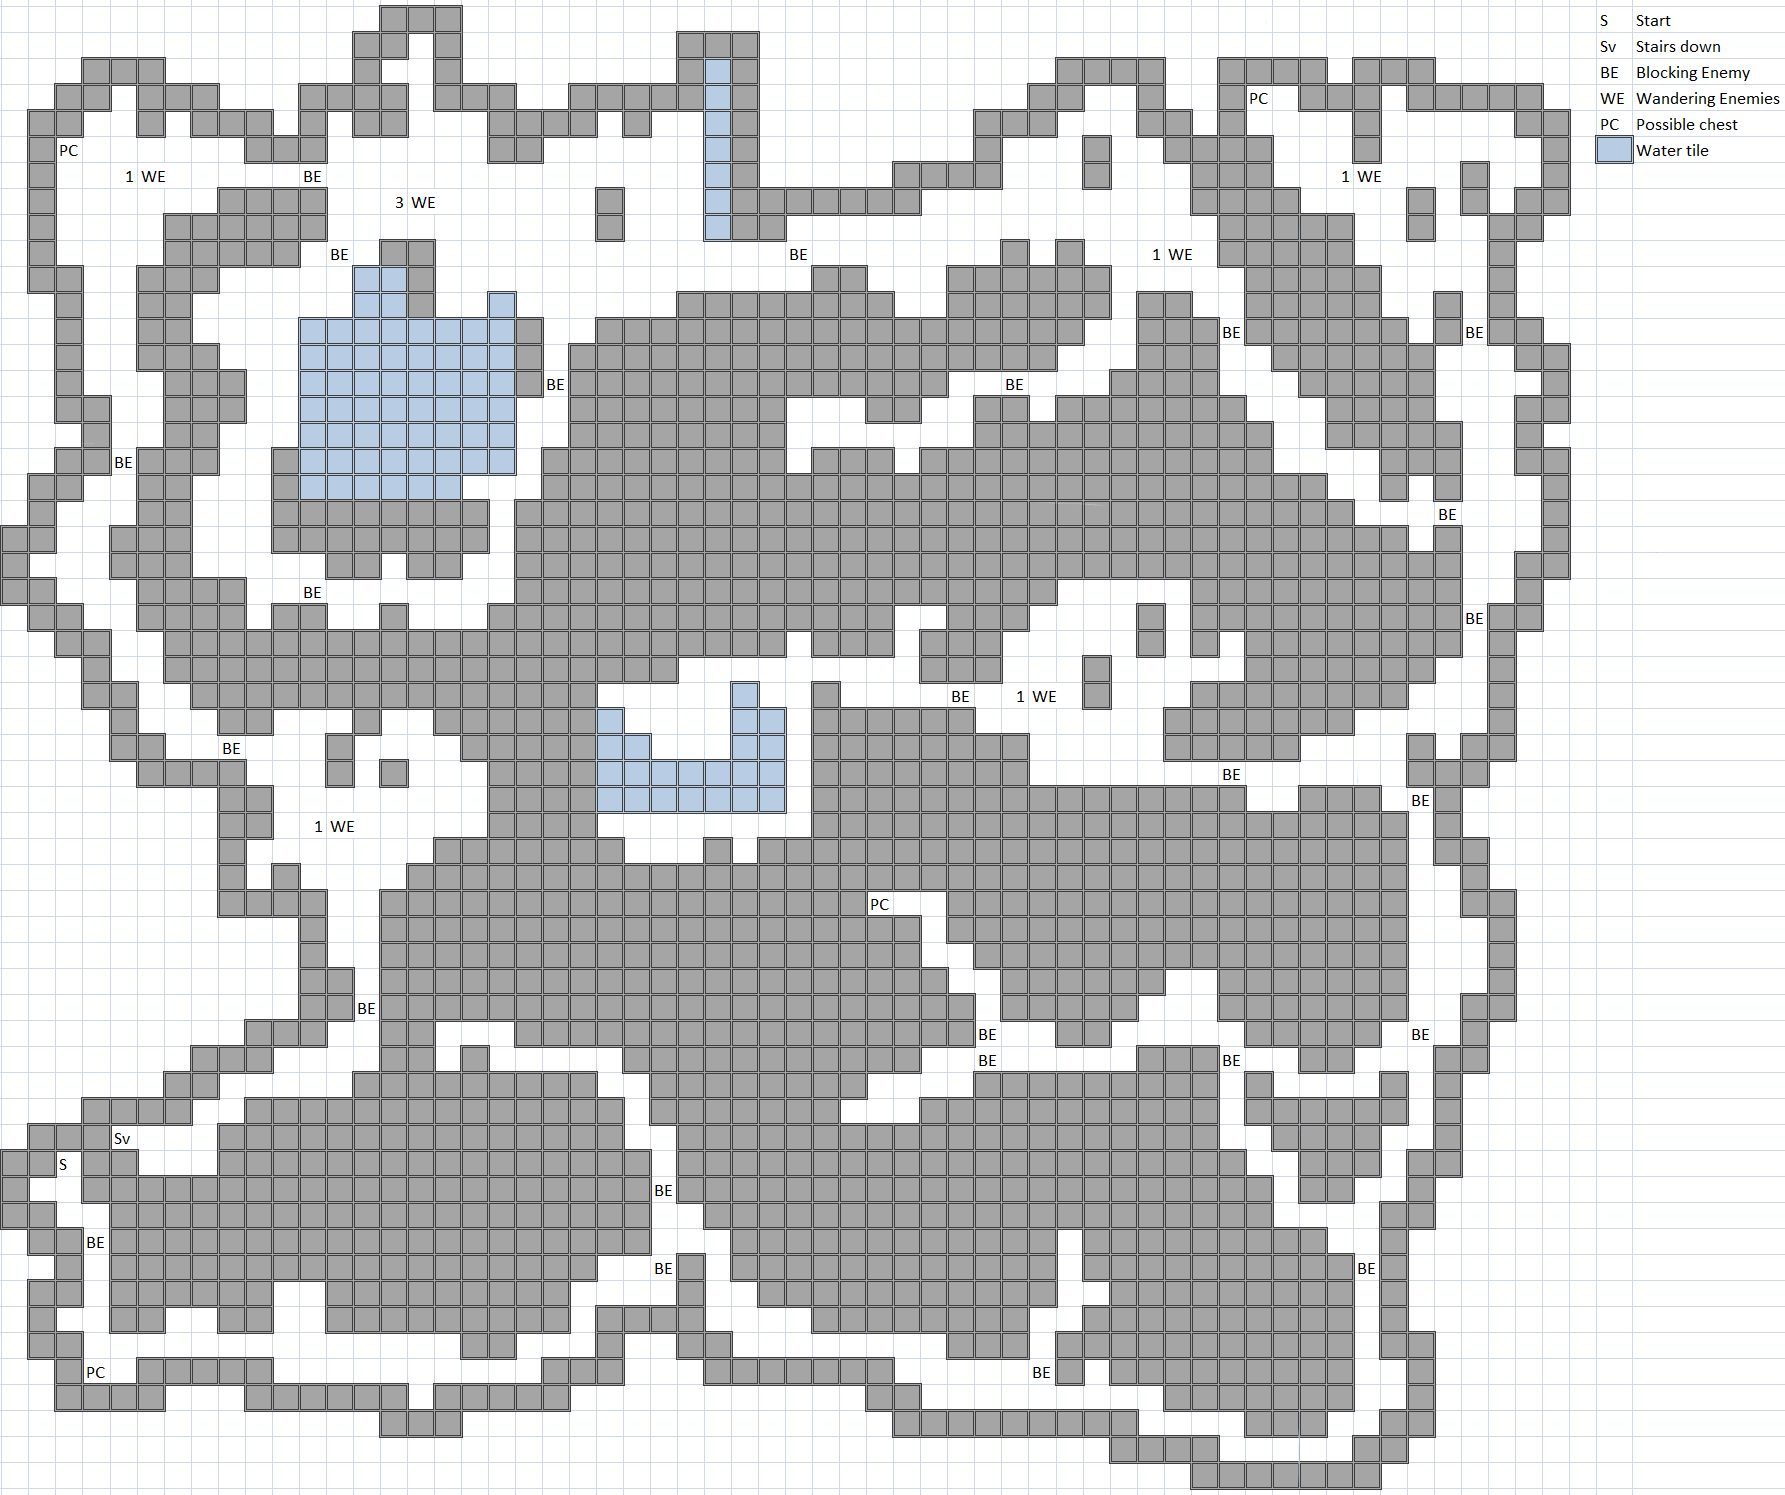
This is a large area that is somewhat of a maze, there are enemies that block your path that force you to fight to proceed further. There are some chests that may appear near an area where you are forced to fight, though the chest will generally be visible if it spawned on the floor.
Treasure: 2 (F1 & 2), 3 (F3), 4 (F4)
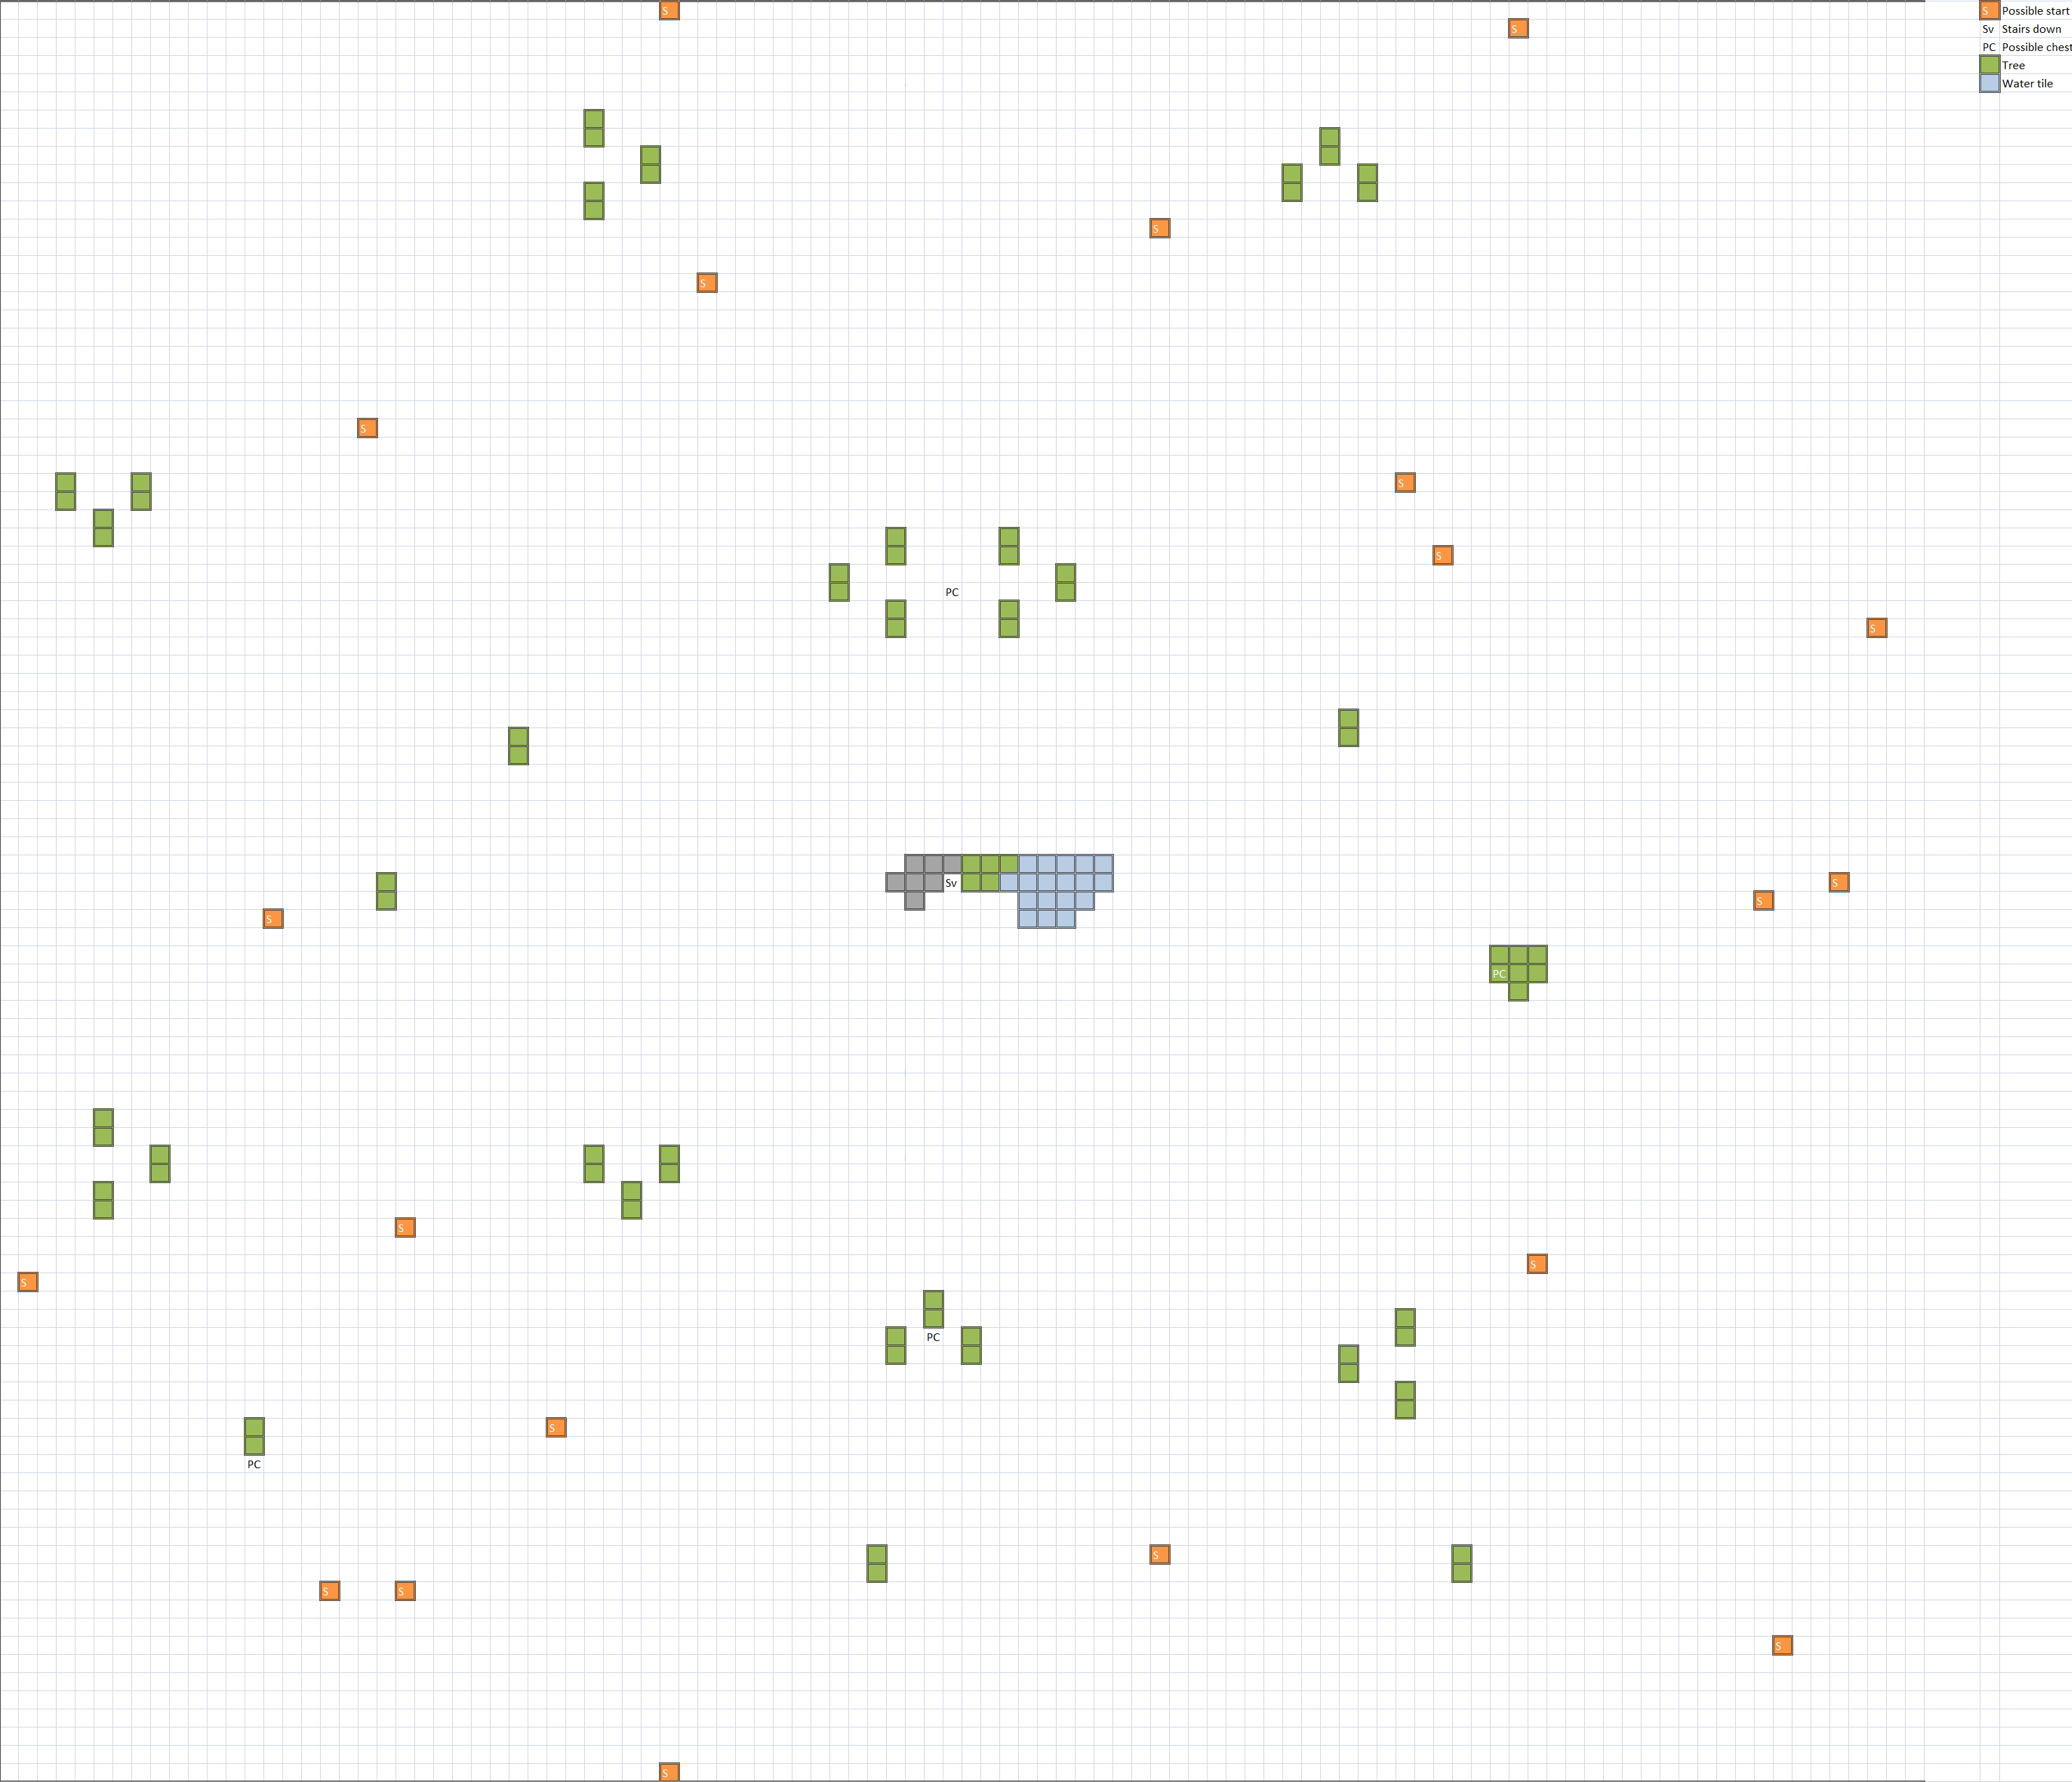
A large area that feels infinite though it will loop on itself, your starting spot is randomized out of several points so you will have to walk around to figure where you could possibly be to find out where you are to be able to find the exit.
Treasure: 2 (F1 & 2), 3 (F3), 4 (F4)
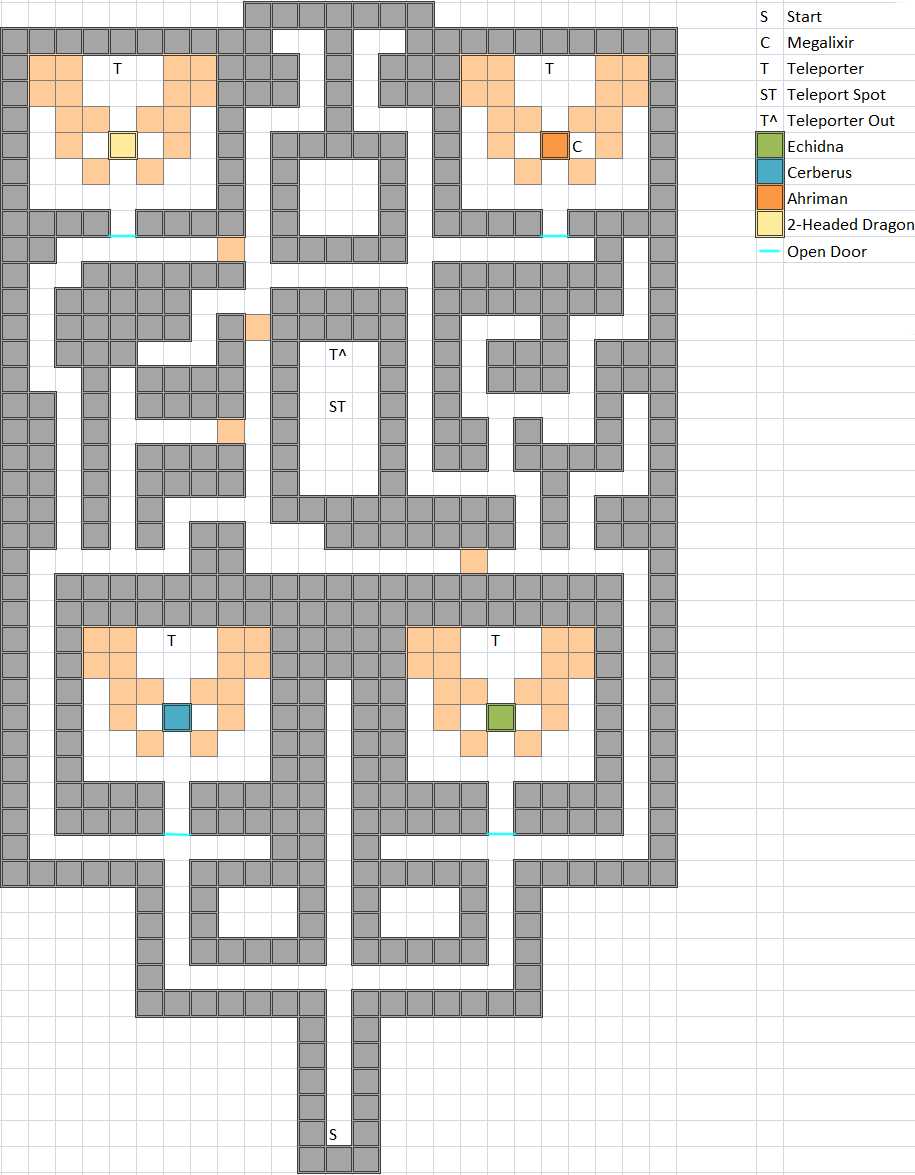
Bosses
Echidna (#129)
HP: 4,800
Attack: 50
Defense: 50
Weak: —
Resist:
Drop: X-Potion (Always)
Echidna mainly focuses on instant death such as the Death spell which can kill one member and Earthquake which can potentially kill your entire party. While Protect Ring can protect you from the Death spell, Earthquake is counted as a Quake elemental attack which bypasses that and can still potentially kill you unless you have NulDeath or NulAll active from your White Wizard (Both) or Red Wizard (NulDeath only) or Ribbons on all characters. She will rarely use Flare which will deal around 250 damage to your entire party. Despite having resistance to Sleep, Sleepra can still land on her.
Cerberus (#130)
HP: 4,000
Attack: 40
Defense: 50
Weak: —
Resist:
Drop: Kotetsu (Always)
Cerberus will mainly do a physical attack which will hit in the low 100s and occasionally do Thunderbolt which will do around 300 damage to your party without NulShock/Blue Curtain (or Ribbon). Invisira can help low level parties if you are having trouble with his physical attack. Despite having resistance to Sleep, Sleepra can still land on him.
Ahriman (#131)
HP: 5,000
Attack: 60
Defense: 50
Weak: —
Resist:
Drop: Dry Ether (Always)
Of the 4 Ahriman is probably the hardest due to having a wide array of elements at its disposal which include Blaze, Icestorm & Thunderstorm which can deal upward of 300 to your group without protection. Ahriman also has Earthquake which can bypass a Protect Rings protection from Instant Death so having a NulDeath spell active (or Ribbon) really helps. It also has Cura which will heal around 200 HP to it and a minor physical attack which shouldn't be too much of a problem.
2-Headed Dragon (#132)
HP: 4,500
Attack: 60
Defense: 50
Weak: —
Resist:
Drop: Bard's Tunic (Always)
2-Headed Dragon will only do one thing which is a physical attack. Those who played the original FF3 know in that game he could hit upward of 5000+ even on a fully equipped Onion Kid (with the best armor possible), here he hits just as hard as he can hit upwards of 500 damage to your character. One thing that wasn't possible in FF3 that you can do here however, is cast Slow/Slowra to reduce his hit count effectively trivializing the fight.
Note worthy Equipment
| Name | Type | User | Stats | Extra |
|---|---|---|---|---|
| Kenpogi | Body Armor | Monk/Master | 28 Defense, -1 Evasion, Weight of 1 | STR+3 |
| Black Cowl | Helmet | Thief/Ninja | 8 Defense, 12 Evasion, Weight of 1 | STR/AGL/STA+3 |
| Elven Cloak | Shield | All except Monk/Master | 9 Defense, Weight of 1 | AGL & INT+1 |
| Kotetsu | Weapon | Fighter/Knight, Thief/Ninja & Red Mage/Red Wizard | 22 Attack, 20 Accuracy | |
| Bard's Tunic | Body Armor | All | 20 Defense, -3 Evade, Weight of 3 | Silence immunity |
Hellfire Chasm
Unlocked: After defeating Marilith
Location: East of Onrac, Cardia Island with 2 holes, but no forests on it, lower hole.
# of floors: 10
Home of the Final Fantasy 4 (2 US SNES) bosses, Scarmiglione, Cagnazzo, Barbariccia & Rubicante the elemental archfiends will await your challenge. Two on Floor 5 and the other two on Floor 10, though you can only fight them one at a time so you will have to take at minimum 2 visits.
Enemies
| Name | Bestiary # | HP | Attack | Defense | EXP | Gil | Weak | Drop | Notes |
|---|---|---|---|---|---|---|---|---|---|
| Elm Gigas | #148 | 250 | 40 | 15 | 850 | 850 | |||
| Yellow Ogre | #151 | 150 | 25 | 15 | 300 | 250 | |||
| Black Goblin | #164 | 50 | 10 | 4 | 200 | 200 | Potion | Can flee if party level is very high | |
| Gloom Widow | #167 | 71 | 8 | 20 | 140 | 520 | Antidote | Attack may Poison | |
| Silver Dragon | #172 | 200 | 53 | 10 | 1,800 | 2,000 | |||
| Blue Troll | #174 | 132 | 20 | 10 | 340 | 300 | |||
| Poison Naga | #176 | 232 | 6 | 8 | 960 | 960 | Can flee if party level is very high | ||
| Dark Elemental | #179 | 200 | 66 | 20 | 1,500 | 780 | |||
| Devil Hound | #180 | 150 | 22 | 8 | 300 | 150 | |||
| Catoblepas | #182 | 200 | 30 | 20 | 1,500 | 800 | Remedy | Gaze may Petrify | |
| Hundlegs | #183 | 235 | 40 | 20 | 1,000 | 200 | |||
| Death Elemental | #185 | 160 | 35 | 4 | 753 | 800 | Zephyr Cape | ||
| Wild Nakk | #186 | 80 | 15 | 20 | 240 | 60 | White Fang | Can flee if party level is very high | |
| Sahagin Queen | #189 | 100 | 30 | 15 | 500 | 500 | Blue Curtain | ||
| Python | #191 | 85 | 22 | 15 | 200 | 150 | Antidote | ||
Elm Gigas - Is the weakest of the Gigas enemies and should be easy to dispatch.
Yellow Ogre - Is not too much stronger than the regular Ogre from the beginning of the game.
Silver Dragon - The weakest of the Dragon enemies, however it has high magic defense and resists all elements.
Blue Troll - Despite its name and coloration is weak to Fire attacks thus a Fira will easily dispatch them.
Poison Naga - Has a Poison Gas attack which can inflict quite a bit of damage to your party, if your levels are above 50 they will often flee.
Dark Elemental - Due to being a color swap of Earth/Fire Elemental is flagged as unrunable, though by this point it should not be too much of a threat, they have a Flash attack that can cause the Darkness status to the party, but is negligible since it does nothing.
Devil Hound - Is weaker than Hellhound which you may have fought at Mount Gulg and should pose no threat.
Hundlegs - Has high magic defense so physical attacks are better to take it out.
Death Elemental - Are weaker than Water/Air Elementals (whom you may have beaten by now depending on when you go to this area), they have high agility to is may be tough to run away from them.
Sahagin Queen - Like other Sahagin's she has high evasion, but she has more magic defense, a Thundara should still be enough to defeat her.
Python - Shouldn't pose too much of a threat, if your levels are above 50 they will often flee.
Enemy Location
| Enemy | Map type(s) |
|---|---|
| Elm Gigas | World Map |
| Yellow Ogre | World Map |
| Black Goblin | All |
| Gloom Widow | Cave, Volcano & World Map |
| Silver Dragon | Sunken Shrine |
| Blue Troll | World Map (Sea) |
| Poison Naga | World Map (Sea) |
| Dark Elemental | Sunken Shrine & World Map |
| Devil Hound | Sunken Shrine |
| Catoblepas | Sunken Shrine, Volcano & World Map |
| Hundlegs | Sunken Shrine |
| Death Elemental | Sunken Shrine & World Map (Sea) |
| Wild Nakk | Cave & Volcano |
| Sahagin Queen | World Map (Sea) |
| Python | World Map |
Map Types
| Type | Map(s) |
|---|---|
| Cave | Trespassers & Winding Path |
| Sunken Shrine | Scalding Bats |
| Volcano | Firewall Maze, Rock Labyrinth, Zigzag Lavaway & Spiral Lavaway |
| World Map | World Map |
Possible Chest Items
Floor 1
- Cockatrice Claw
- Remedy
- Hermes' Shoes
- Speed Plus
- Stamina Plus
Floor 2
- Echo Grass
- Hi-Potion
- Blue Fang
- X-Potion
- Bard's Tunic
Floor 3
- Phoenix Down
- Red Fang
- Stamina Plus
- Mind Plus
- Sage's Surplice
Floor 4
- 700 Gil
- Eye Drops
- Giant's Tonic
- Turbo Ether
- Silver Apple
Floor 6
- Red Curtain
- Blue Fang
- Strength Tonic
- Luck Plus
- Thief's Gloves
Floor 7
- 150 Gil
- Hi-Potion
- Faerie Tonic
- Hermes' Shoes
- Twist Headband
Floor 8
- White Curtain
- 250 Gil
- Blue Curtain
- Power Plus
- Sage's Mitre
Floor 9
- Emergency Exit
- Giant's Tonic
- Ether
- Soma Drop
- War Hammer
Areas
1. Trespassers
2. Winding Path
3. Scalding Bats
4. Firewall Maze
5. Rock Labyrinth
6. Zigzag Lavaway
7. Spiral Lavaway
8. World Map
Maps
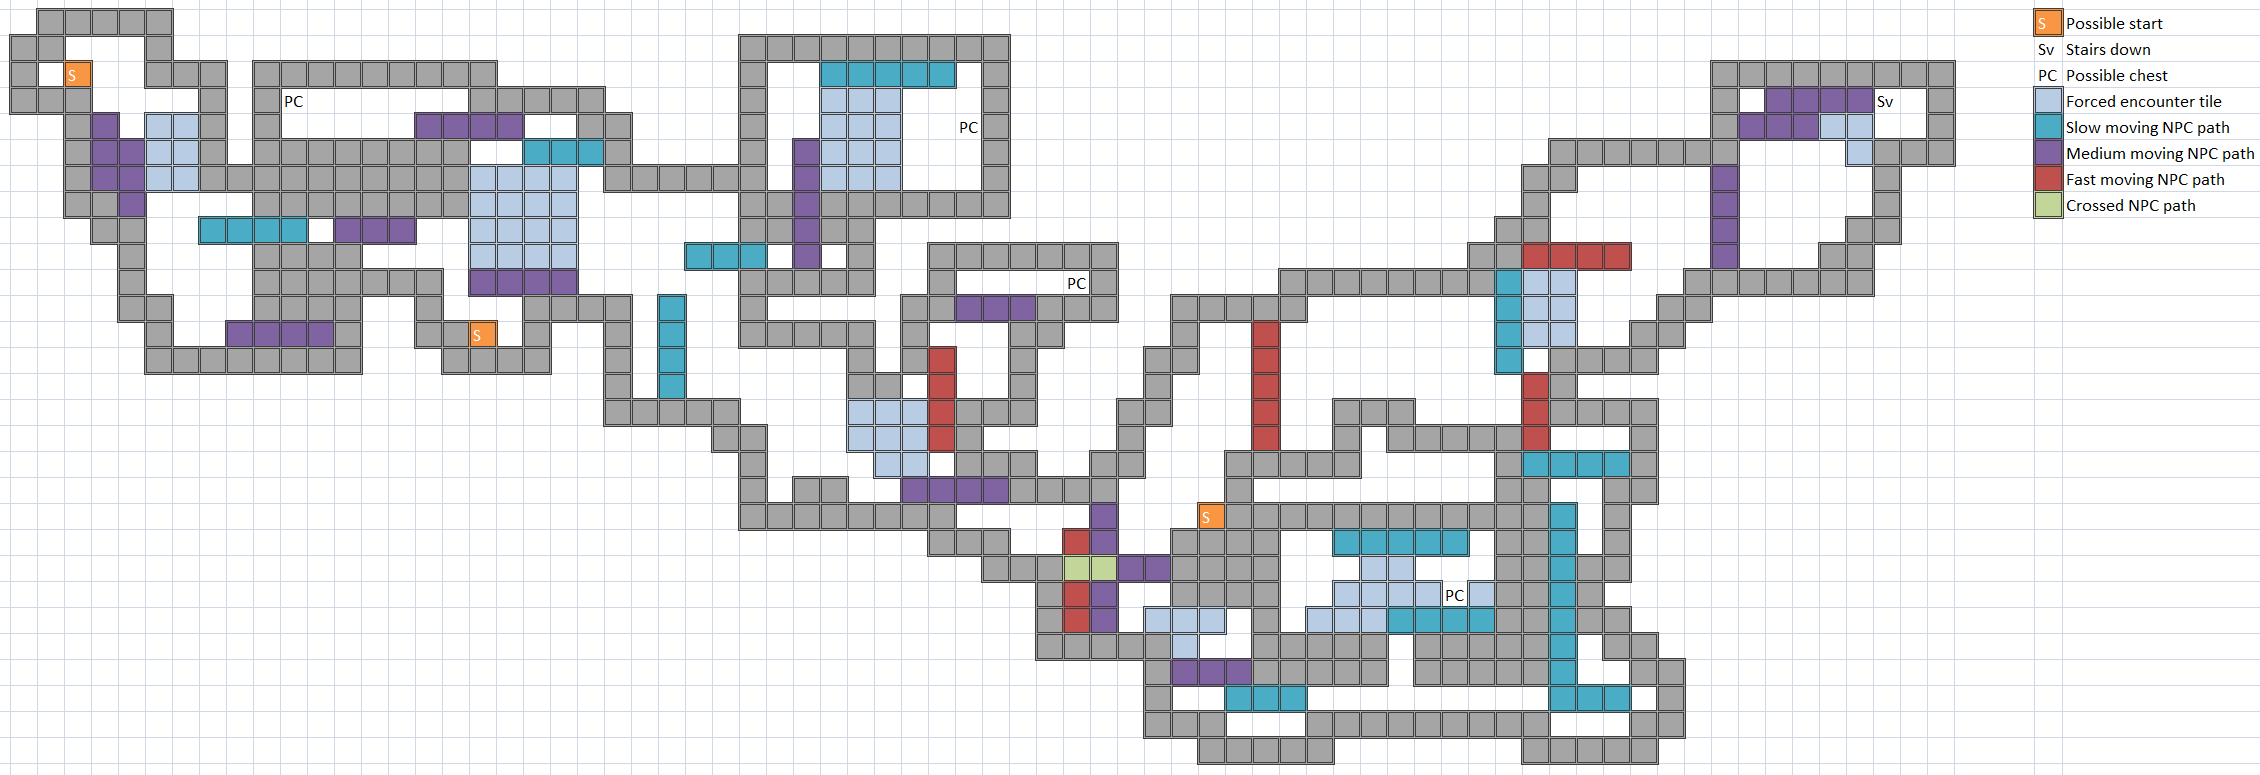
This map is unique in that there are no random encounters, spots where you see sparkles are the encounters that will happen for this area. You must maneuver through NPCs that move at differing speeds, if they run into you they won't turn around unless they reach a certain point in their cycle.
Treasure: 2 (F1 & 2), 3 (F3, 4 & 6), 4 (F7-9)
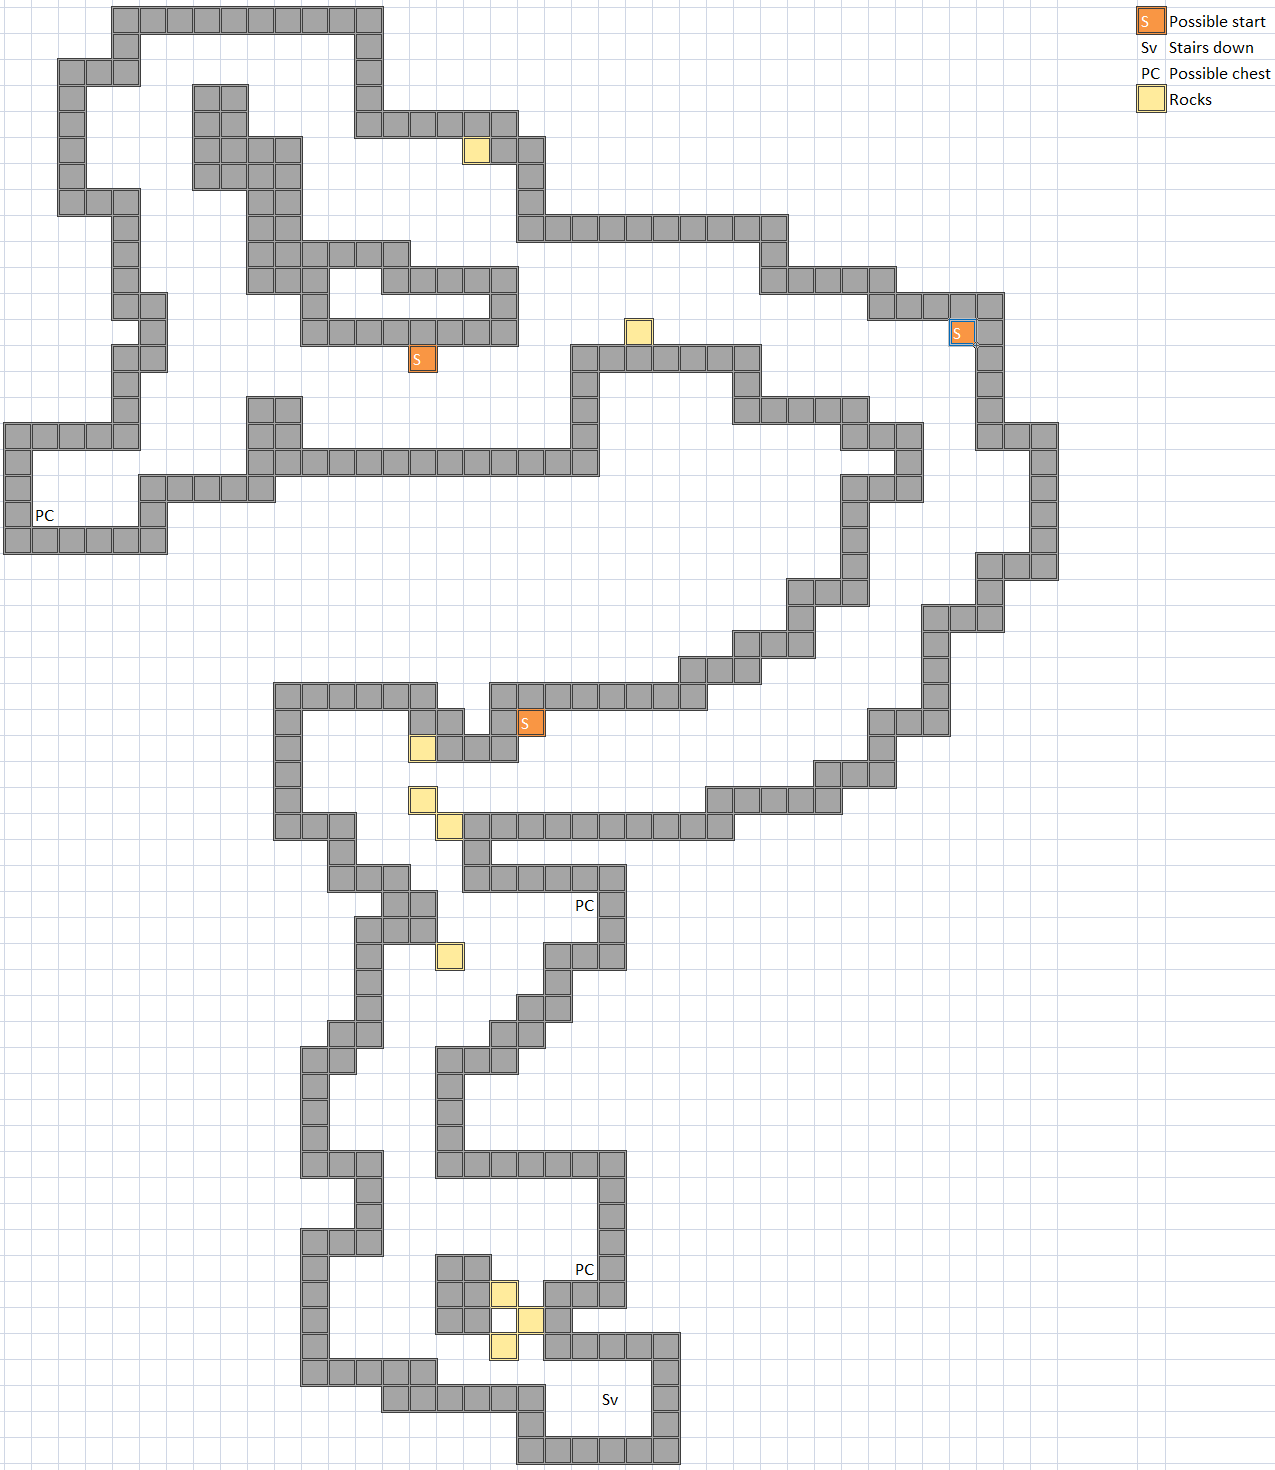
A very simple map with the goal of reaching the bottom of the path.
Treasure: 2 (F1 & 2), 3 (F3, 4 & 6-9)
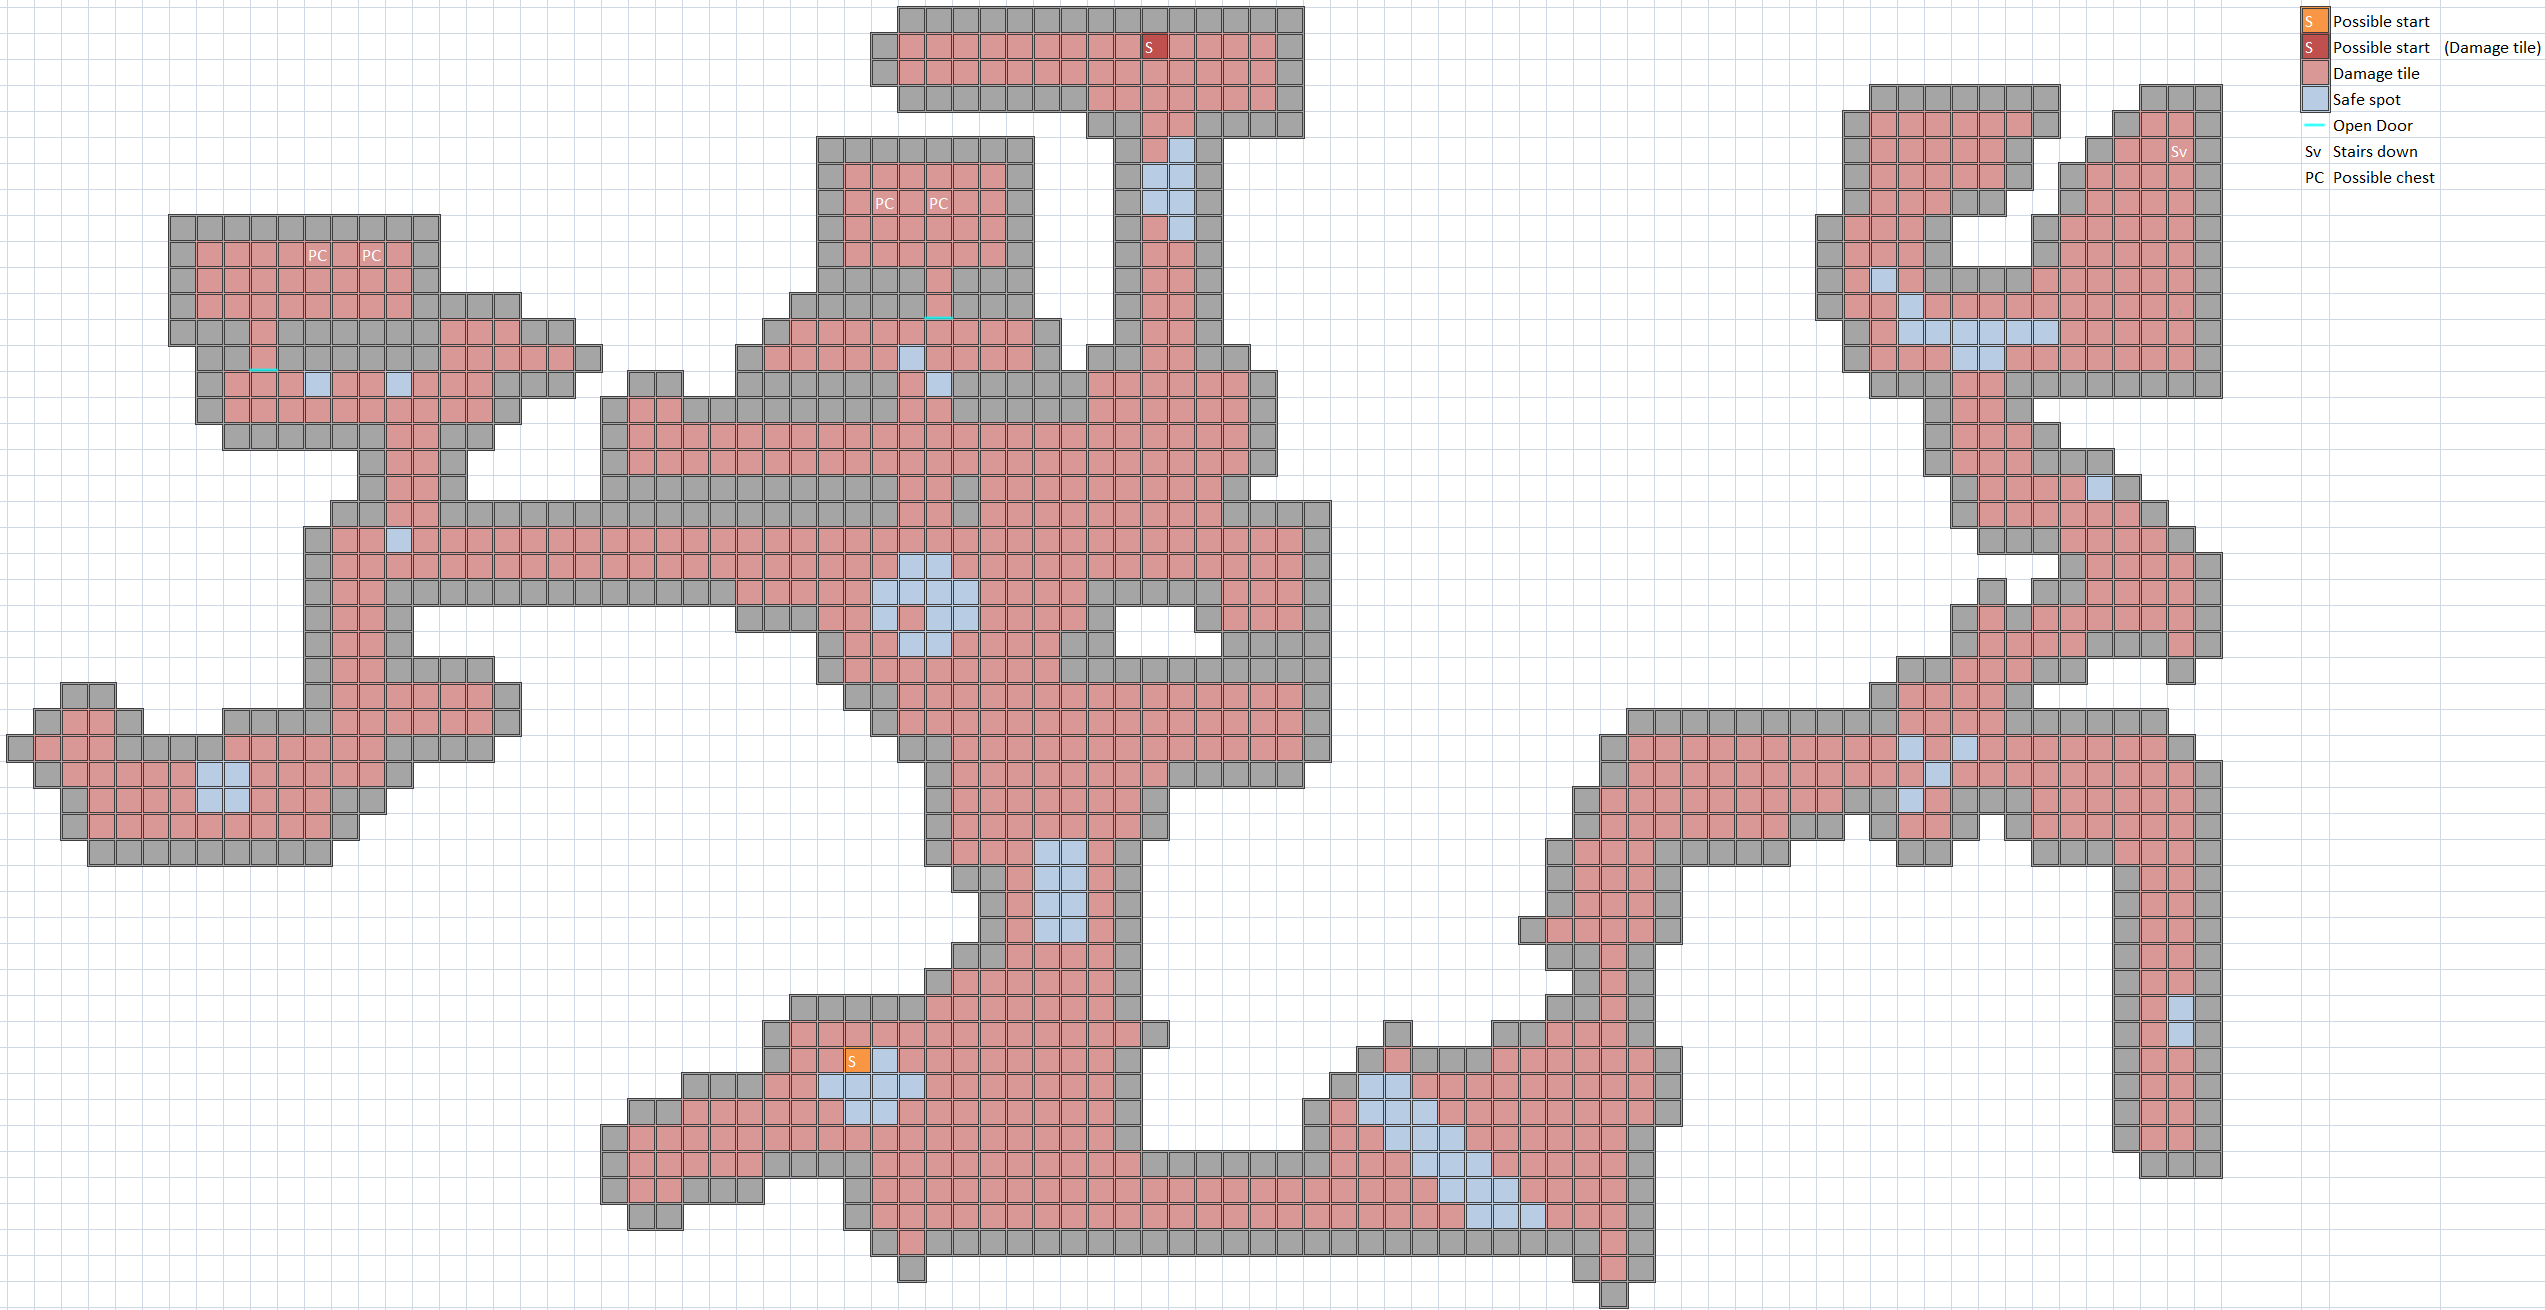
This map is unique in that it introduces heat tiles, unlike lava tiles which damage you every step these tiles damage you every couple of seconds. This map is filled to the brim with annoying fast moving bats that will tend to block your way, due to the heat tiles you will want to move around them rather than force them to move out of your way.
Treasure: 2 (F1 & 2), 3 (F3, 4 & 6), 4 (F7-9)
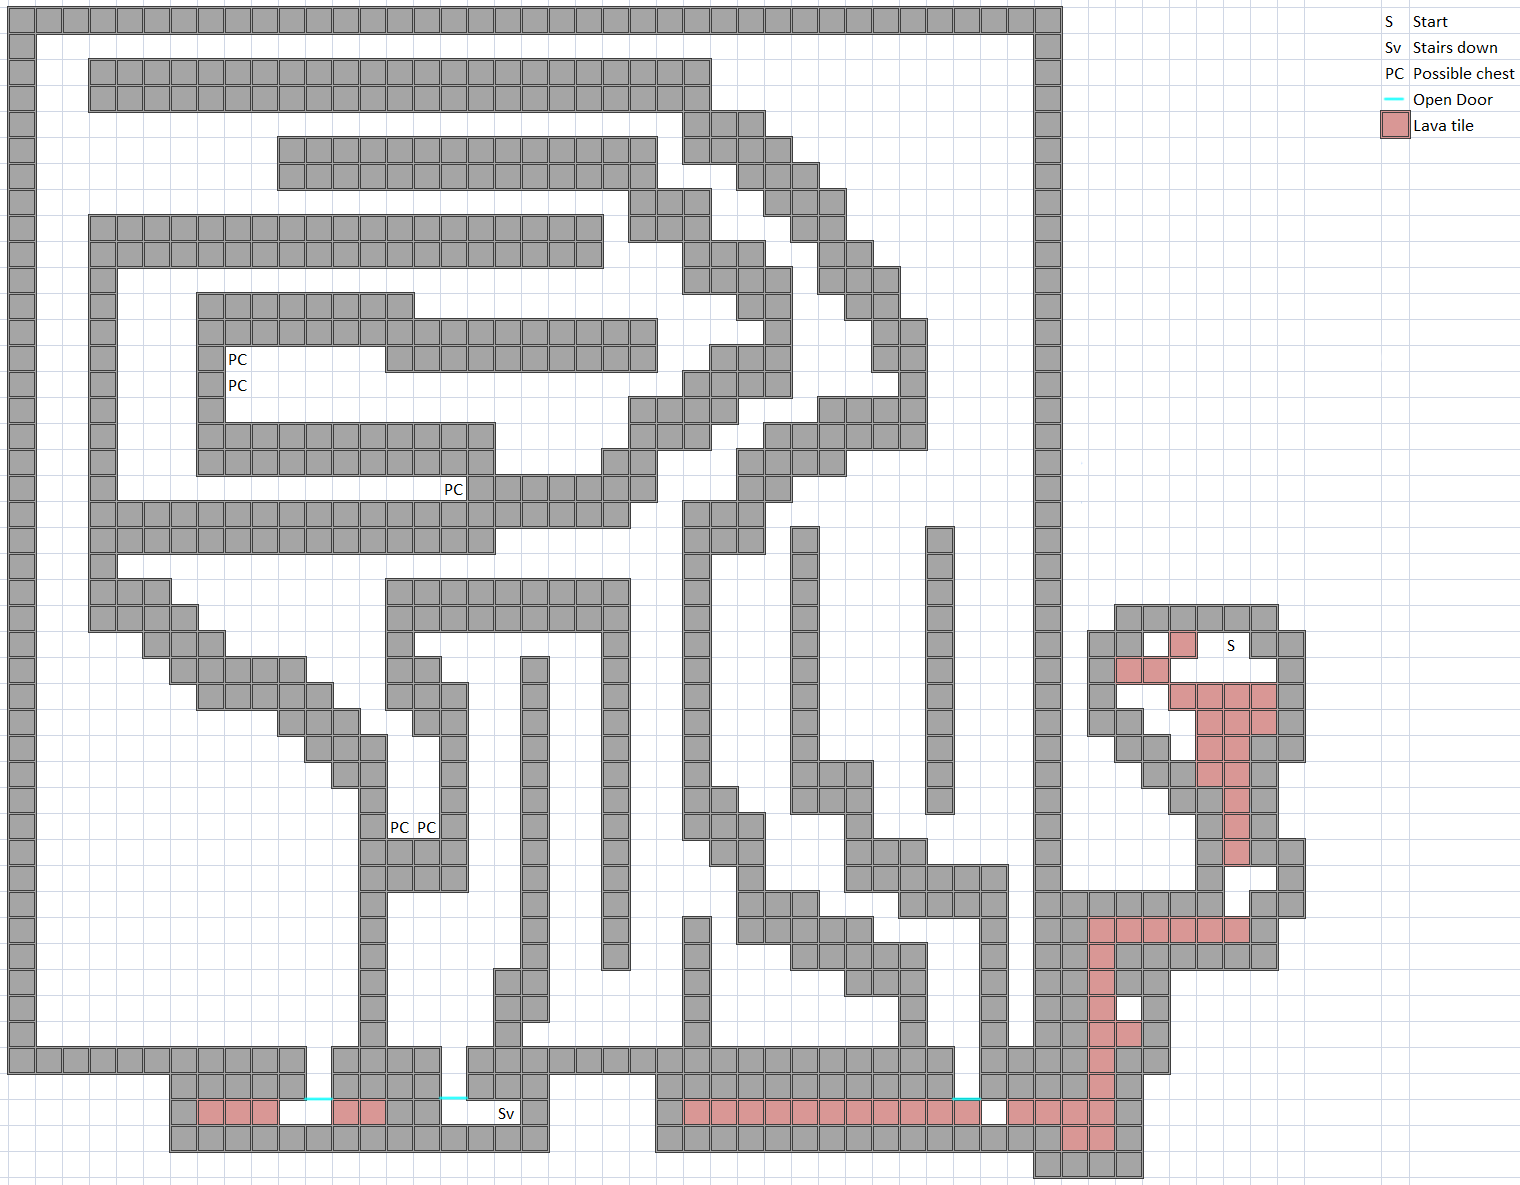
This is one large maze you have to go through in order to reach the exit and also get the treasure.
Treasure: 2 (F1-4 & 6-8), 3 (F9)
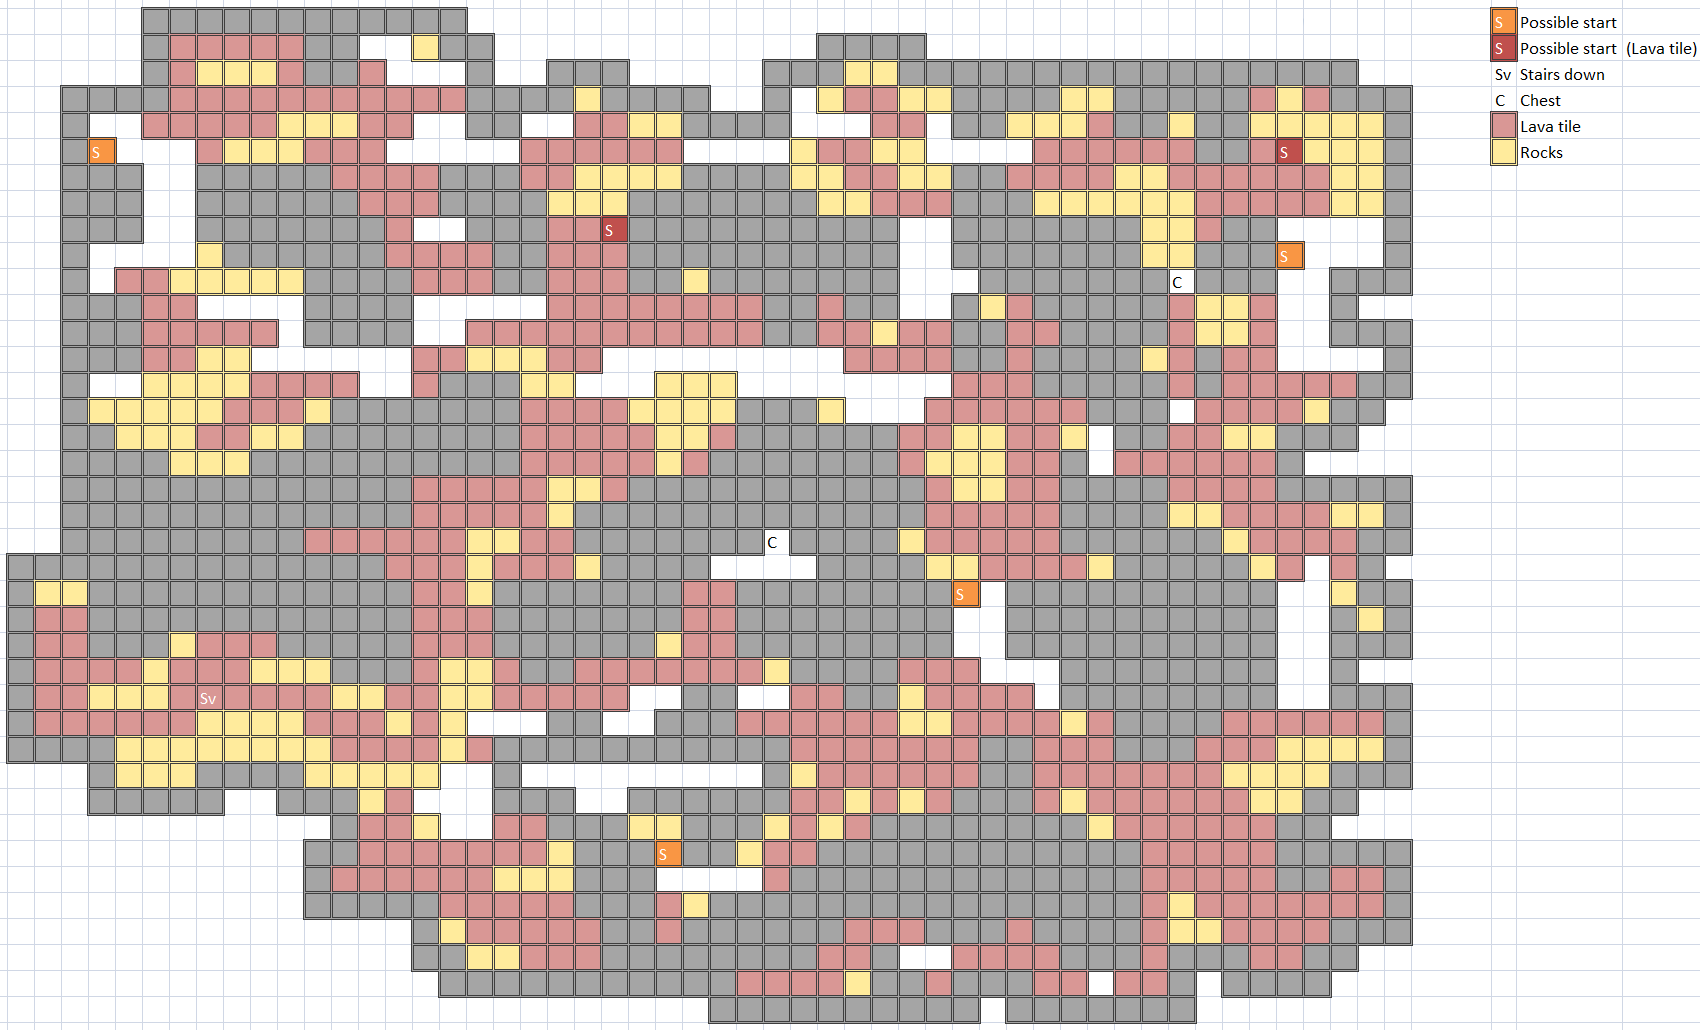
There is a possibility that you will start on a lava tile instead of solid ground, speaking of there are very few tiles here that aren't lava so you will find your health going down quite fast here. You're also trying to get to exit near the middle left side of the map.
Treasure: 2 (Always)
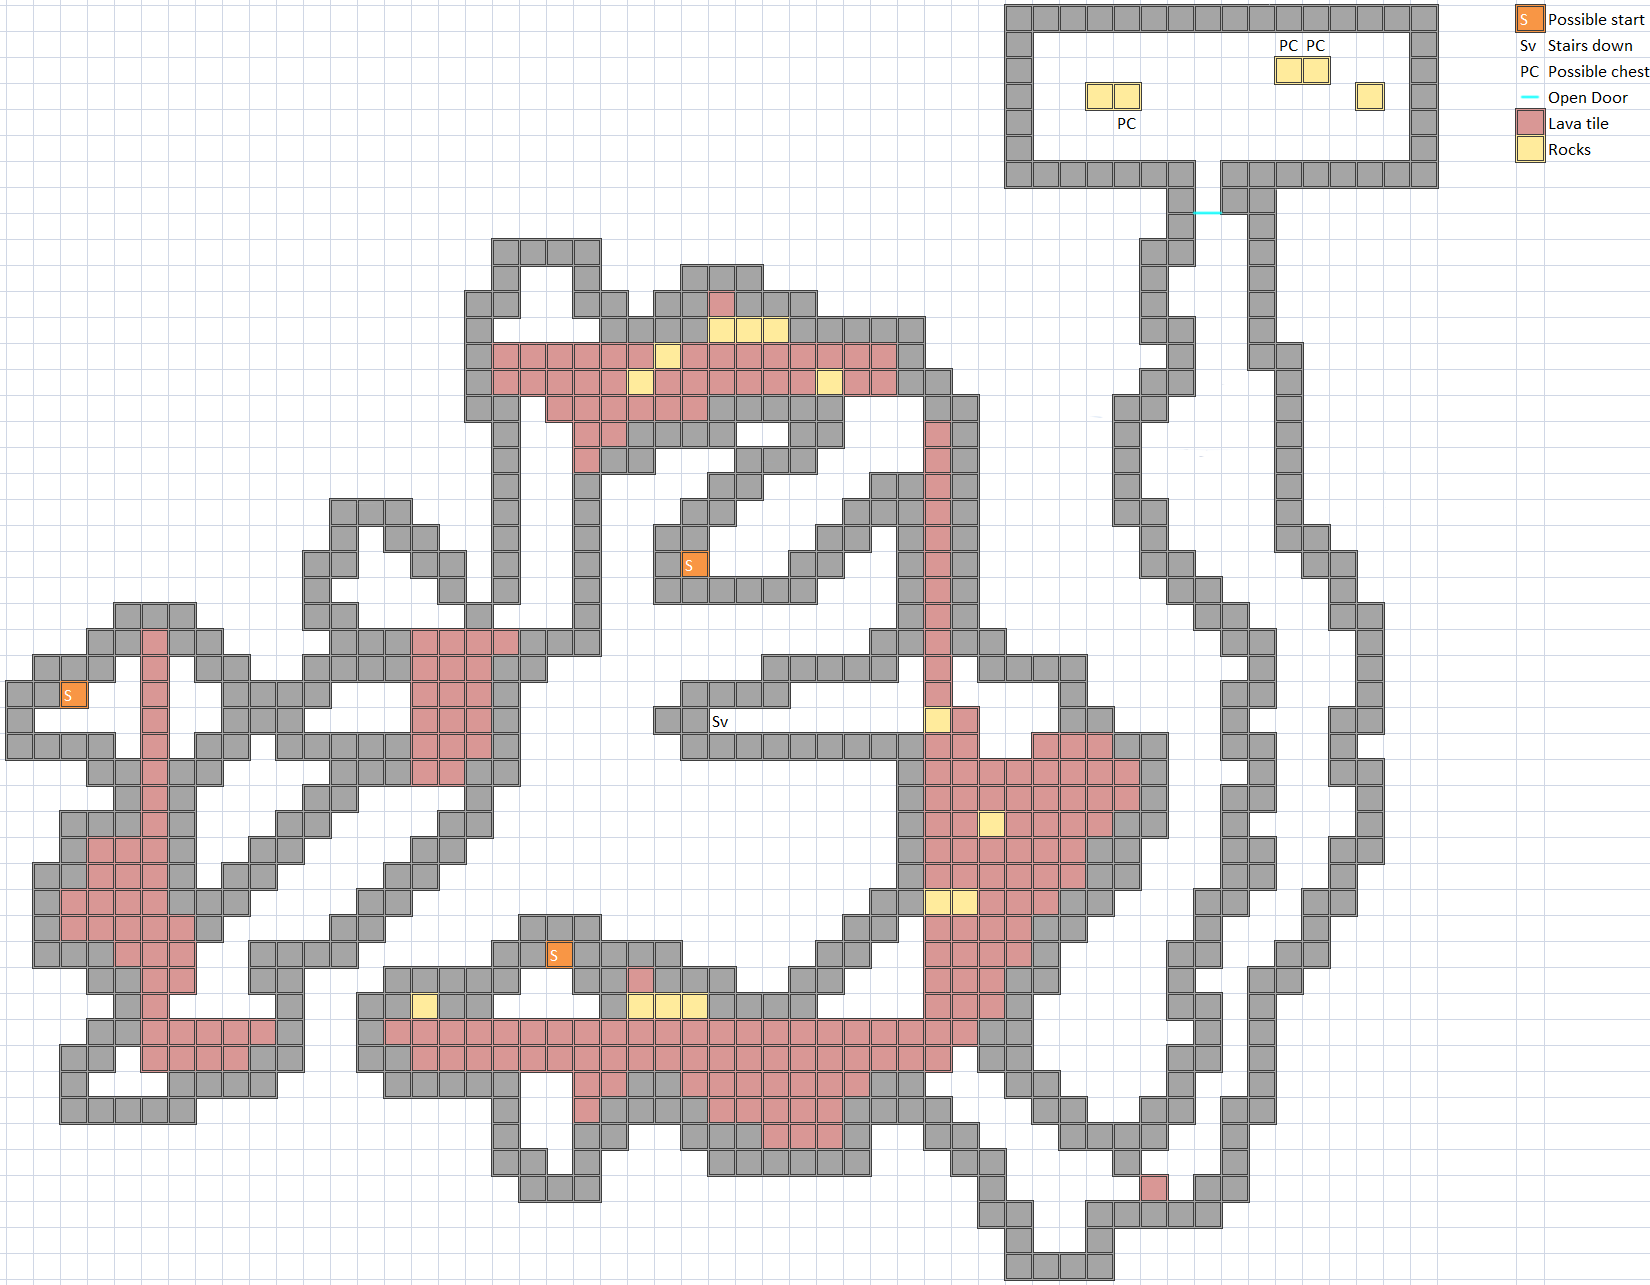
Of the volcano areas this one has the least amount of lava tiles and has a safe spot where the chests may appear in, there are two starting points that are close to the exit in the center of the map with one being farther away.
Treasure: 2 (F1-4 & 6-8), 3 (F9)
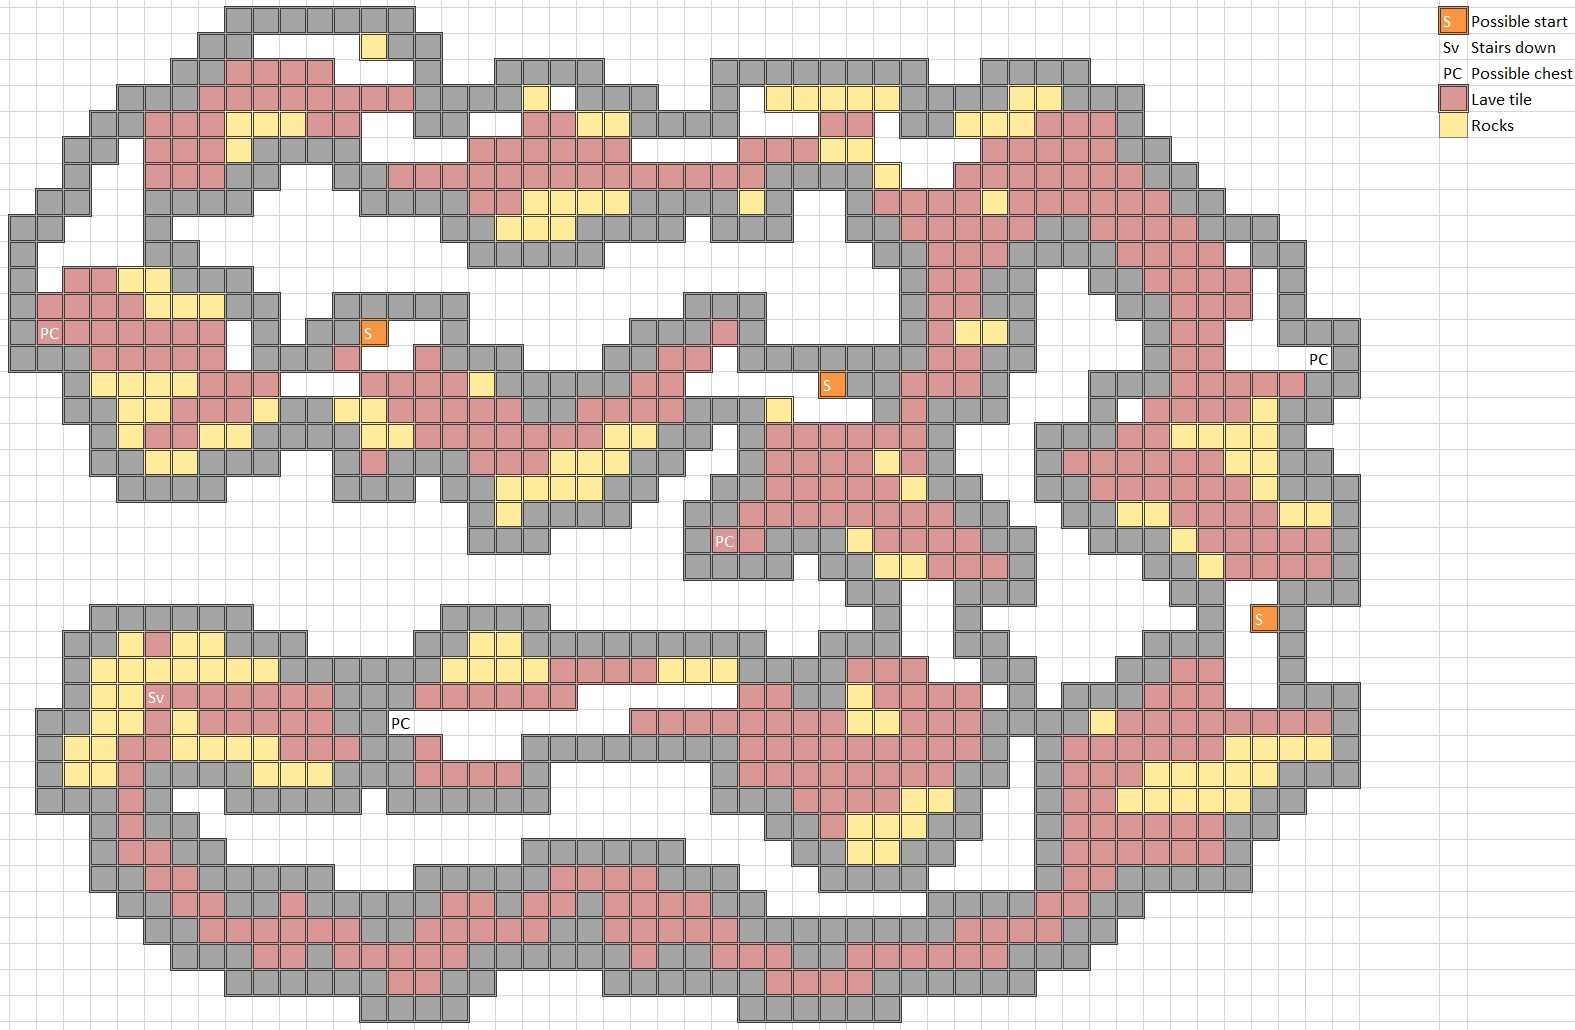
A large loop requiring you to get to the outer wall to reach the exit at the lower left.
Treasure: 2 (F1-4 & 6-8), 3 (F9)
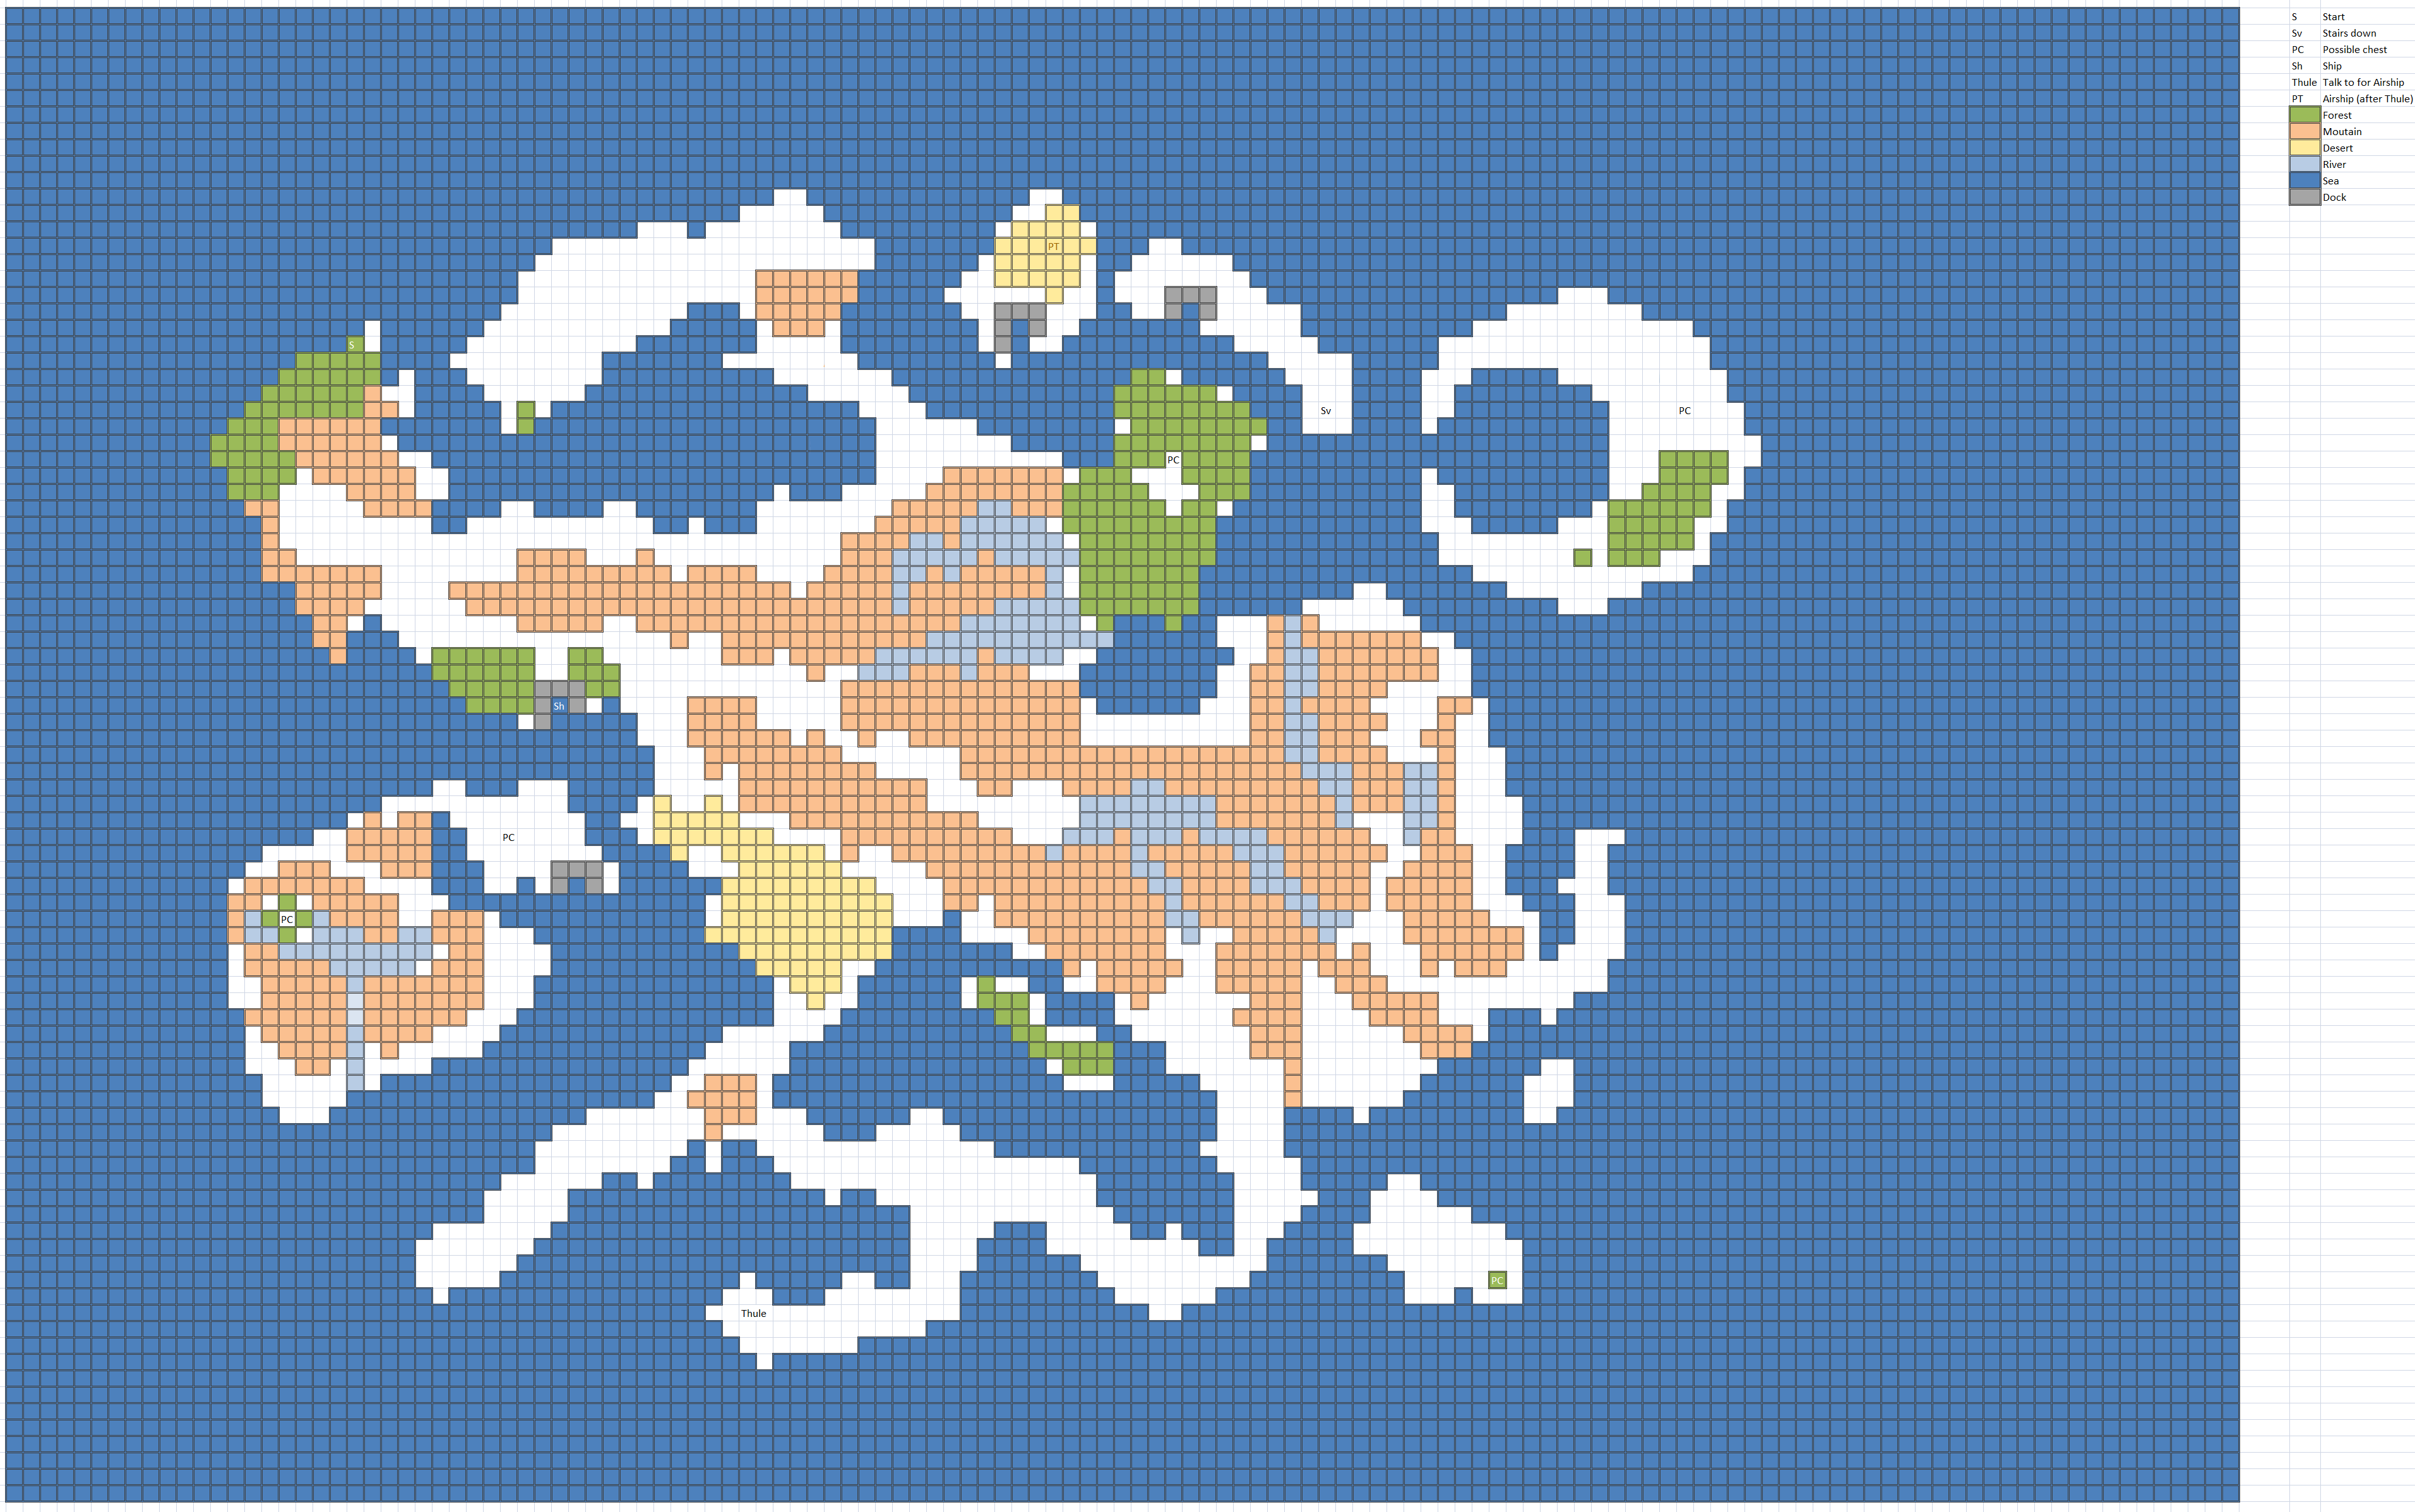
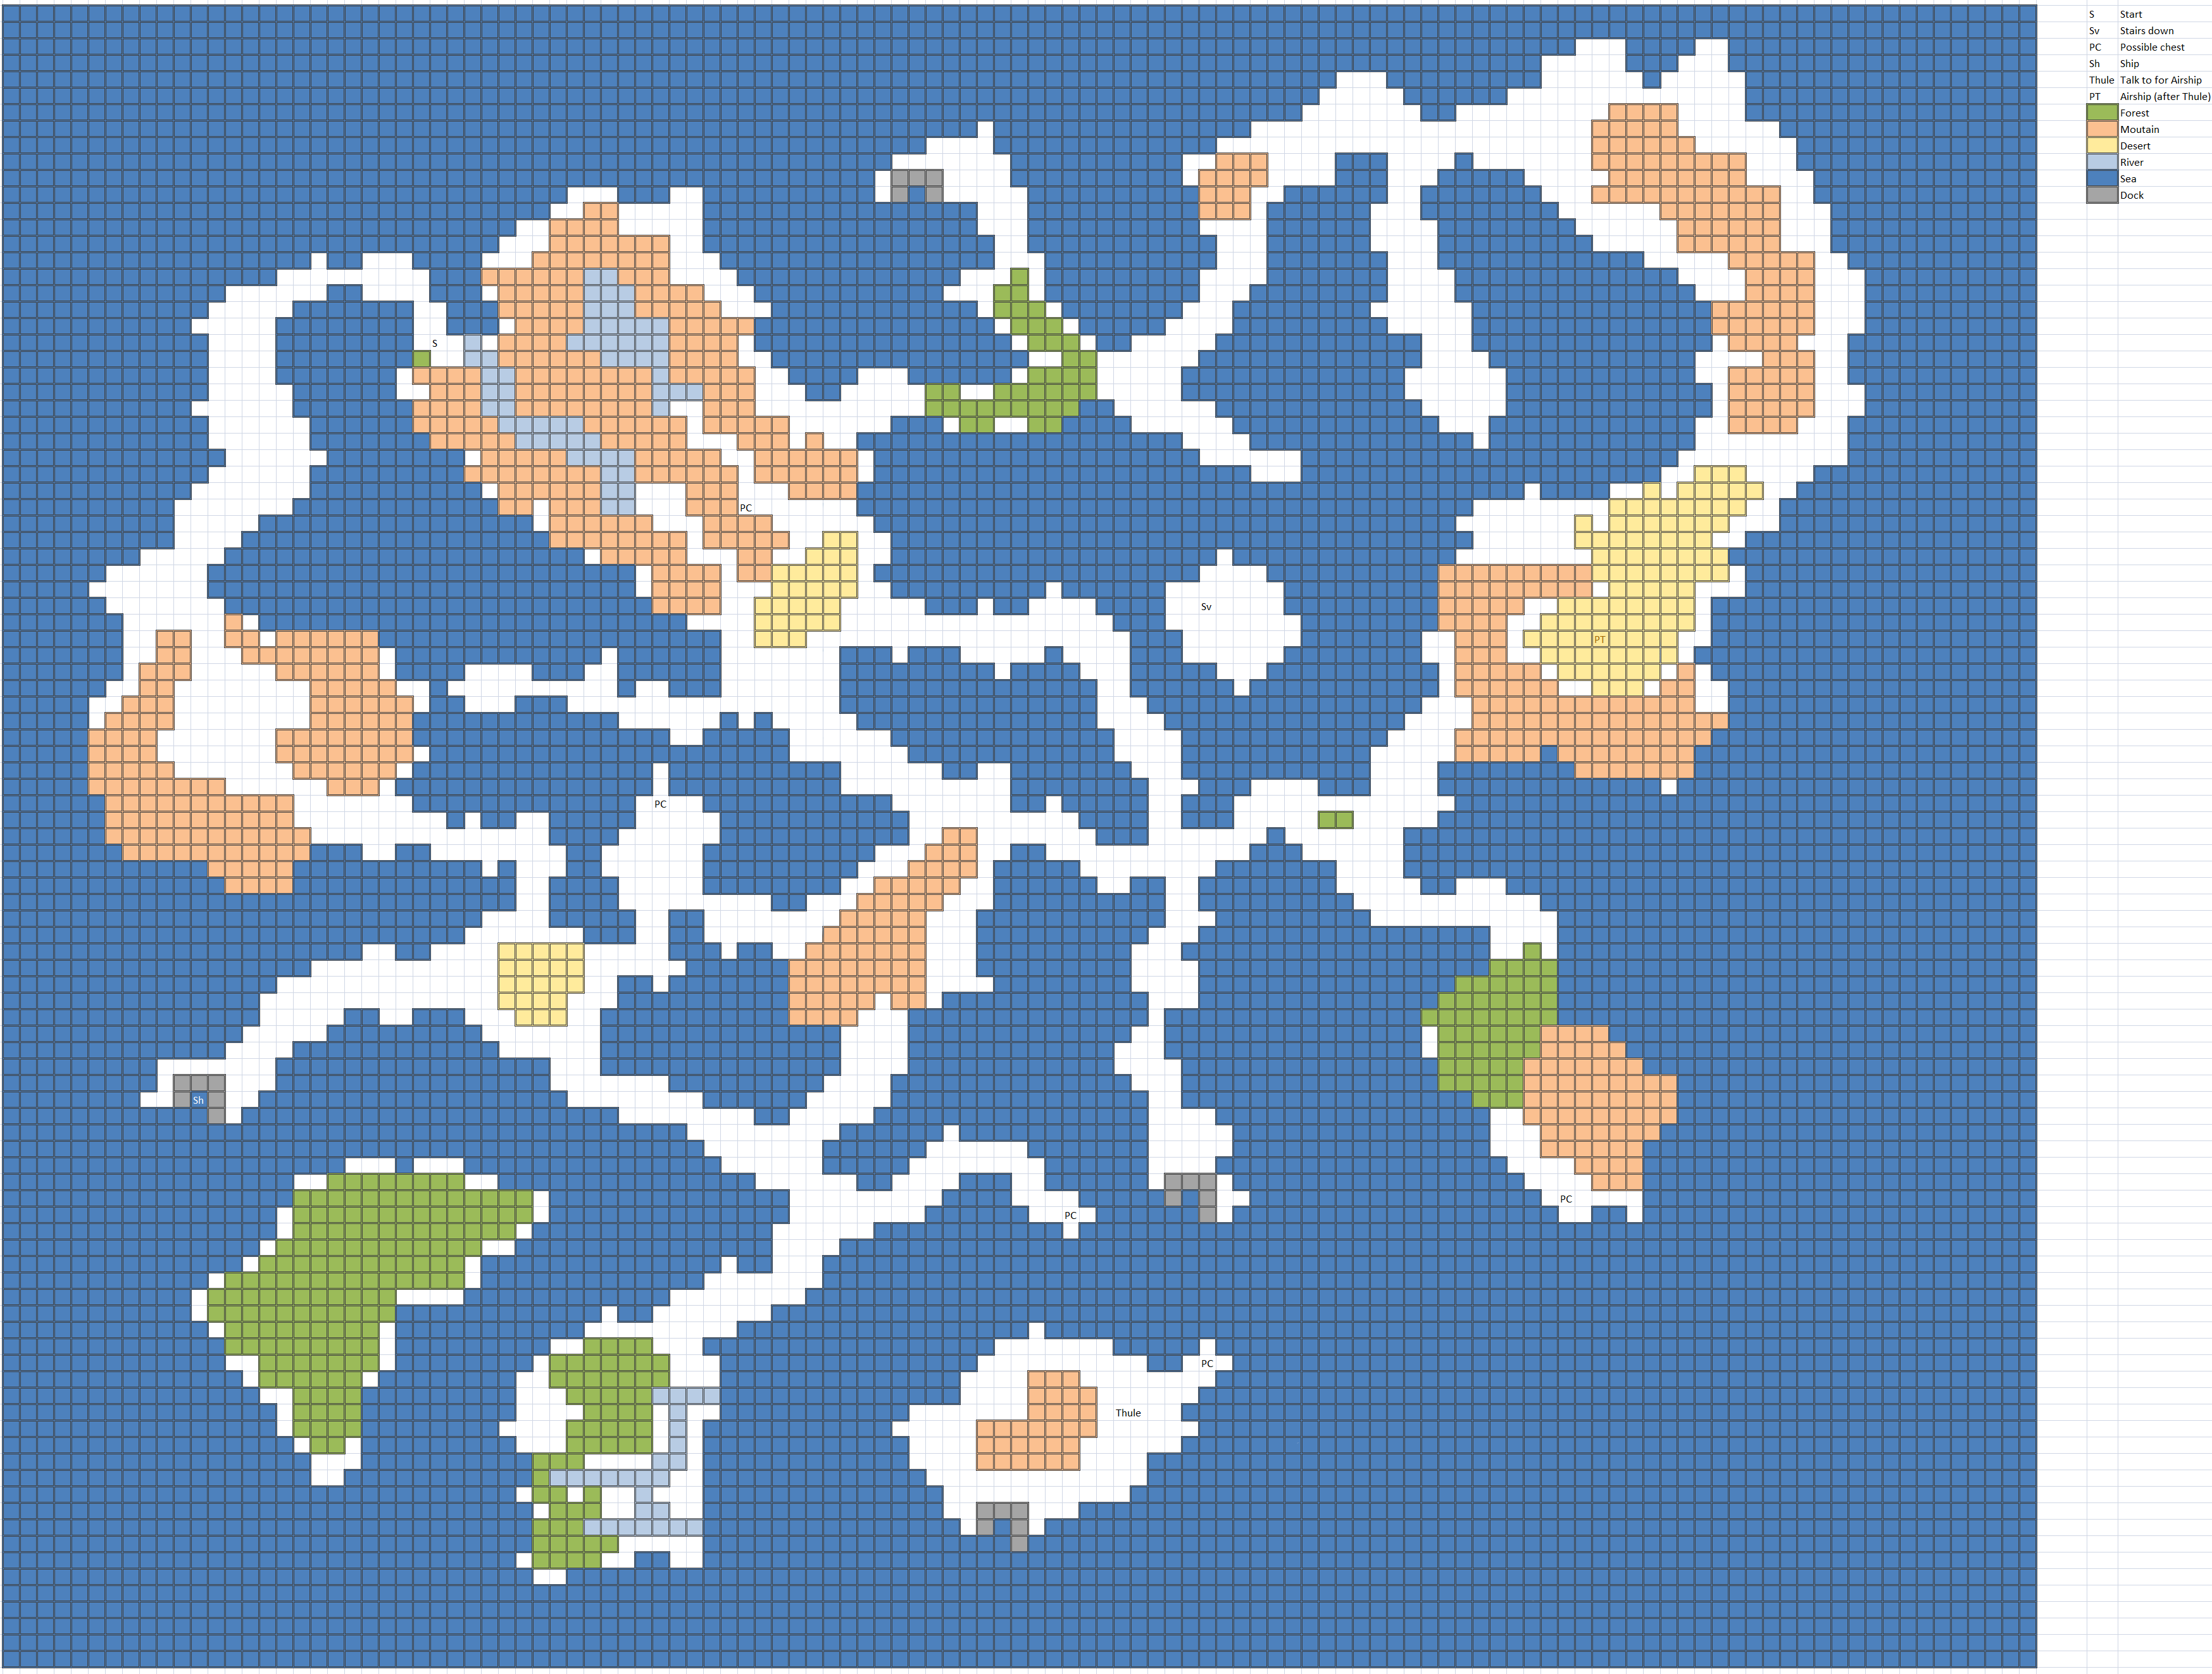
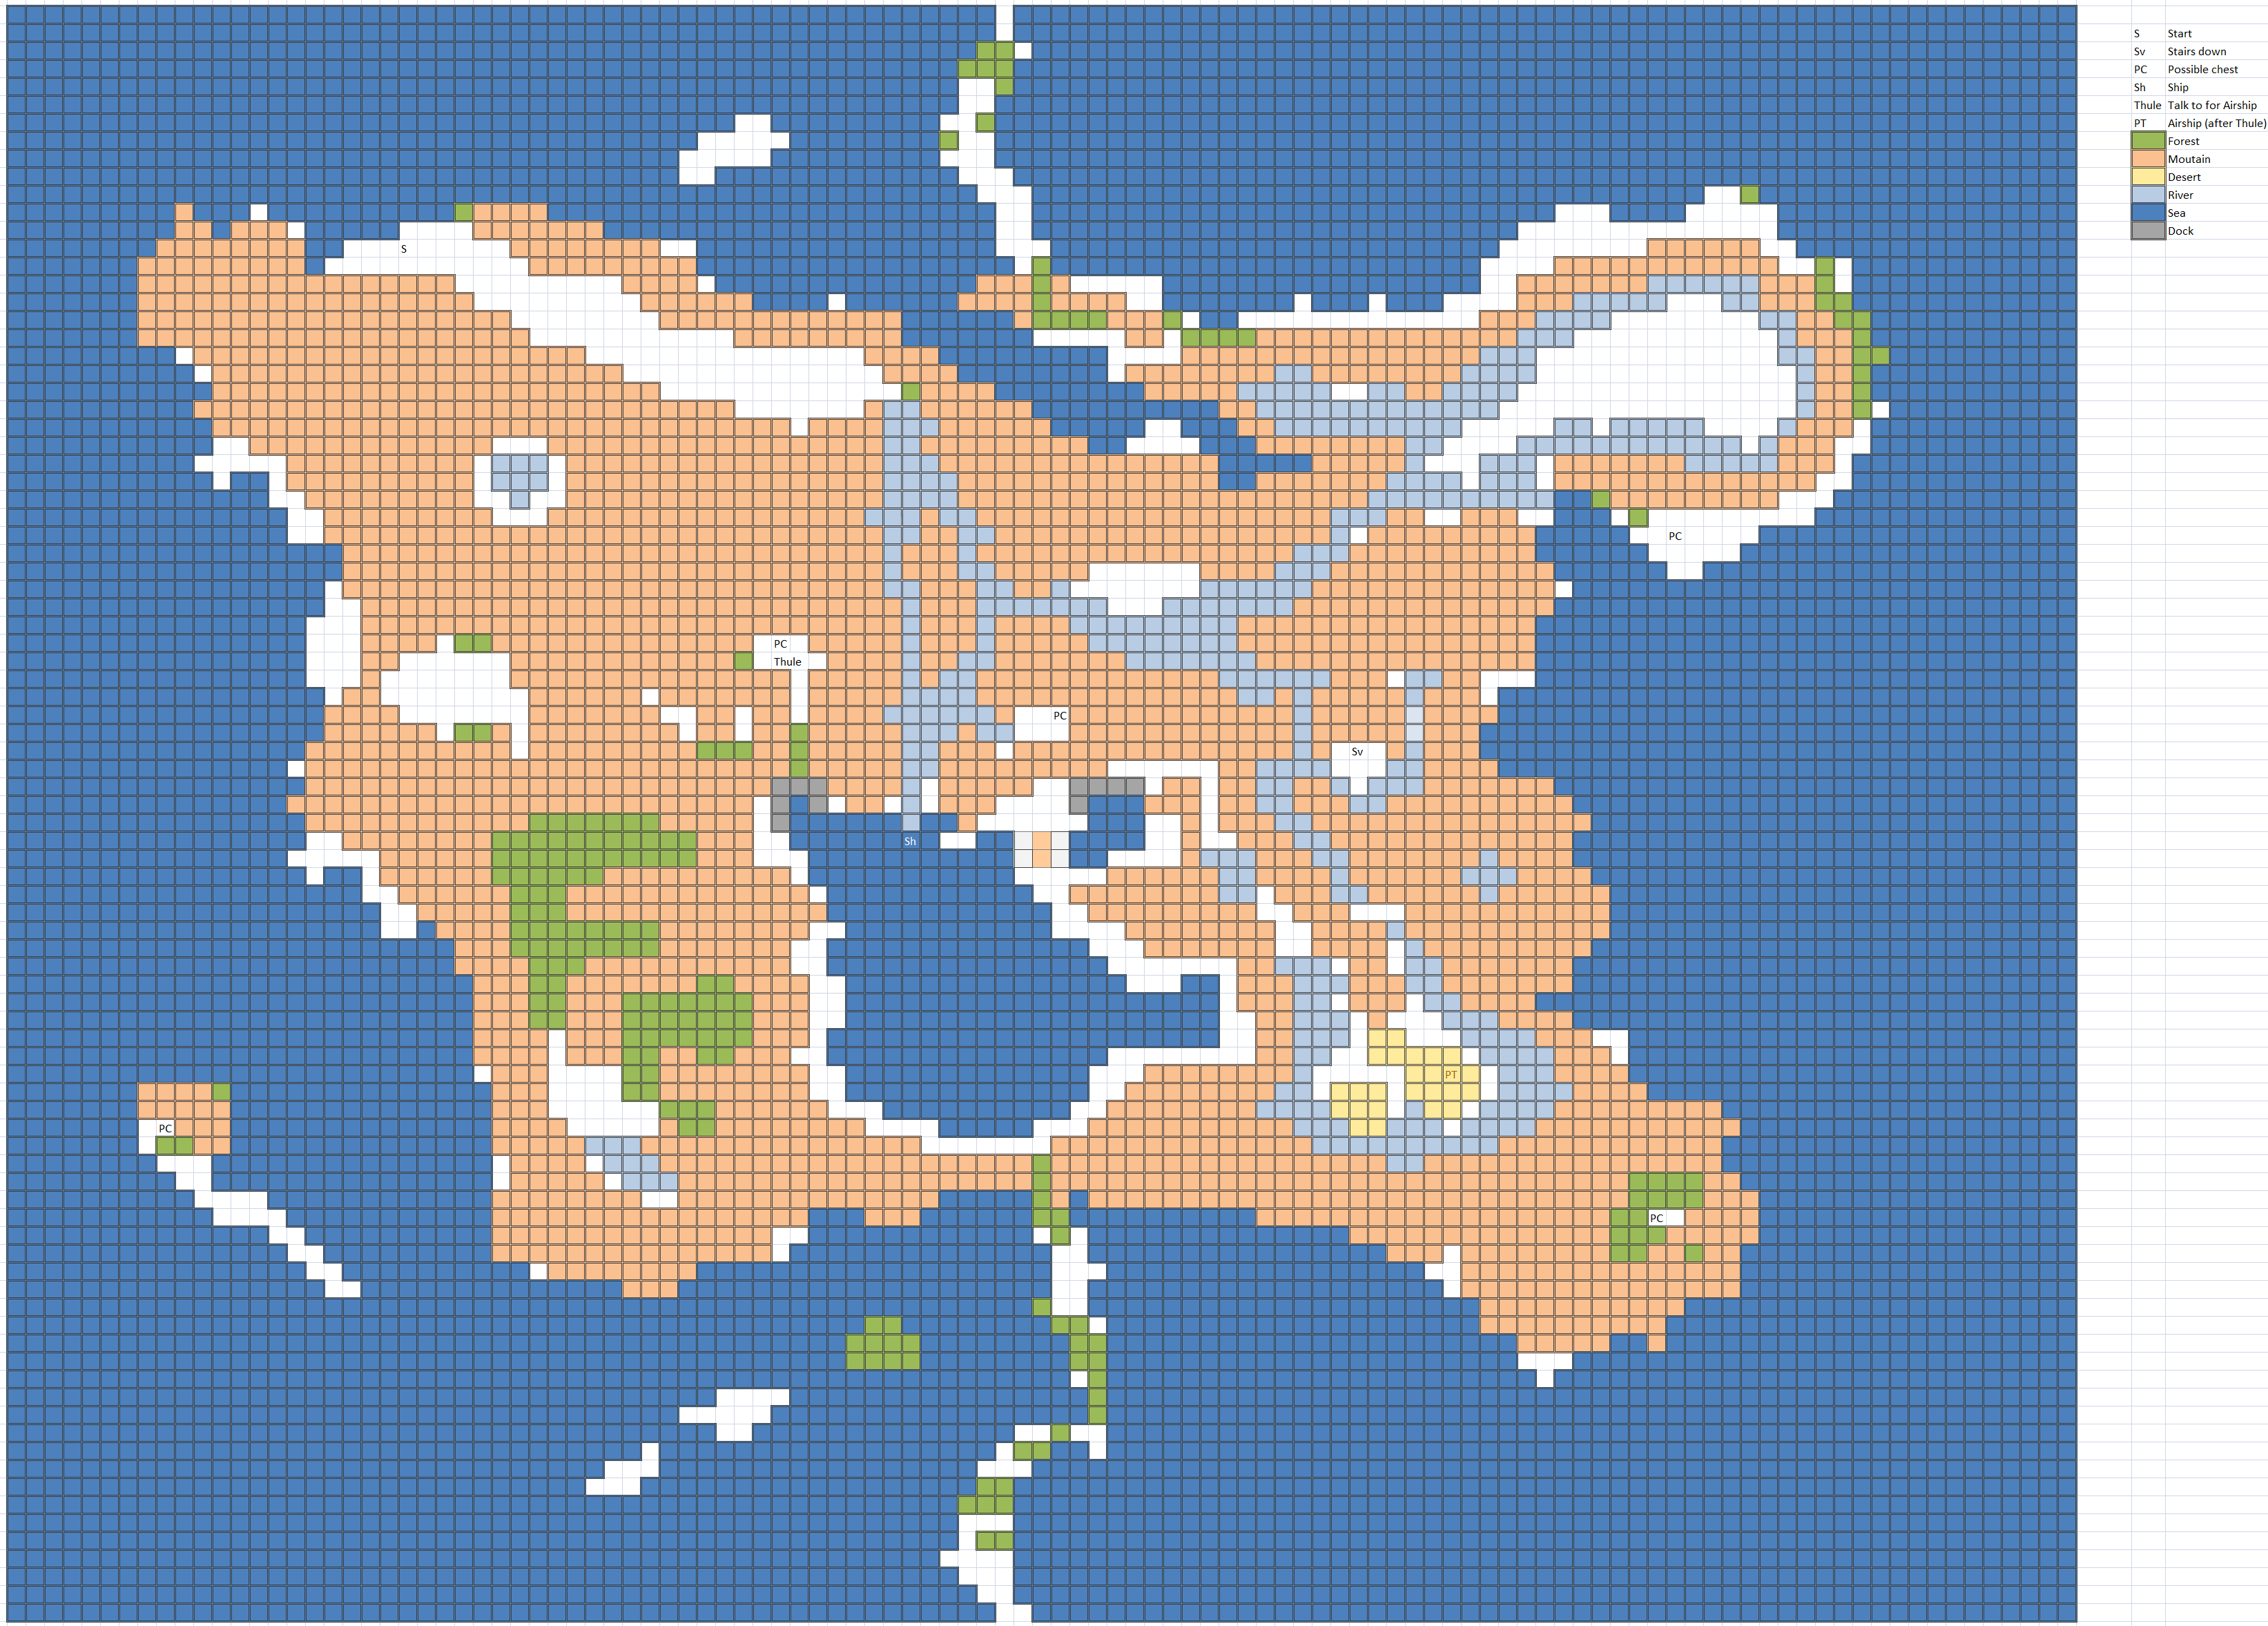
3 different maps all counted as the same (you will get one of the 3 above). Each have a similar objective, find and talk to Thule to mention needing the Levistone to get an Airship, find a palm tree in a desert section to get the Airship and use the Airship to fly to the exit (not all maps need it to complete).
Treasure: 2 (F1 & 2), 3 (F3, 4 & 6), 4 (F7 & 8), 5 (F9)
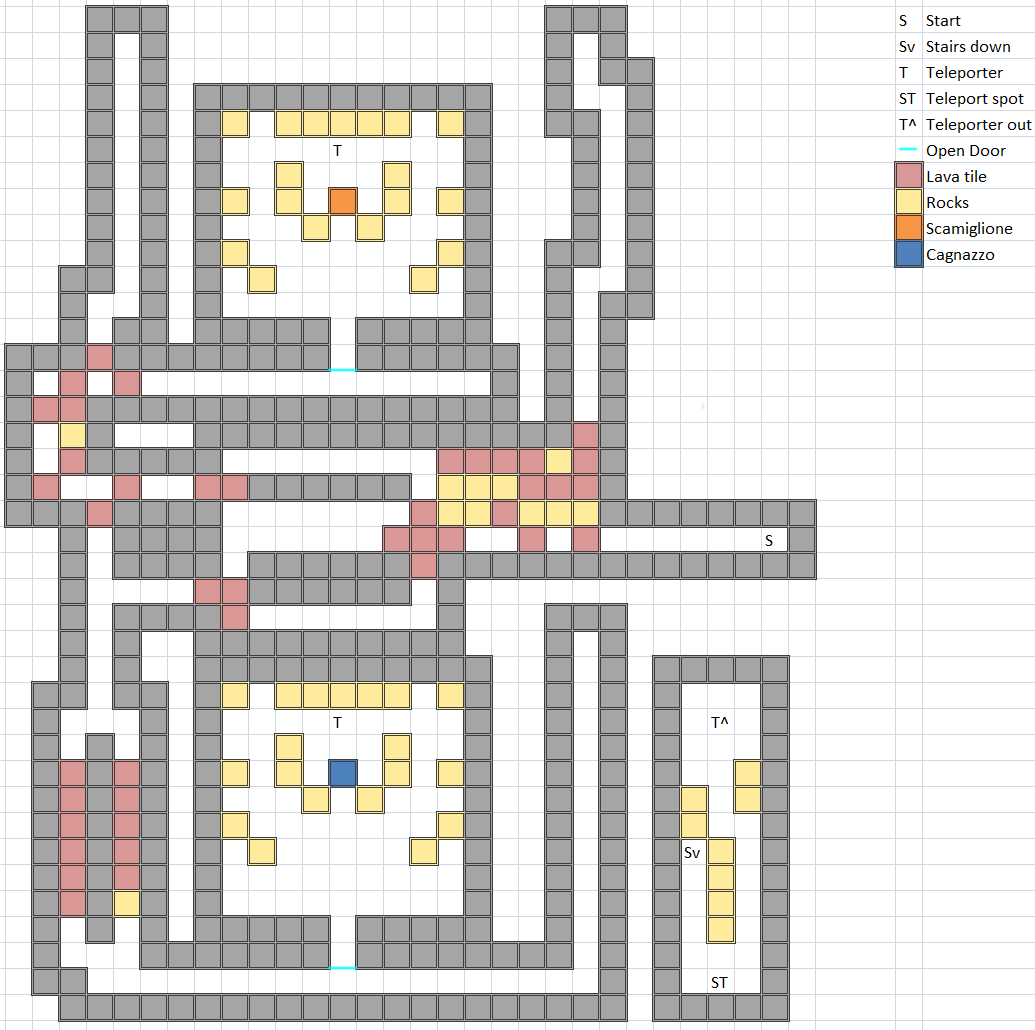
This floor gives you the option of fighting either Scarmiglione to the North or Cagnazzo to the South, after your victory you can choose to back out or continue to the next floor.
Bosses
Scarmiglione (#133/134)
HP: 4,000/7,046
Attack: 19/46
Defense: 10/20
Weak: —/
Resist: /
Drop: None/Lunar Curtain (Always)
I would not recommend fighting Scarmiglione unless you have a Ribbon on your White Wizard because of the second portion of the battle.
First form
He is not too big of a threat as his only method of damage is Thunder, though it will deal around 200 damage to those without protection so use NulShock/Blue Curtain for your members who don't have a Ribbon. Don't use too much MP as you'll want to save your buffs for his second form which comes immediately after you defeat his first form.
Second form
Any buffs you had from the previous fight are gone and have to be reapplied. He now has access to Poison Gas which will deal hefty damage to your party (over 400 without a Ribbon or NulAll active on a member) and has a chance to Poison. While he has elemental weaknesses his magic defense is quite high so you won't deal too much damage to him with magic.
Cagnazzo (#135)
HP: 7,968
Attack: 44
Defense: 20
Weak:
Resist:
Drop: Light Curtain (Always)
He doesn't have his gimmick of raising water around himself or entering his shell like the original game so Thundaga will do a lot of damage to him. He will usually use Tsunami which will hit for around 300 damage so Healaga after to stay in shape, he may cast Haste to increase his attack or Curaga to heal himself.
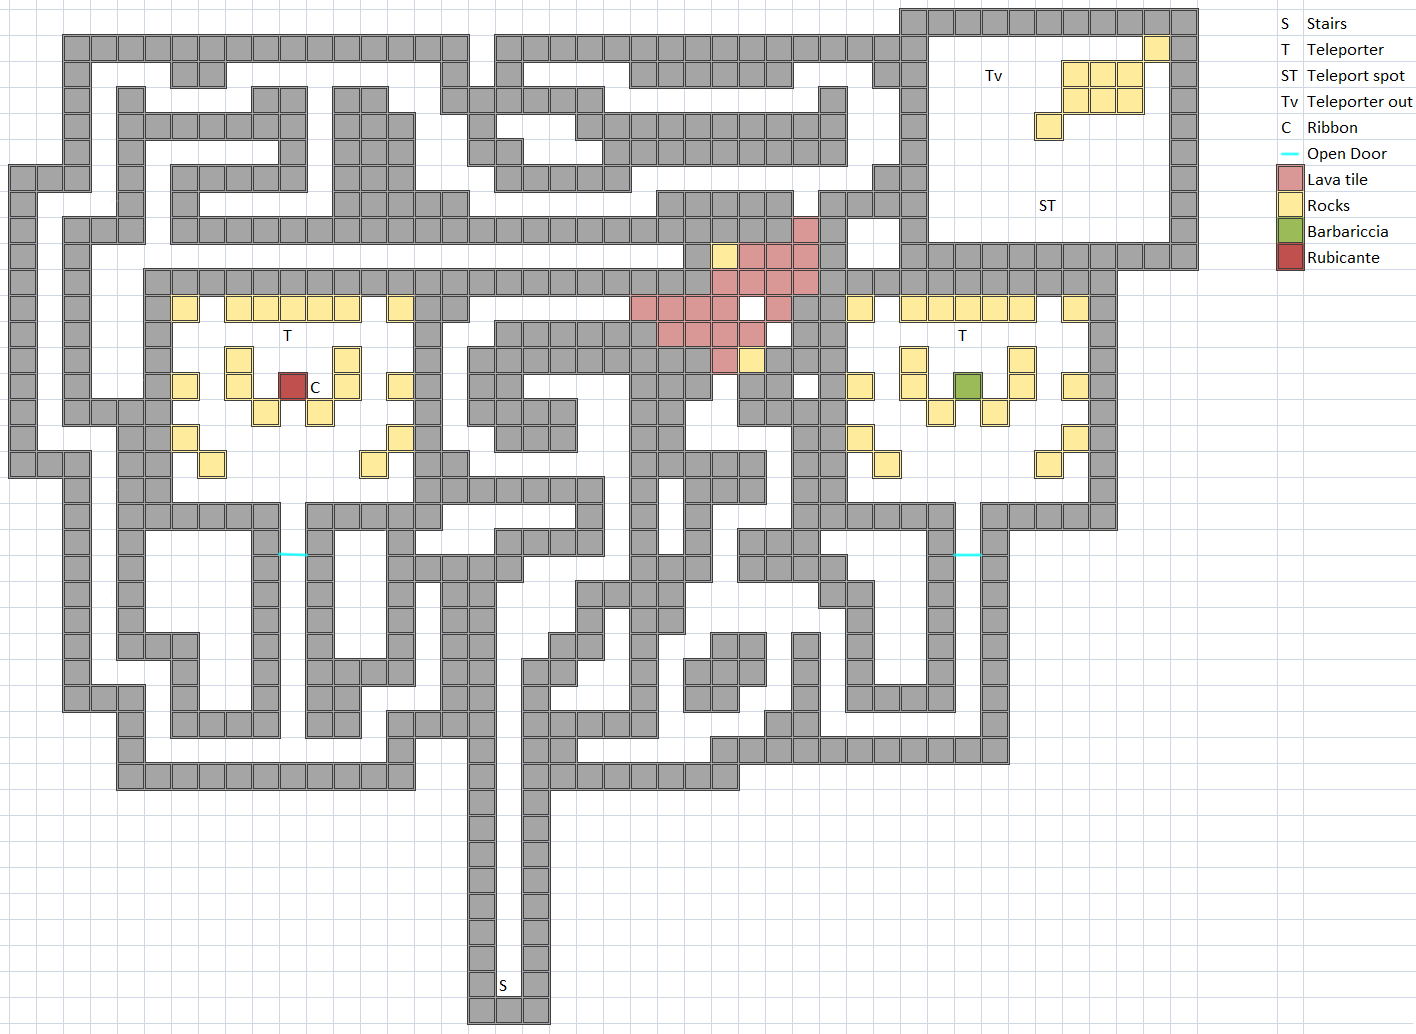
Like the previous boss room you are given the choice to either fight Barbariccia to the East or Rubicante to the West.
Bosses
Barbariccia (#136)
HP: 12,954
Attack: 88
Defense: 10
Weak: —
Resist:
Drop: Braveheart (Always)
She will not cover herself in her hair like in the original game. She will often deal around 200 damage with a physical attack and will usually use Ray which can petrify a member, though it will often miss so you will want NulDeath for members without a Ribbon. She can also use Cyclone which can deal 300 damage to the entire party. Her physical defense is much lower than her magic defense so boosting your attackers with a Red/Black Wizard is advised.
Rubicante (#137)
HP: 15,000
Attack: 88
Defense: 40
Weak: —
Resist:
Drop: Kikuichimonji (Always)
He does not have his gimmick of opening and closing his cloak like the original so in this incarnation he doesn't have a weakness to Ice. He will mainly use Fira, Firaga & Scorch all Fire based moves which you should use NulBlaze/Red Curtain to reduce the damage of. A Red/Black Wizard can choose to cast Thundaga or Flare (Black Wizard only) though his magic defense is very high so you may want to focus on buffing your attackers.
Note worthy Equipment
| Name | Type | User | Stats | Extra |
|---|---|---|---|---|
| Zephyr Cape | Shield | All except Monk/Master | 4 Defense, 9 Evasion, Weight of 1 | |
| Sage's Surplice | Body Armor | Red Mage/Wizard, White Mage/Wizard & Black Mage/Wizard | 25 Defense, -2 Evasion, Weight of 2 | INT+5 |
| Thief's Gloves | Glove | Thief/Ninja | 6 Defense, 14 Evasion, Weight of 1 | AGI+5 |
| Twist Headband | Helmet | Thief/Ninja & Monk/Master | 3 Defense, Weight of 1 | STR+15, AGI+1 & STA+2 |
| Sage's Mitre | Helmet | White Mage/Wizard & Black Mage/Wizard | 5 Defense, -1 Evasion, Weight of 1 | INT+5, Max MP+10% |
| War Hammer | Weapon | Knight, Ninja & White Wizard | 30 Attack | |
| Braveheart | Weapon | Warrior/Knight & Ninja | 30 Attack, 52 Accuracy | Casts Confuse when used as an item. |
| Kikuichimonji | Weapon | Warrior/Knight, Thief/Ninja & Red Mage/Wizard | 35 Attack, 25 Accuracy | STR+5 |
Lifespring Grotto
Unlocked: After defeating Kraken
Location: Whirlpool West of Mount Duergar and East of Melmond, you can only enter via the Ship.
# of floors: 20
Home of the Final Fantasy 5 bosses Gilgamesh & Atomos as well as the first real Superbosses of the series Omega & Shinryu will await your challenge. Gilgamesh is on Floor 5, Atomos on Floor 10 and Omega & Shinryu on Floor 20, though you can only fight either Omega or Shinryu on Floor 20 to leave so you will have to take at minimum 2 visits.
Enemies
| Name | Bestiary # | HP | Attack | Defense | EXP | Gil | Weak | Drop | Notes |
|---|---|---|---|---|---|---|---|---|---|
| Red Dragon | #066 | 248 | 75 | 30 | 2,904 | 4,000 | |||
| White Dragon | #068 | 200 | 53 | 8 | 1,701 | 2,000 | |||
| Dragon Zombie | #092 | 268 | 56 | 30 | 2,331 | 999 | Megalixir | Attack may Stun/Paralyze | |
| Blue Dragon | #107 | 454 | 92 | 20 | 3,274 | 2,000 | |||
| Green Dragon | #108 | 352 | 72 | 16 | 4,068 | 5,000 | |||
| Elm Gigas | #148 | 250 | 40 | 15 | 850 | 850 | |||
| Yellow Ogre | #151 | 150 | 25 | 15 | 300 | 250 | |||
| Yellow Dragon | #154 | 500 | 50 | 16 | 2,400 | 3,000 | Lunar Curtain | ||
| Holy Dragon | #155 | 1,374 | 100 | 50 | 5,505 | 5,505 | Dry Ether | ||
| Killer Shark | #157 | 1,200 | 60 | 20 | 2,500 | 400 | |||
| Death Manticore | #158 | 243 | 22 | 12 | 800 | 1,200 | Can flee if party level is very high | ||
| Dark Eye | #160 | 450 | 45 | 20 | 555 | 2,000 | Gaze may Paralyze | ||
| Black Goblin | #164 | 50 | 10 | 4 | 200 | 200 | Potion | Can flee if party level is very high | |
| Desertpede | #166 | 120 | 35 | 15 | 250 | 100 | Antidote | Attack may Poison | |
| Gloom Widow | #167 | 71 | 8 | 20 | 140 | 520 | Antidote | Attack may Poison | |
| Silver Dragon | #172 | 200 | 53 | 10 | 1,800 | 2,000 | |||
| Black Dragon | #173 | 1,600 | 95 | 30 | 3,000 | 4,000 | Lunar Curtain | ||
| Blue Troll | #174 | 132 | 20 | 10 | 340 | 300 | |||
| Death Elemental | #185 | 160 | 35 | 4 | 753 | 800 | Zephyr Cape | ||
| Wild Nakk | #186 | 80 | 15 | 20 | 240 | 60 | White Fang | Can flee if party level is very high | |
| Sahagin Queen | #189 | 100 | 30 | 15 | 500 | 500 | Blue Curtain | ||
| Python | #191 | 85 | 22 | 15 | 200 | 150 | Antidote | ||
| Skuldier | #192 | 120 | 25 | 6 | 80 | 133 | |||
| Revenant | #195 | 68 | 20 | 15 | 250 | 250 | Attack may Paralyze | ||
Yellow Dragon - Relatively weak for this point in the game, it has access to Thunderbolt to deal Lightning damage to your party.
Holy Dragon - Is quite powerful and may use Holy on your party.
Killer Shark - Has a pretty powerful physical attack and high HP, but it shouldn't be too much trouble.
Death Manticore - A very weak enemy that has access to Blaze to deal small Fire damage to your party, if your levels are above 50 they will often flee.
Dark Eye - Its Gaze attack has a chance to Paralyze a member without a Ribbon.
Black Dragon - Is a powerful enemy that has access to Kill which can instantly kill any members that don't have Death resistance.
Revenant - A pathetically weak enemy whose attack may paralyze the member it hits, if your levels are above 50 they will often flee.
Enemy Location
| Enemy | Map type(s) |
|---|---|
| Elm Gigas | Ice Cave (F11-19) |
| Yellow Ogre | Marsh Cave |
| Killer Shark | Sunken Shrine (F11-19) |
| Death Manticore | Flying Fortress (F11-19, Rare) |
| Dark Eye | Sunken Shrine (F11-19) |
| Black Goblin | All |
| Desertpede | Marsh Cave |
| Gloom Widow | Temple & Ice Cave |
| Silver Dragon | Temple (F11-19) |
| Blue Troll | Sunken Shrine (F11-19) |
| Death Elemental | Sunken Shrine & Flying Fortress |
| Wild Nakk | Temple |
| Sahagin Queen | Sunken Shrine |
| Python | Sunken Shrine (F1-9) |
| Skuldier | Marsh Cave |
| Revenant | Marsh Cave & Ice Cave |
Note: Dragon enemies not listed are found in Dark Bahamut's Challenge only. Dancing Girls, Library, Flooded Village & Shimmering Walkways have no encounters.
Map Types
| Type | Map(s) |
|---|---|
| Sunken Shrine | Sunken Shrine 2F, Sunken Shrine 4F, Sunken Shrine 5F, Sunken Shrine Caves, Remote Sunken Shrine & Winding Sunken Shrine |
| Temple | Open Area Temple, Room Maze Temple & Pillar Maze Temple |
| Marsh Cave | Pillar Maze Cave |
| Ice Cave | Ice Cavern |
| Flying Fortress | Flying Fortress |
Possible Chest Items
The maximum amount of treasures normal floors can have is 5, however there is one map that always has 10 so for all maps except that one take into account the first 5 items. If you are looking to max your stats this is the best extra dungeon to do so as you are guaranteed to get at least 1 stat increasing item, do note to save before using them as they can increase stats by 1-3 unless said otherwise in their description.
Floor 1
- 200 Gil
- Echo Grass
- Hi-Potion
- Phoenix Down
- Dry Ether
- Red Curtain
- Dry Ether
- Mind Plus
- Hermes' Shoes
- Feathered Cap
Floor 2
- 400 Gil
- Eye Drops
- X-Potion
- Ether
- Giant's Tonic
- Mind Plus
- White Fang
- Lunar Curtain
- Golden Apple
- Genji Shield
Floor 3
- Potion
- 3,000 Gil
- Spider's Silk
- Speed Plus
- Tiger Mask
- White Curtain
- Light Curtain
- Remedy
- Elixir
- Soma Drop
Floor 4
- Hi-Potion
- Ether
- Speed Drink
- Strength Tonic
- Red Fang
- Phoenix Down
- Emergency Exit
- Dry Ether
- Hermes' Shoes
- Power Plus
Floor 6
- 123 Gil
- Emergency Exit
- Blue Fang
- Cockatrice Claw
- Faerie Tonic
- Luck Plus
- Giant's Tonic
- Elixir
- Silver Apple
- Crystal Ring
Floor 7
- Phoenix Down
- Protect Drink
- Vampire Fang
- Spider's Silk
- Golden Apple
- Speed Plus
- Strength Tonic
- 32,000 Gil
- X-Potion
- Megalixir
Floor 8
- 300 Gil
- Speed Drink
- Hermes' Shoes
- Light Curtain
- Turbo Ether
- Stamina Plus
- Silver Apple
- Remedy
- Mind Plus
- 4464 Gil
Floor 9
- Blue Curtain
- Hermes' Shoes
- Faerie Tonic
- Silver Apple
- X-Potion
- Eye Drops
- Power Plus
- Protect Drink
- Deathbringer
- Elixir
Floor 11
- White Fang
- Cockatrice Claw
- Silver Apple
- Protect Drink
- Orichalcum
- Speed Plus
- Soma Drop
- Strength Tonic
- Elixir
- Lunar Curtain
Floor 12
- Ether
- 5,000 Gil
- Mind Plus
- Light Curtain
- Remedy
- Giant's Tonic
- Power Vest
- Hermes' Shoes
- X-Potion
- Megalixir
Floor 13
- Red Curtain
- Blue Fang
- Vampire Fang
- Power Plus
- Strength Tonic
- Turbo Ether
- White Curtain
- Stamina Plus
- Elixir
- Megalixir
Floor 14
- Phoenix Down
- Hi-Potion
- Hermes' Shoes
- Silver Apple
- Faerie Tonic
- Luck Plus
- Mind Plus
- Emergency Exit
- Gaia Gear
- Soma Drop
Floor 15
- Potion
- Blue Curtain
- Echo Grass
- Asura
- Spider's Silk
- Power Plus
- Golden Apple
- Speed Drink
- X-Potion
- Stamina Plus
Floor 16
- 800 Gil
- Giant's Tonic
- Protect Drink
- Turbo Ether
- Elixir
- Speed Plus
- 40,000 Gil
- Hermes' Shoes
- Kenpogi
- Light Curtain
Floor 17
- Spider's Silk
- Phoenix Down
- X-Potion
- Hermes' Shoes
- Sage's Mitre
- Mind Plus
- Gigantaxe
- Dry Ether
- Crystal Shield
- Elixir
Floor 18
- Remedy
- Hi-Potion
- Lunar Curtain
- Strength Tonic
- Feathered Cap
- Faerie Tonic
- Luck Plus
- Soma Drop
- Crystal Ring
- 80,000 Gil
Floor 19
- Ether
- Phoenix Down
- Sage's Surplice
- Speed Plus
- Hermes' Shoes
- Golden Apple
- Light Curtain
- Elixir
- Stamina Plus
- Power Plus
Areas
1. Dancing Girls
2. Library
3. Flooded Village
4. Shimmering Walkways
5. Sunken Shrine 2F
6. Sunken Shrine 4F
7. Sunken Shrine 5F
8. Sunken Shrine Caves
9. Remote Sunken Shrine
10. Winding Sunken Shrine
11. Open Area Temple
12. Room Maze Temple
13. Pillar Maze Temple
14. Pillar Maze Cave
15. Ice Cavern
16. Flying Fortress
17. Dark Bahamut's Challenge
Maps

Of these set of rooms you can only go through 3 of the 5 each trip. The first room will always be the same while the second and third rooms have 2 possible outcomes.
Treasure: 2 (F1-4), 3 (F6-12), 4 (F13-19)

A very large area with a lot of NPCs that block your path, the exit is in the upper right section of the map.
Treasure: 2 (F1-4), 3 (F6-19)

A fairly small area completely done on the raft. The exit is randomly chosen from the many houses you can enter.
Treasure: 3 (F1-4), 4 (F6-19)

A large and unique map, the gimmick with this one is that there are periodic flashing tiles which are always solid, but aren't always revealed. This is the only map that has 10 chests and thus will have at least 1 stat increasing item.
Treasure: 10 (Always)

All start points except 1 are near a wall so is one way to know you are on this version of Sunken Shrine. This is somewhat similar to 2F of the Sunken Shrine ,the map is pretty big with the exit is along the Eastern section of the map.
Treasure: 3 (Always)

Looks close to 4F from Sunken Shrine with minor changes. There are 3 rooms, though one will always be empty while the other two can possible have chests the exit is near the center room.
Treasure: 2 (F1-8), 3 (F9-16), 4 (F17-19)

Looks very similar, but not completely like 5F from Sunken Shrine where you had to find the Rosetta Stone. Treasures are near the bottom and top right rooms on the map with the exit at the Northwest.
Treasure: 2 (F1-8), 3 (F9-16), 4 (F17-19)

The smallest map with the exit in the Eastern section of the map which you have a chance of spawning by.
Treasure: 2 (F1-8), 3 (F9-16), 4 (F17-19)

Distinct from the other Sunken Shrine maps as you either spawn right near the exit or near the room on the right which is partially visible.
Treasure: 2 (F1-8), 3 (F9-19)

To reach the exit you have to make your way to the Southeastern section which you start either away from it in the North or close to it in the South.
Treasure: 2 (F1-8), 3 (F9-16), 4 (F17-19)

You start in either the bottom which is next to the exit or the top which is further away. The exit is in the bottom right with two ways to get there while the treasures are around the various corners.
Treasure: 2 (F1-4), 3 (F6-12), 4 (F13-19)

You start in either the bottom right corner of the top center and must make your way to the exit in the bottom left.
Treasure: 2 (F1-4), 3 (F6-12), 4 (F13-19)

A pretty small map in which you start either in the center or near the bottom and must make your way to the exit in the Northeast. You have to make you way through the Northern side as that is the only section it is not blocked from.
Treasure: 2 (F1-4), 3 (F6-12), 4 (F13-16), 5 (F17-19)

A large cave filled with pillars made to make a maze, regardless where you start (unless in the lower left) you will have to go counterclockwise to reach the exit, however the upper routes can potentially have a chest.
Treasure: 3 (F1-4), 4 (F6-12), 5 (F13-19)

A large cave and the only one that is based on the Ice Cavern map, not too large of an area with the treasures on the left sides of the map. The exit is near the center of the map.
Treasure: 2 (F1-2), 3 (F3-19)

If you haven't been to the Flying Fortress Dungeon this will easily standout due to the clouds. This is a pretty large floor that will always have 3 treasures, the exit is in the Southeast of the map.
Treasure: 3 (Always)

You will start near Dark Bahamut and must speak to him to find out what dragons he wants you to defeat in order to open the door leading to the stairs to the next floor. This is a good place to get levels as you will gain at least 1 maybe 2 from all the dragons which are randomly picked when you talk to them (there are exactly 3 of each Dragon available), due note that if you beat the needed dragons and speak to Dark Bahamut you will not be able to defeat the remaining dragons, though you can talk to them for some dialogue.
Treasure: 0 (Always)
Bosses
On Floor 5 you must speak with the mermaids to figure out which spot Gilgamesh is hiding in, there are 3 possible solutions and even if you check the spots preemptively he will not appear unless the mermaids have told you where he can be.
Gilgamesh (#138)
HP: 8,800
Attack: 70
Defense: 50
Weak: —
Resist:
Drop: Genji Gloves (Always)
Gilgamesh can be pretty strong, though he will often use Excalipur which will only do 1 damage. He has access to Protect to raise his defense and NulAll to reduce damage from elemental spells. He can do Wind Slash which will hit all members. Casting Protera & Invisira are recommended if his damage is a little high for your group.
On Floor 10 you simply need to walk to the right to encounter Atomos and defeat him to pass through the door it is blocking. The path to the right leads to a teleporter which leads outside to the surface while the left leads to the stairs to continue.
Atomos (#141)
HP: 13,000
Attack: 50
Defense: 70
Weak: —
Resist:
Drop: Judgement Staff (Always)
Atomos' main attack Wormhole has a chance of causing Instant Death on one member, at this point you should easily have a Protect Ring on everyone to negate it from happening, otherwise use a Lunar Curtain or NulDeath spell to null this attack. Atomos' other attacks are Firaga which will deal around 300 damage to anyone without Fire protection and Comet which will deal the same amount to only one member.
On Floor 20 you have two choices between which boss to face Omega to the left, Shinryu to the right to leave you must defeat one of them or die trying.
Omega (#139)
HP: 35,000
Attack: 115
Defense: 190
Weak: —
Resist:
Drop: Murasame (Always)
This is mainly a battle of attrition due to Omegas absurdly high defense stats. The difficulty of the fight depends on whether you did this as early as possible or after going through Whisperwind Cove. Omegas main attacks are Earthquake which can instantly kill if you have no protection against Earth and Wave Cannon which will deal around 200-300 damage. Melee fighters should not try attacking until a couple of Giant's Gloves/Temper buffs have been put up including Haste from a Ninja, Black Wizard or Red Wizard. Those using a Red Wizard will want to set up some Proteras to lighten Omegas psychical attack as it can deal a lot of damage. White Wizard should stick exclusively to Healara/Healaga while any extra healing from the Healing Staff or Rune Staff from any other units will be useful or damage via Judgement Staff for free Flare uses.
Shinryu (#140)
HP: 35,000
Attack: 220
Defense: 60
Weak: —
Resist:
Drop: Ragnarok (Always)
Where Omega is a battle of attrition this is a straight up damage race as Shinryu is not afraid to wipe the party with its barrage of hard hitting moves. Any Giant's Tonic to increase a characters HP is great if they have less than 799 max. Shinryus moves are Icestorm dealing Ice elemental damage to everyone, Thunderbolt which deals Lightning elemental damage to everyone, Tsunami which deals non-elemental damage to everyone and it's most dangerous attack you don't want to see twice in a row Flare which deals hefty non-elemental damage to the party. Haste/Temper your strongest attacker while trying to keep them alive with the White Wizards Healara/Healaga and any spare help from the Healing Staff or Rune Staff. After defeating Shinryu you can open the chest it was guarding which has the best Shield in the game (unless on PSP) the Hero's Shield which has 16 Defense & 40 Evasion with no Weight, its main perk is that it works like a Ribbon + Protect Ring in that it reduces elemental damage and protects from statuses, it can be equipped by a Knight and Ninja.
Note worthy Equipment
| Name | Type | User | Stats | Extra |
|---|---|---|---|---|
| Feather Cap | Helmet | Warrior/Knight, Thief/Ninja & Red Mage/Red Wizard | 4 Defense, 9 Evade, Weight of 1 | |
| Genji Shield | Shield | Warrior/Knight & Ninja | 14 Defense, 42 Evade, Weight of 8 | Poison & Stone immunity |
| Tiger Mask | Helmet | Knight, Ninja & Master | 8 Defense, Weight of 2 | STR+3, AGI+2 & STA+1 |
| Crystal Ring | Glove | Knight, Ninja, Master & Red Wizard | 9 Defense, 4 Evade, Weight of 1 | Sleep & Paralysis immunity, AGI+5 |
| Deathbringer | Weapon | Red Wizard | 33 Attack, 20 Accuracy | Casts Death when used as an item & STR/AGI/INT/STA+5 |
| Orichalcum | Weapon | All except Monk/Master | 28 Attack, 35 Accuracy | Recover HP on hit (reverse with Undead) |
| Power Vest | Body Armor | Monk/Master | 38 Defense, Weight of 1 | STR+15, AGI & STA+1 |
| Gaia Gear | Body Armor | Black Mage/Black Wizard | 35 Defense, -2 Evade, Weight of 2 | Quake & Stone immunity |
| Asura | Weapon | Warrior/Knight, Thief/Ninja & Red Mage/Red Wizard | 25 Attack, 25 Accuracy | |
| Gigantaxe | Weapon | Warrior/Knight & Ninja | 42 Attack | STR+4 & INT-4 |
| Crystal Shield | Shield | Knight & Ninja | 15 Defense, 45 Evade, | Stone immunity |
| Sage's Surplice | Body Armor | Red Mage/Red Wizard, White Mage/White Wizard & Black Mage/Black Wizard | 25 Defense, -2 Evade, Weight of 2 | INT+5 |
| Genji Gloves | Glove | Warrior/Knight & Ninja | 9 Defense, 13 Evade, Weight of 2 | Poison & Stone immunity |
| Judgement Staff | Weapon | Black Wizard | 25 Attack, 25 Accuracy | Casts Flare when used as an item |
| Murasame | Weapon | Ninja | 50 Attack, 10 Accuracy | Casts Protect when used as an item, +40 Evade, STR/INT/STA+5 & AGI-5 |
| Ragnarok | Weapon | Knight | 55 Attack 40 Accuracy | Casts Flare when used as an item, +30 Evade, STR/INT/STA+7 & AGI+3 |
Whisperwind Cove
Unlocked: After defeating Tiamat
Location: Near Cavern of Ice, South intersection on the path near where you had to go West to enter the Cavern.
# of floors: 40
Home of the Final Fantasy 6 (3 US SNES) bosses Typhon, Orthros (Ultros), Phantom Train & Death Gaze. Every x0th floor houses a boss to fight Typhon on 10, Orthros on 20, Phantom Train on 30 & Death Gaze on 40.
Enemies
| Name | Bestiary # | HP | Attack | Defense | EXP | Gil | Weak | Drop | Notes |
|---|---|---|---|---|---|---|---|---|---|
| Astos | #33 | 420 | 30 | 18 | 2,250 | 2,200 | Mythril Sword | ||
| Vampire | #46 | 280 | 76 | 26 | 1,200 | 2,000 | Gaze may Paralyze | ||
| Devil Wizard | #146 | 700 | 50 | 50 | 3,800 | 3,800 | |||
| Elm Gigas | #148 | 250 | 40 | 15 | 850 | 850 | |||
| Flare Gigas | #149 | 1,050 | 80 | 30 | 2,000 | 2,000 | Red Curtain | ||
| Unicorn | #150 | 150 | 20 | 8 | 500 | 300 | Ether | ||
| Yellow Ogre | #151 | 150 | 25 | 15 | 300 | 250 | |||
| Mad Ogre | #152 | 1,000 | 75 | 40 | 1,000 | 1,000 | Strength Tonic | ||
| Mage Chimera | #153 | 600 | 55 | 30 | 5,000 | 4,500 | Hermes' Shoes | ||
| Yellow Dragon | #154 | 500 | 50 | 16 | 2,400 | 3,000 | Lunar Curtain | ||
| Mythril Golem | #156 | 848 | 84 | 160 | 6,000 | 6,000 | Dark Claymore | ||
| Death Manticore | #158 | 243 | 22 | 12 | 800 | 1,200 | Can flee if party level is very high | ||
| Blood Tiger | #159 | 213 | 22 | 16 | 300 | 100 | Can flee if party level is very high | ||
| Blood Eye | #161 | 720 | 100 | 80 | 2,000 | 2 | Remedy | ||
| Flood Gigas | #162 | 400 | 45 | 10 | 300 | 1,500 | |||
| Poison Eagle | #163 | 200 | 30 | 5 | 500 | 555 | Cockatrice Claw | ||
| Black Goblin | #164 | 50 | 10 | 4 | 200 | 200 | Potion | Can flee if party level is very high | |
| Knocker | #165 | 450 | 40 | 40 | 500 | 500 | Hi-Potion | ||
| Desertpede | #166 | 120 | 35 | 15 | 250 | 100 | Antidote | Attack may Poison | |
| Gloom Widow | #167 | 71 | 8 | 20 | 140 | 520 | Antidote | Attack may Poison | |
| Duel Knight | #168 | 520 | 60 | 50 | 1,200 | 4,300 | Enhancer | ||
| Squidraken | #169 | 480 | 40 | 32 | 888 | 888 | Sage's Staff | Mind Blast can Paralyze. | |
| Pharaoh | #170 | 1,220 | 75 | 44 | 1,542 | 1,542 | Asura | Attack may Sleep. | |
| Bonesnatch | #171 | 500 | 45 | 12 | 500 | 800 | |||
| Black Dragon | #173 | 1,600 | 95 | 30 | 3,000 | 4,000 | Lunar Curtain | ||
| Earth Troll | #175 | 566 | 62 | 55 | 1,667 | 556 | |||
| Earth Plant | #177 | 675 | 35 | 60 | 4,440 | 300 | Turbo Ether | ||
| Yamatano Orochi | #178 | 1,068 | 50 | 42 | 4,050 | 800 | Braveheart | ||
| Dark Elemental | #179 | 200 | 66 | 20 | 1,500 | 780 | |||
| Devil Hound | #180 | 150 | 22 | 8 | 300 | 150 | |||
| Sekhret | #181 | 1,400 | 110 | 25 | 1,300 | 1,300 | War Hammer | ||
| Catoblepas | #182 | 200 | 30 | 20 | 1,500 | 800 | Remedy | Gaze may Petrify | |
| Undergrounder | #184 | 690 | 75 | 50 | 2,500 | 1,300 | Gaia Gear | ||
| Death Elemental | #185 | 160 | 35 | 4 | 753 | 800 | Zephyr Cape | ||
| Wild Nakk | #186 | 80 | 15 | 20 | 240 | 60 | White Fang | Can flee if party level is very high | |
| Dark Wolf | #187 | 360 | 30 | 25 | 75 | 300 | White Fang | ||
| Rock Gargoyle | #188 | 337 | 30 | 72 | 50 | 120 | |||
| Reaper | #190 | 350 | 90 | 20 | 1,000 | 1,000 | Deathbringer | Attack my paralyze | |
| Python | #191 | 85 | 22 | 15 | 200 | 150 | Antidote | ||
| Skuldier | #192 | 120 | 25 | 6 | 80 | 133 | |||
| Red Flan | #193 | 390 | 50 | 255 | 1,110 | 500 | |||
| Prototype | #194 | 1,500 | 85 | 45 | 1,000 | 2,000 | Rune Axe | ||
| Revenant | #195 | 68 | 20 | 15 | 250 | 250 | Attack may Paralyze | ||
Devil Wizard - Has access to the Flare spell which can deal a lot of damage if it gets it off.
Flare Gigas - The strongest of the Gigas enemies with no special trait.
Unicorn - Not too difficult of an enemy to deal with.
Mage Chimera - Like other Chimera type enemies it has access to Blaze to deal fire damage to your entire party.
Mythril Golem - Has nothing special unlike most Golem enemies.
Blood Tiger - A very weak enemy with nothing noteworthy, if your levels are above 50 they will often flee.
Blood Eye - Has the spell Death, though you should have Protect Rings by this point to neutralize it's chance of hitting.
Flood Gigas - Has nothing special to other Worm enemies that look like it.
Poison Eagle - Despite the name it's physical attack doesn't inflict the Poison status.
Knocker - The strongest of the Goblin type enemies, shouldn't pose much of a threat if you have ways of dealing with their large groups.
Duel Knight - Has nothing special about it.
Squidraken - Unlike Mindflayer which can instant kill even through Protect Rings, Squidraken does not have that property with it's attack, however it still has Mind Blast to attempt to Paralyze your party. It has a very nice drop you may want to tray and farm.
Pharaoh - Like other Mummy type enemies his physical attack has a chance to cause a party member to Sleep.
Bonsesnatch - Has nothing special about it.
Earth Troll - Has nothing special about it.
Earth Plant - Has access to Poison Gas to deal a lot of damage to your party and potentially Poison anyone not resistant to it.
Yamatano Orochi - Has access to Blaze to deal fire damage to your party.
Sekhret - Has a pretty strong physical attack, but that's all it has going for it.
Undergrounder - It has access to Quake which can potentially kill any party member without protection against Quake element.
Dark Wolf - Not too threatening as it doesn't have a means to hit your party like Frost Wolf.
Rock Gargoyle - Has nothing special about it.
Reaper - Has access to Dispel to remove your buffs and its attack can paralyze if your member hit doesn't have protection against it, otherwise should not be to tough to deal with.
Red Flan - Has perfect physical defense making physical attacks not deal too much damage, though you should have equipment that have spells to deal with them.
Prototype - Has fairly high magic defense and can deal quite a bit of damage to the member it hits.
Enemy Equipment Drop (New)
| Name | Type | User | Stats | Extra | Dropped by |
|---|---|---|---|---|---|
| Dark Claymore | Weapon | Warrior/Knight | 40 Attack, 5 Accuracy | Mythril Golem | |
| Enhancer | Weapon | Warrior/Knight, Ninja & Red Mage/Wizard | 28 Attack, 25 Accuracy | INT+5 | Duel Knight |
| Sage's Staff | Weapon | Red Mage/Wizard, White Mage/Wizard & Black Mage/Wizard | 20 Attack, 10 Accuracy | Casts Life when used as an item, INT+15 and doubles damage from the Holy spell. | Squidraken |
| Rune Axe | Weapon | Warrior/Knight & Ninja | 40 Attack, 20 Accuracy | Casts Curaga when used as an item, INT+3. For 25 MP all hits are critical (24 MP or lower doesn't proc this). | Prototype |
Note worthy Equipment
| Name | Type | User | Stats | Extra |
|---|---|---|---|---|
| Feather Cap | Helmet | Warrior/Knight, Thief/Ninja & Red Mage/Red Wizard | 4 Defense, 9 Evade, Weight of 1 |